Transfer Entry
1.1 Edit Button (Transfer Entry)
Used to update the transfer entry.
Common Use Cases
- Correct quantity
- Update warehouse selection
- Modify details
1.2 Delete Option (Transfer Entry)
Used to remove the transfer entry.
Important:
Deleting this entry will update stock levels.
Recommended Practice:
Allow deletion only to authorized users.
Add Transfer
The Transfer screen is used to record stock movements.
By Clicking the “Transfer” Button, the Following Functions Apply:
2.1 Transfer Details (Form)
Enter basic transfer information:
- Transfer Date: Date of stock movement
- Invoice No: Unique reference number
2.2 Transfer Item (Movement Direction)
Defines stock movement direction.
Transfer From
Select source details:
- Branch Name
- Warehouse Name
Transfer To
Select destination details:
- Branch Name
- Warehouse Name
Purpose:
Specifies where stock moves from and to.
2.3 Item Details (Form)
Add items being transferred.
To add multiple items, click + New Row.
2.4 Remark (Form)
Used for additional notes.
2.5 Submit / Cancel / Back
- Submit: Saves the transfer entry.
- Cancel: Exits without saving.
- Back: Returns to the previous screen.
Transfer Details And Invoice View
Transfer Details View
This screen displays complete information for the selected transfer entry.
1.1 Viewing Details
Selecting a transfer entry displays all related details.
1.2 Transfer Details
Shows the basic transfer information.
Fields Available
- Invoice No: Unique reference number
- Transfer Date: Date of stock movement
1.3 Transfer From
Indicates where stock is moved from.
Fields Available
- Branch Name: Source branch
- Warehouse Name: Source warehouse
1.4 Transfer To
Indicates where stock is moved to.
Fields Available
- Branch Name: Destination branch
- Warehouse Name: Destination warehouse
Purpose:
Clearly defines stock movement direction.
1.5 Item Details
Displays items included in the transfer.
Columns Available
- Sr. No.: Item sequence
- Item Name: Name of product
- UOM: Unit of measurement
- Available Qty: Current stock before transfer
- Qty: Quantity transferred
- Rate: Item value per unit
- Amount: Total item value
Purpose:
Provides stock and value breakdown.
1.6 Remarks
Displays additional notes.
View Invoice
Used to preview the transfer invoice.
Purpose:
Allows review or printing of transfer details.
2.1 Invoice Preview
Shows the full transfer invoice including:
- Business details
- Transfer information
- Item details
- Totals
Purpose:
Allows you to verify the transaction before sharing or printing.
2.2 Edit Button (Invoice Preview)
Used to modify the invoice details.
Purpose:
Allows corrections without leaving the preview screen.
2.3 Download Button
Used to download the invoice.
Purpose:
Helps save the invoice for records or sharing.
2.4 Print Button
Used to print the invoice.
Purpose:
Allows quick physical copy generation.
2.5 Close Button
Closes the invoice preview.
Purpose:
Returns to the previous screen.
Introduction And List View
Introduction to Transfer Module
The Transfer module is used to move stock between warehouses or branches.
1.1 Common Use Cases
- Stock movement between branches
- Warehouse stock movement
Transfer – List View
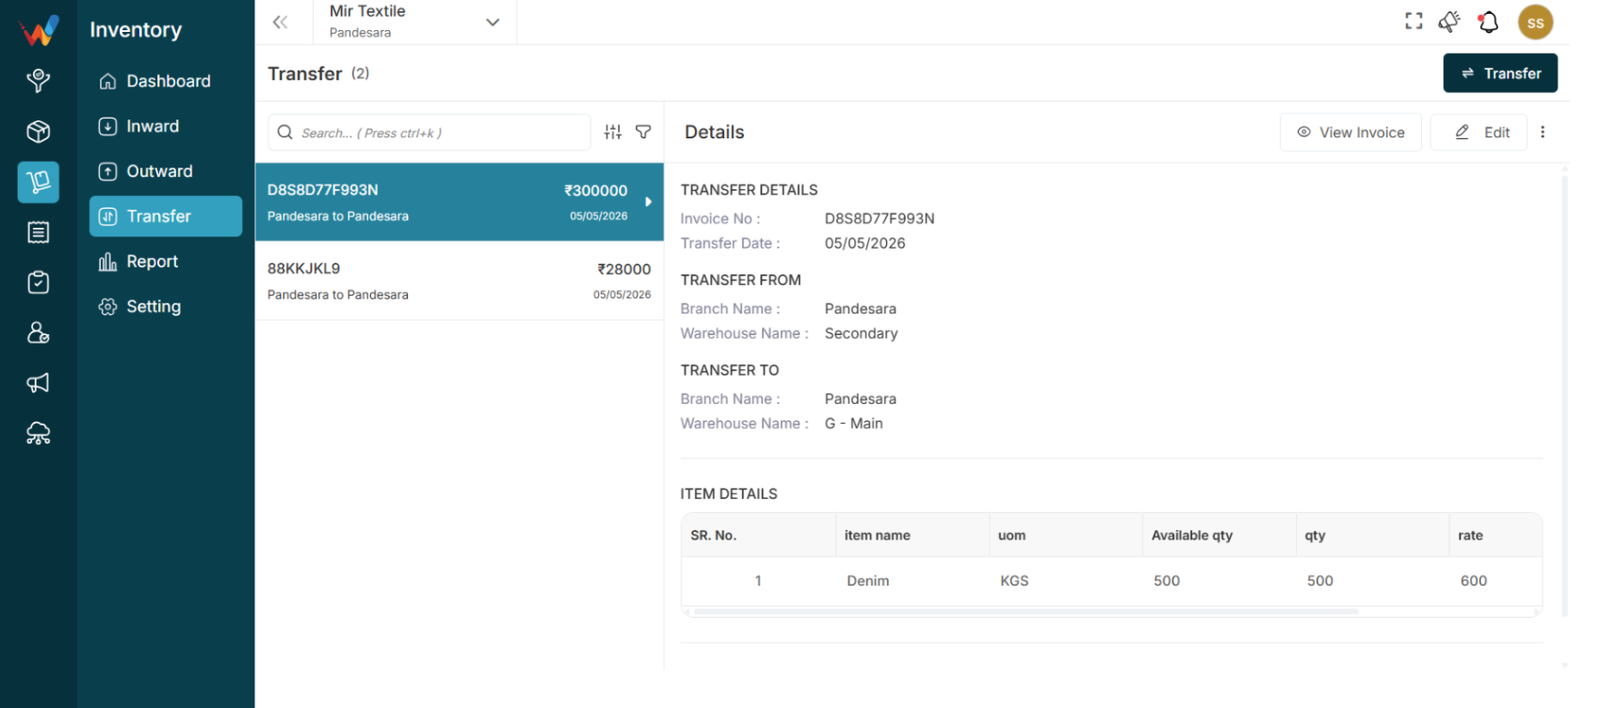
Navigation Path:
Inventory Module → transfer
2.1 Purpose of Transfer List View
Displays all stock transfer entries. Each entry typically includes:
- Invoice Number
- Transfer Direction
- Amount
- Date
2.2 Transfer Direction
The Transfer Direction shows the movement of stock between locations.
Explanation
Stock moved from one location to another location.
Example
If the record displays HQ to Surat, then:
- Stock moved from HQ
- Stock moved to Surat
If the record displays Surat to HQ, then:
- Stock moved from Surat
- Stock moved to HQ
Purpose:
Provides instant visibility of stock movement without opening details.
2.3 Search Bar
Used to quickly find transfer records.
Shortcut: Ctrl + K
How to Use
- Enter Invoice No or Amount.
2.4 Sort Function
Used to arrange transfer records.
Available Options
- Invoice Date
- Transfer Date
- Updated Date
- Voucher Number
- Amount
Sort Order
Apply: Confirms sorting
Reset: Clears selection
Purpose:
Helps organize transfer records easily.
2.5 Filter Panel
It helps you find exactly what you’re looking for by filtering out unnecessary results.
Available Filters
- Item Name
- Amount
- Transfer Date
How to Use
- Open the Filter Panel.
- Enter filter details.
- Click Submit.
- Click Reset to clear filters.
Purpose:
Allows viewing only relevant transfers.