Task Settings And Trash
Task Settings
Navigation Path:
Task Module → Setting → Click on Task

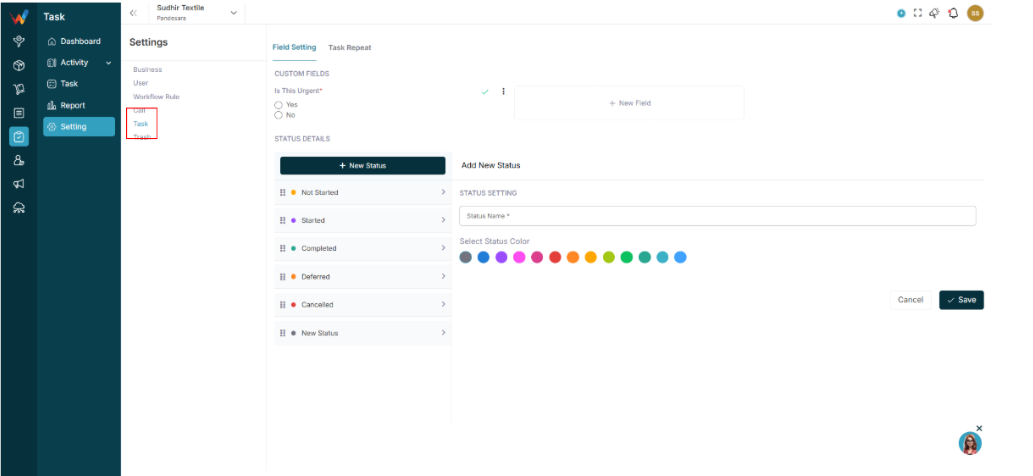
1.1 Custom Fields

Add New Field.
Field types:
1.2 Status Management
Default statuses:
- Not Started
- Started
- Completed
- Deferred
- Cancelled
Admin can:
- Add new status
- Assign color
- Reorder via drag and drop
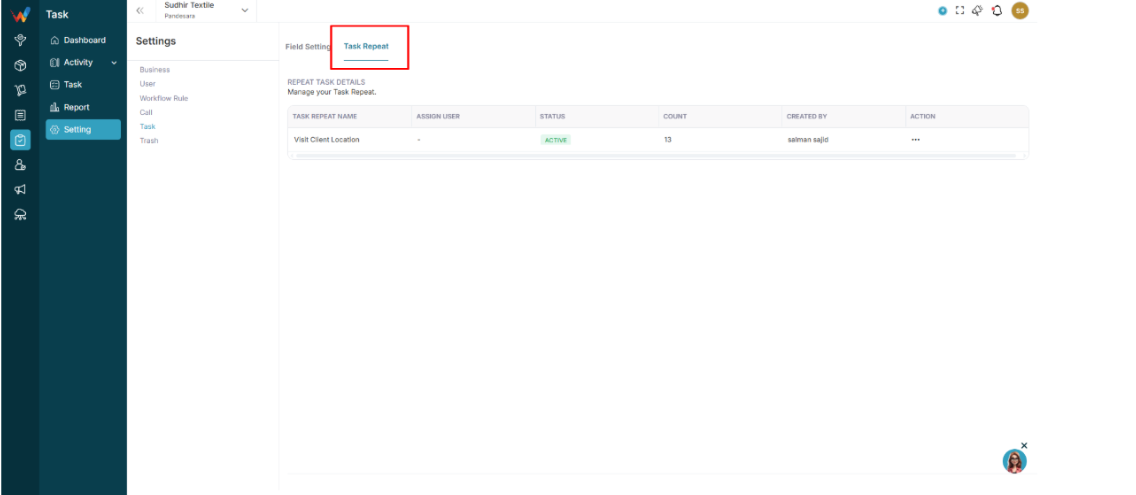
1.3 Task Recurring (Settings Tab)

Manage recurring tasks.
Columns:
- Recurring Task
- Assign User
- Status
- Count
- Created By
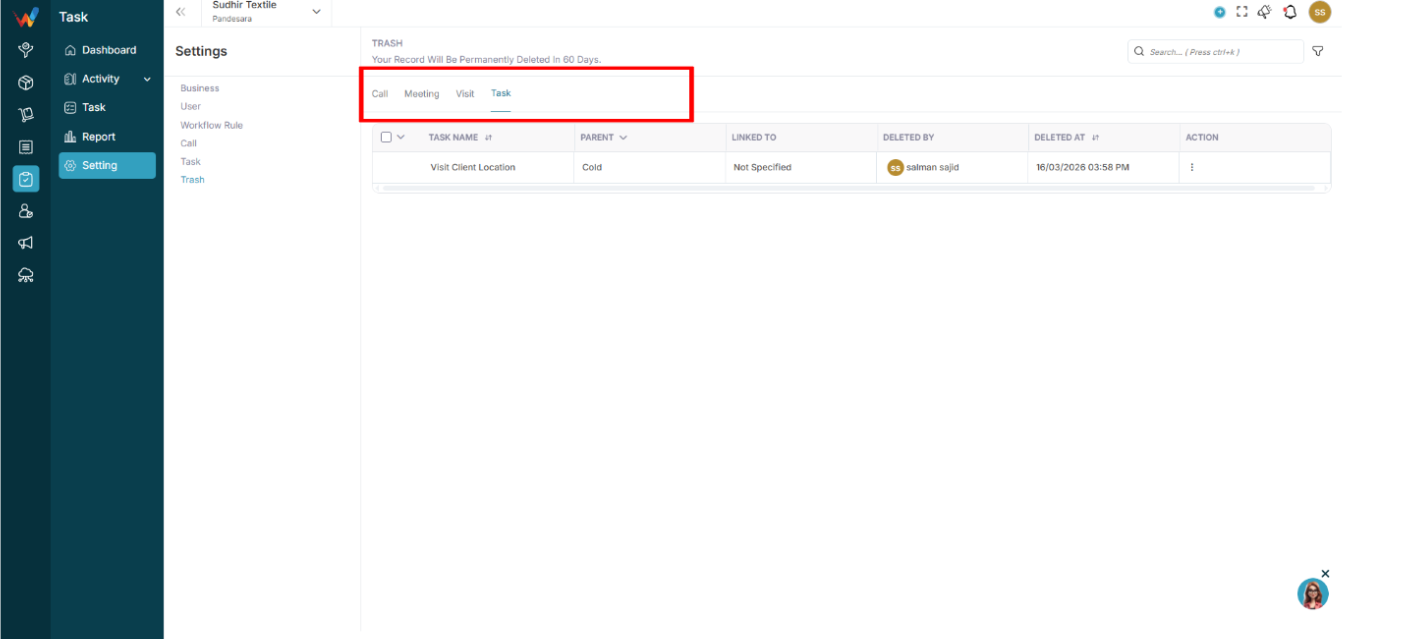
Trash: Task
2.1 Location
Navigation Path:
Task Module → Setting → Click on Trash

2.2 Tabs
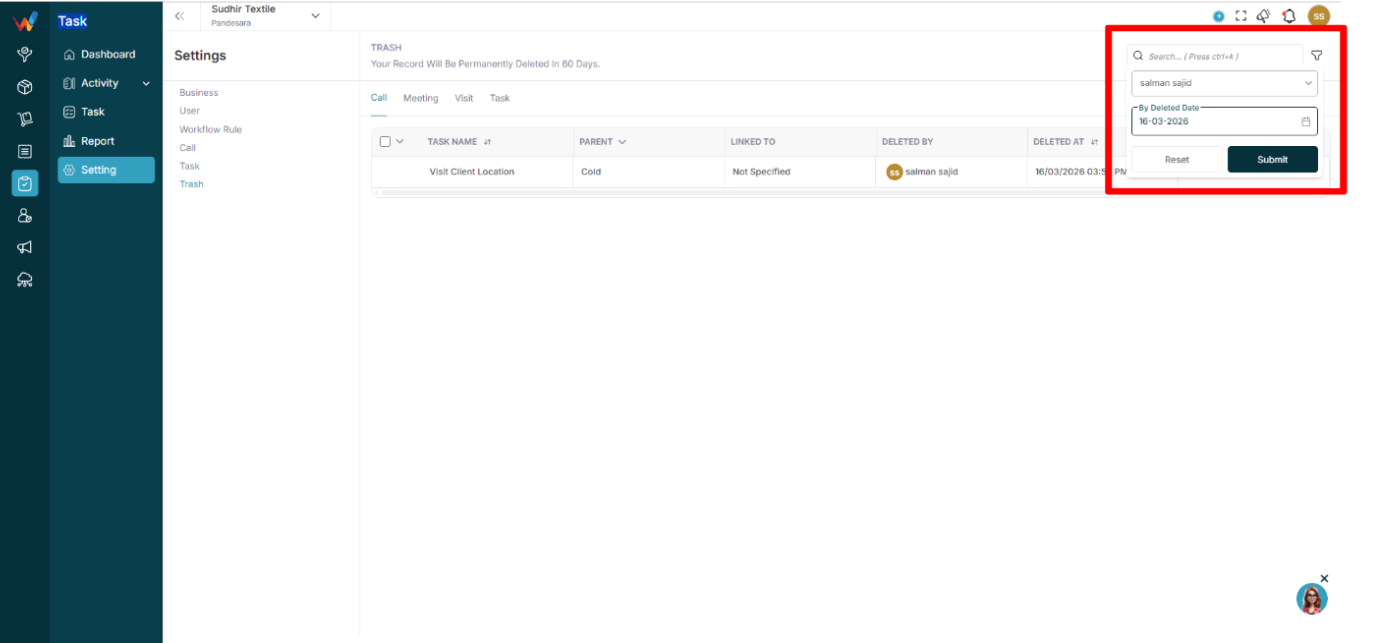
2.3 Filters

- Branch filter
- Deleted By filter
- Deleted Date filter
System rule:
Tasks are permanently deleted after 60 days.
System Logic And Behavior
System Behavior Summary
- Subtask completion does not auto-complete the parent task.
- Task completion can be restricted if subtasks are not completed (as per system configuration).
- Parent task status is manually controlled.
- Comments do not change status.
- Activity creation does not automatically change status.
System Logic and Rules
- Due Date is mandatory.
- Completed tasks cannot be edited without a status change (as per system controls).
- Subtask completion updates parent progress.
- Recurring tasks auto-duplicate after completion.
- Bulk delete moves tasks to Trash (not hard delete).
- Restore is possible within 60 days.
Business Impact
The Task module ensures:
- No follow-up is missed
- Accountability is maintained
- Visibility for owners and managers
- Productivity tracking
- Structured internal workflow
- Multi-branch work monitoring
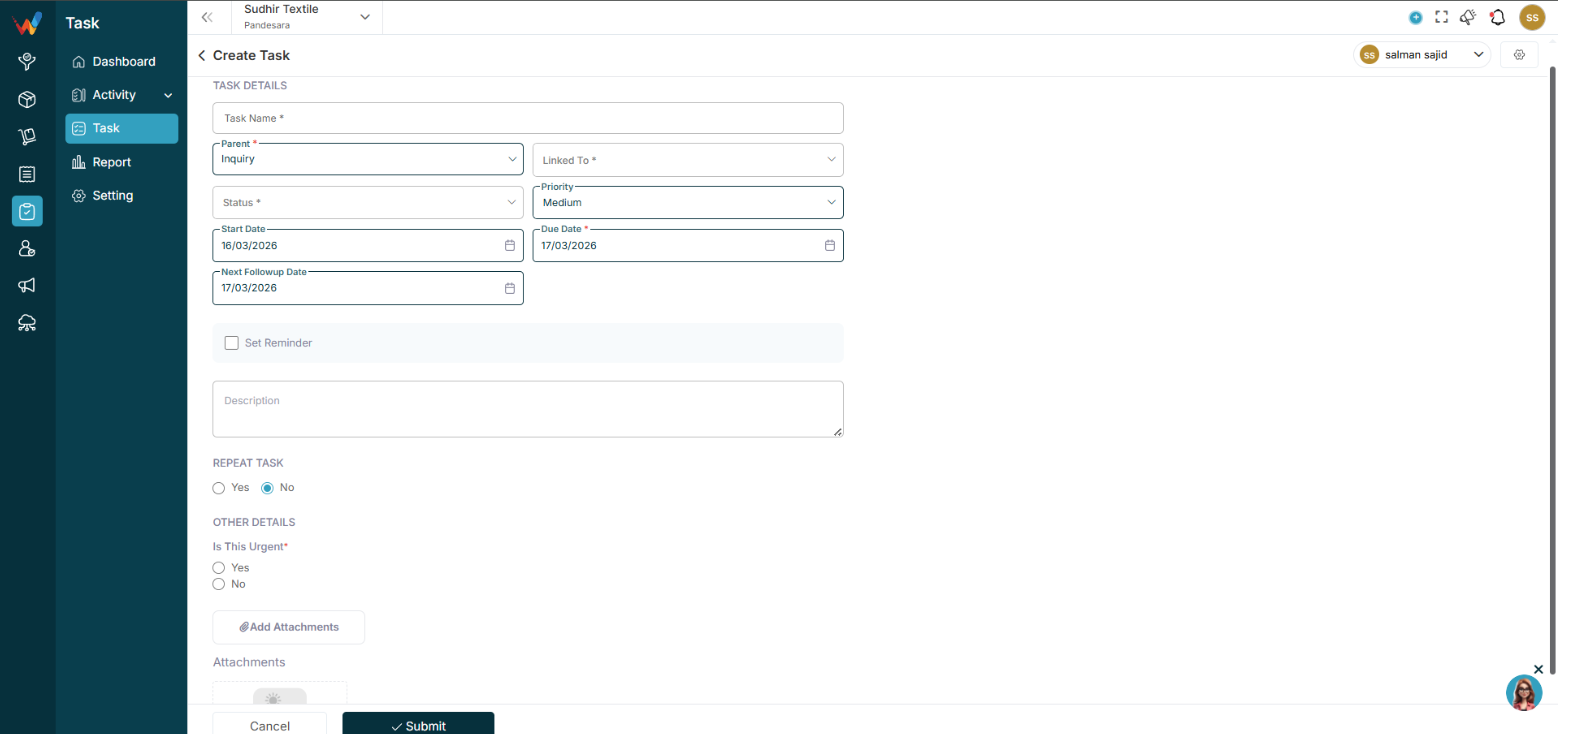
Task Details
Create Task Screen

1.1 Fields

- Task Name (mandatory)
- Parent (mandatory) (Lead, Deal, Contact, etc.)
- Linked To (mandatory)
- Status (mandatory)
- Priority
- Start Date
- Due Date (mandatory)
- Next Follow-up Date
- Set Reminder (checkbox)
- Description
- Recurring Task (Yes or No)
- Add Attachments
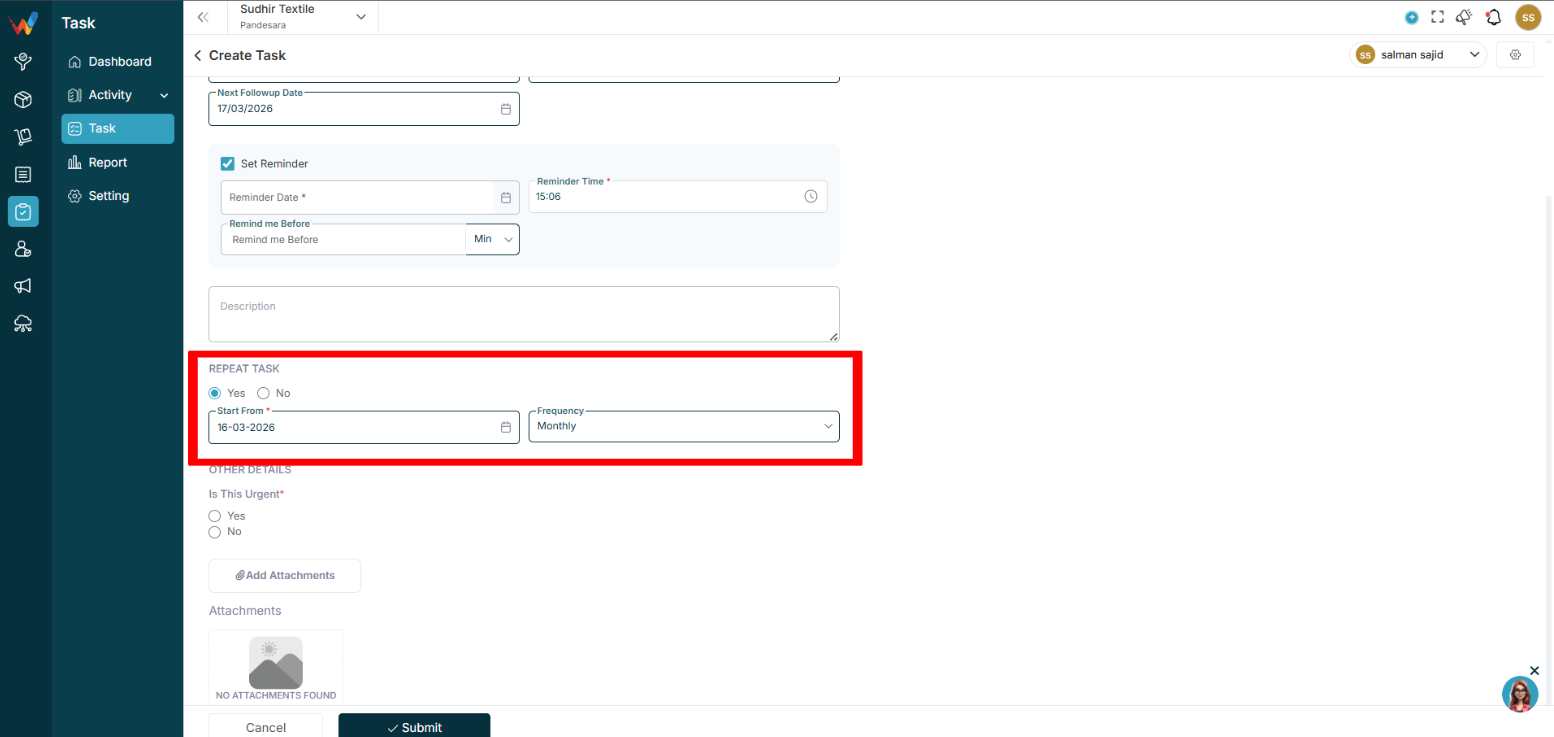
1.2 Recurring Task Logic

If Yes is selected:
The task automatically regenerates after completion.
This is based on recurrence rules configured in Settings.
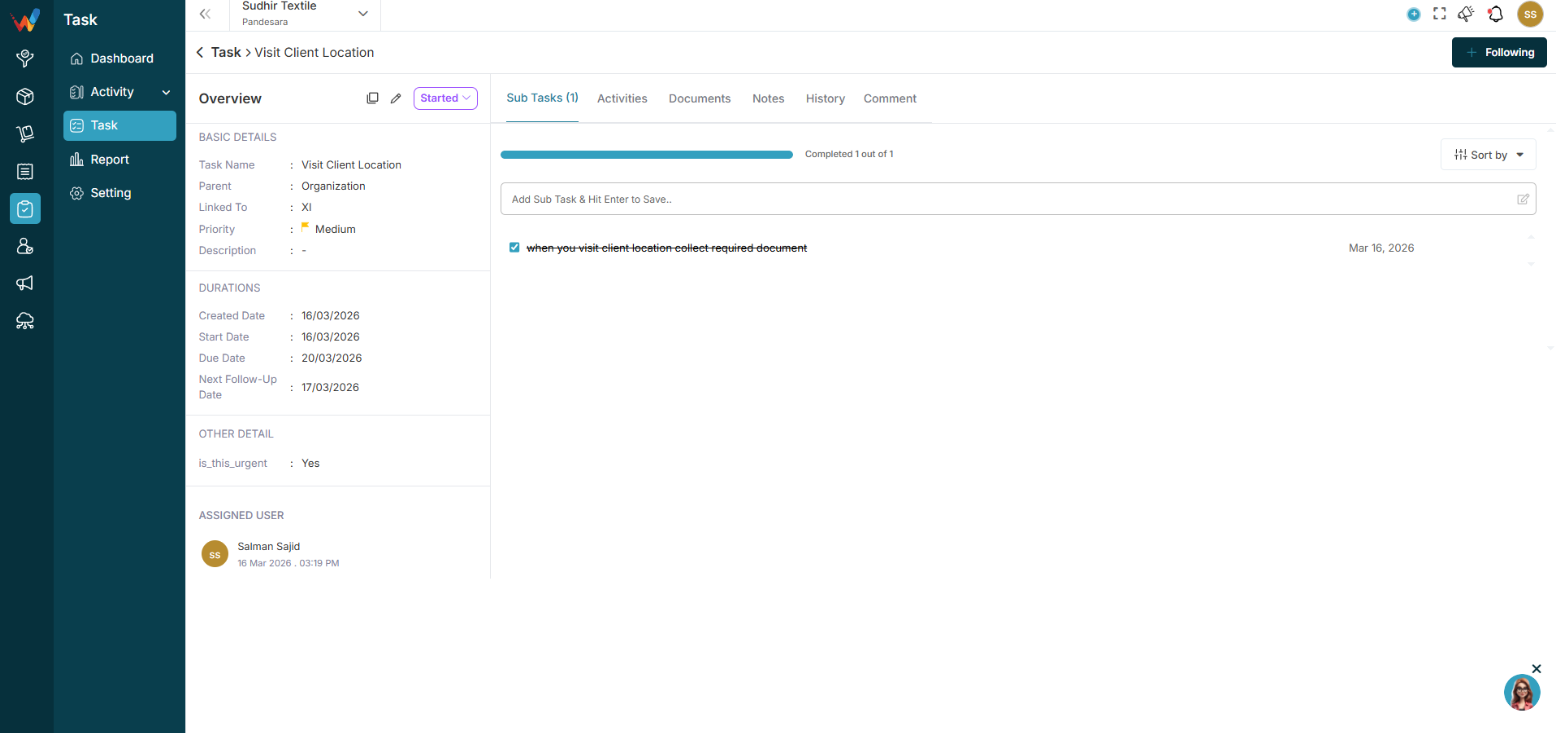
Task Detailed View

2.1 Overview Tab
The detailed view is split into:
- Left panel (information summary)
- Right content area (tabs and activity)
Left Panel: Information Summary
3.1 Basic Details Section
Displays static information:
- Task Name
- Parent (Lead, Deal, etc.)
- Linked To (specific record name)
- Priority (with color indicator)
- Description
These are editable only via the Edit option.
3.2 Durations Section
Shows timeline data:
- Created Date
- Start Date
- Due Date
- Next Follow-up Date
Important logic:
Due Date is used for:
- Overdue tracking
- Dashboard reporting
- Reminder alerts
Next Follow-up Date:
- Used in follow-up views
- Drives reminder logic
3.3 Assigned User Section
Shows:
- Assigned user profile
- Date and time of assignment
If reassigned, the history logs it.
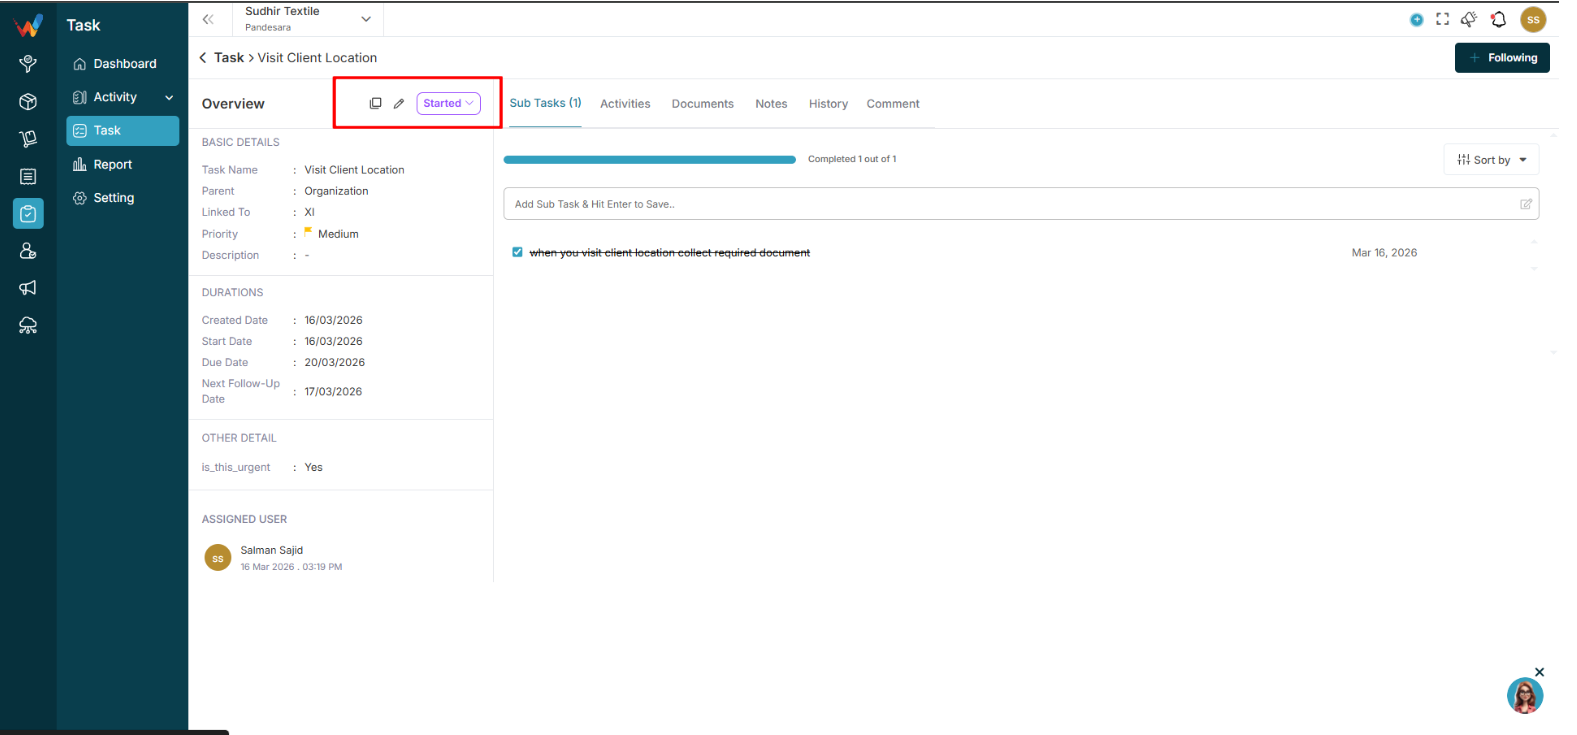
3.4 Quick Action Icons (Left of Status)

Duplicate
Creates an exact copy of the task.
All fields are copied except:
- Status resets to Not Started
- Subtasks are not copied (if configured that way)
Edit
Opens the Edit Task form.
3.5 Status Dropdown
Current Status example: Not Started
Dropdown options:
- Not Started
- Started
- Completed
- Deferred
- Cancelled
System logic:
Changing to Completed:
- Marks the task finished
- Does not auto-complete pending subtasks
Deferred:
Cancelled:
- Work is stopped permanently
Tabs Section (Main Work Area)

4.1 Tabs Available
- Sub Tasks
- Activities
- Documents
- Notes
- History
- Comment
4.2 Following Button (Top Right)

“Following” is used to:
- Follow task activity
- Get updates and notifications
- Track comment updates
Sub Tasks Tab

5.1 Progress Bar
Example: “Completed 1 out of 3”
Auto-calculated
Progress Percent = (Completed Subtasks ÷ Total Subtasks) × 100
5.2 Add Sub Task Input
Field example: “Add Sub Task and hit Enter to save.”
Behavior:
- Press Enter to instantly save
- Subtask is created inline
- Default status is unchecked
5.3 Subtask List
Each row shows:
- Checkbox
- Subtask Name
- Due Date
- Edit icon
- Delete icon
Checkbox logic:
- Checked: Mark complete
- Unchecked: Pending
Completion updates:
- Progress bar
- Parent task progress
Edit:
- Allows renaming the subtask inline.
Delete:
- Deletes the subtask permanently.
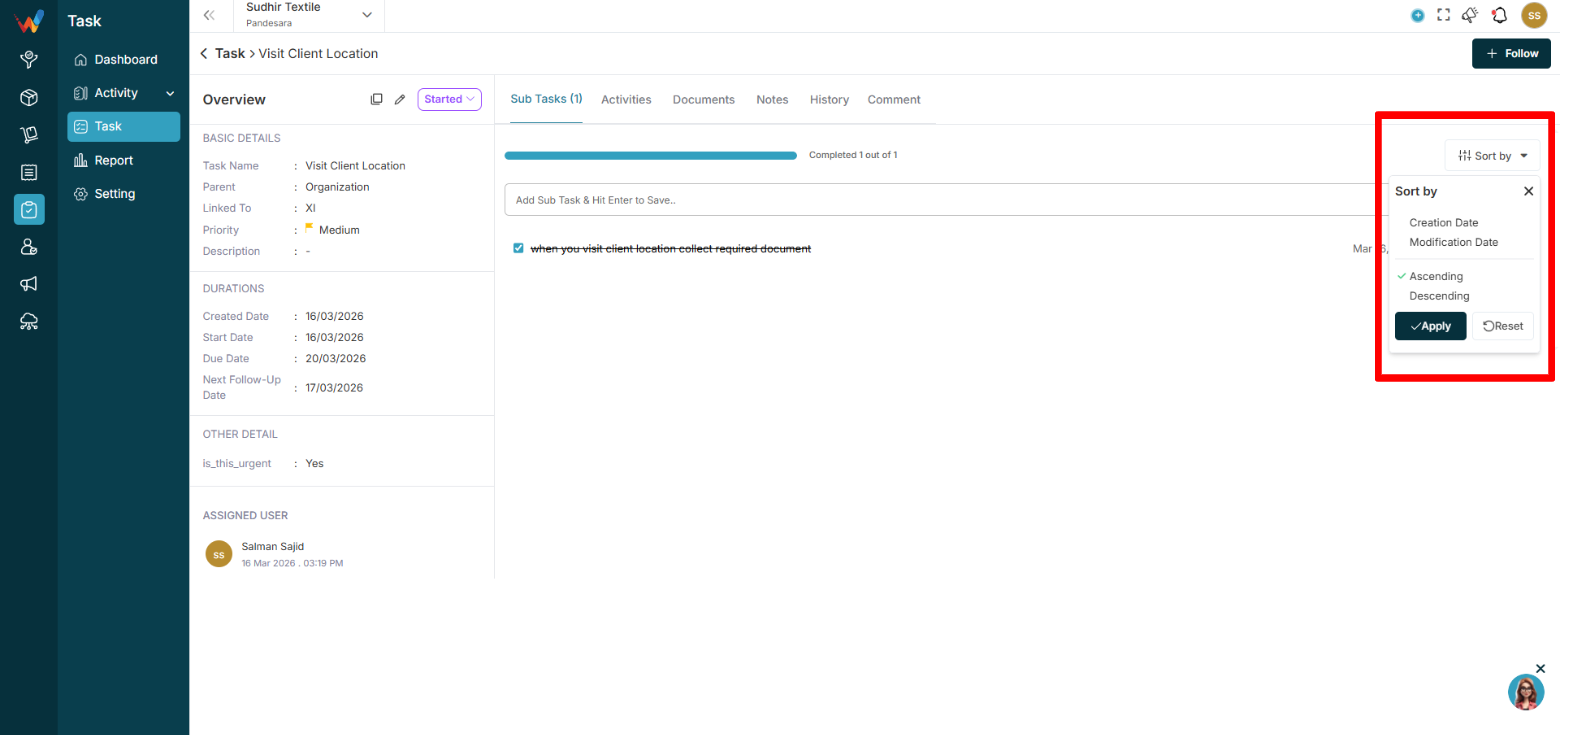
5.4 Sort By (Top Right)

Options:
- Creation Date
- Modification Date
- Ascending
- Descending
Apply and Reset are supported.
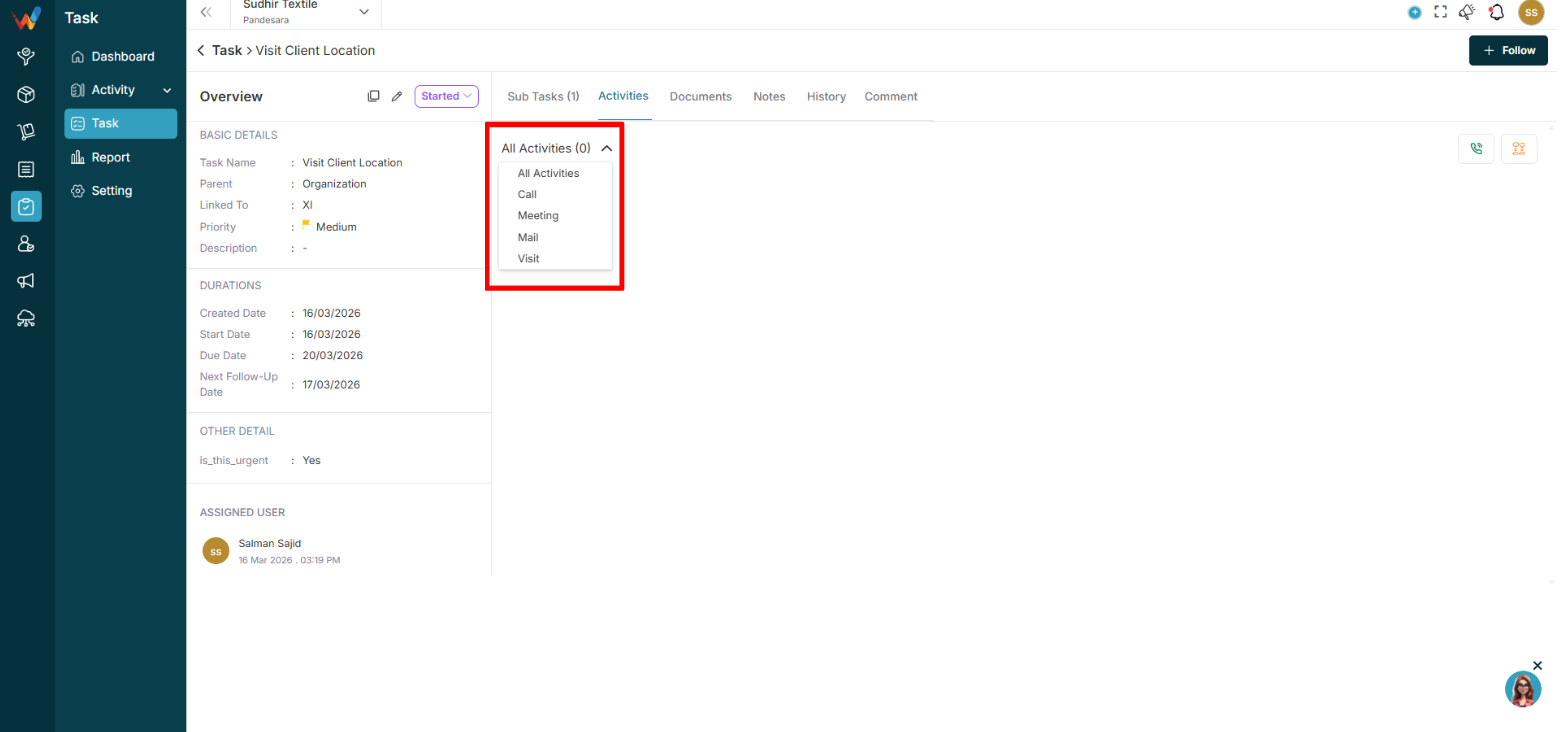
Activities Tab (Detailed View)

6.1 Includes
- Activity count
- Filters: All, Call, Meeting, Mail, Visit
- Activity cards with:
- Type
- Description
- Created by
- Created date
- Status tag (Log, Held, Call Later, Interested, etc.)
- Three-dot menu (edit and delete based on permissions)
6.2 Log and Follow-up (Key Concept)
Log records a completed interaction.
Follow-up schedules the next interaction.
Common actions:
- Log a Call
- Follow-up Call
- Log a Meeting
- Follow-up Meeting
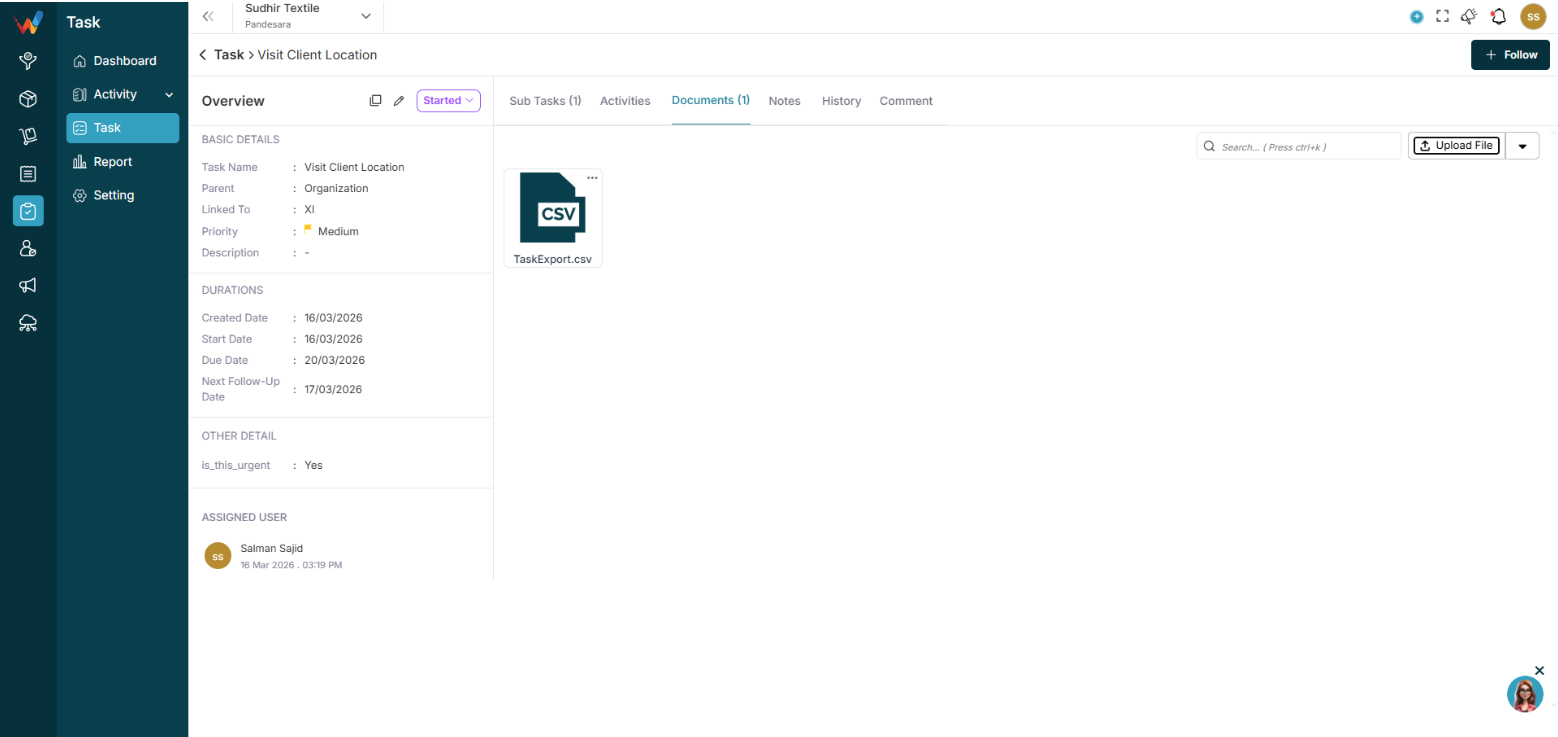
Documents Tab

File management inside a task.
Features:
- Search
- Upload File
- Create Folder
- Drag and drop (if supported)
Used for:
- Attach quotations
- Share screenshots
- Upload work proofs
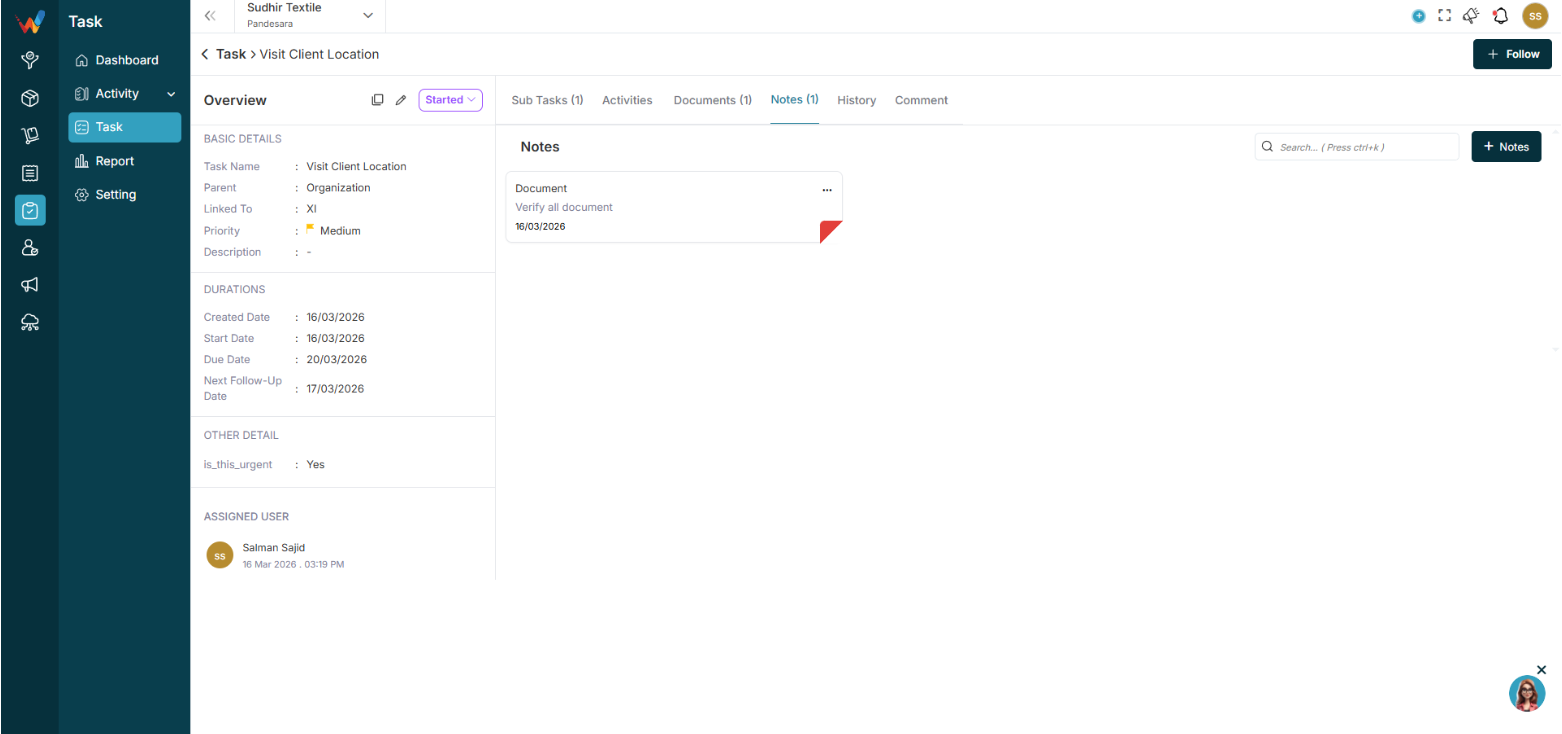
Notes Tab

Internal notes for task context.
Used for:
- Internal remarks
- Instructions
- Task clarification
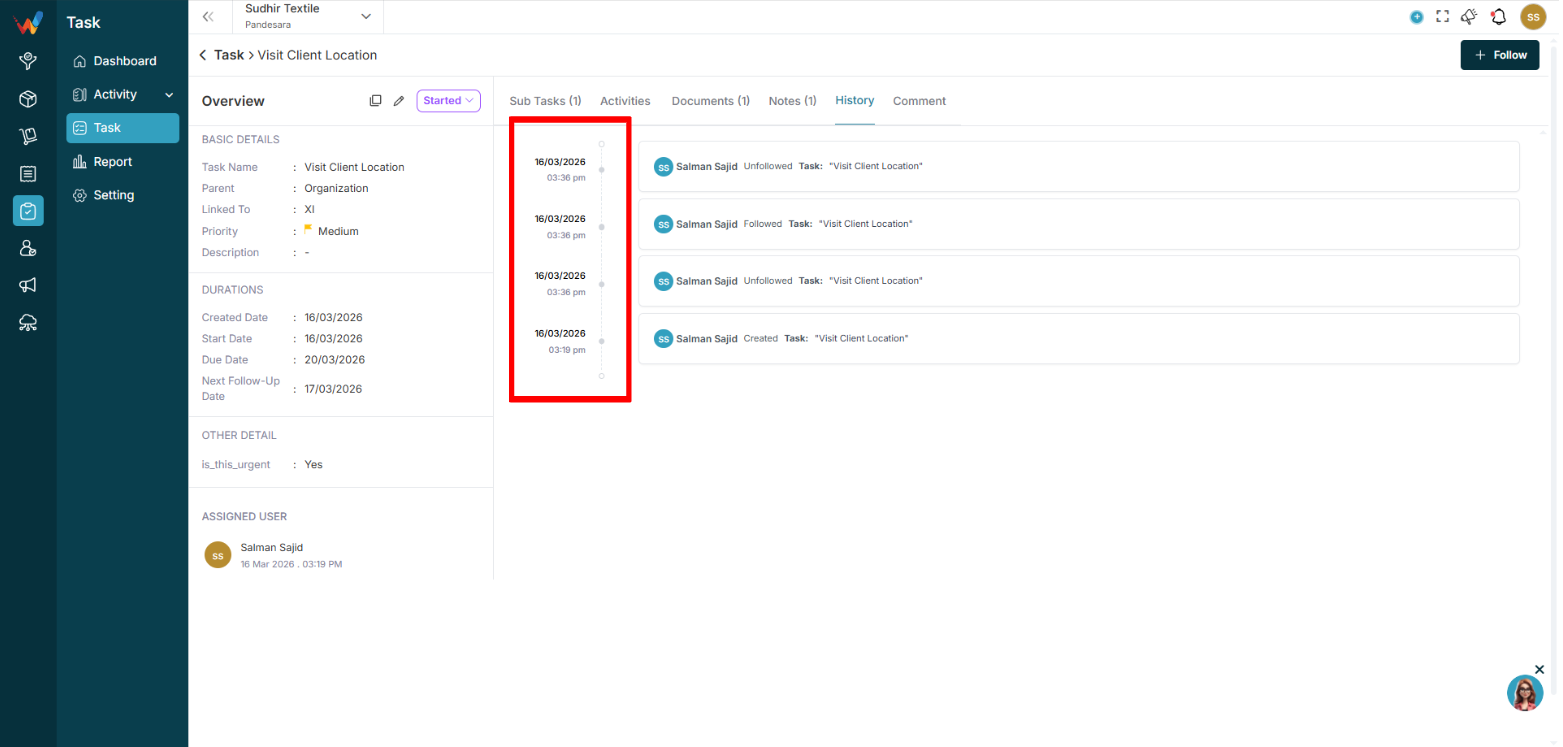
History Tab

System logs for audit and accountability.
Tracks:
- Status changes
- User reassignment
- Field edits
- Due date changes
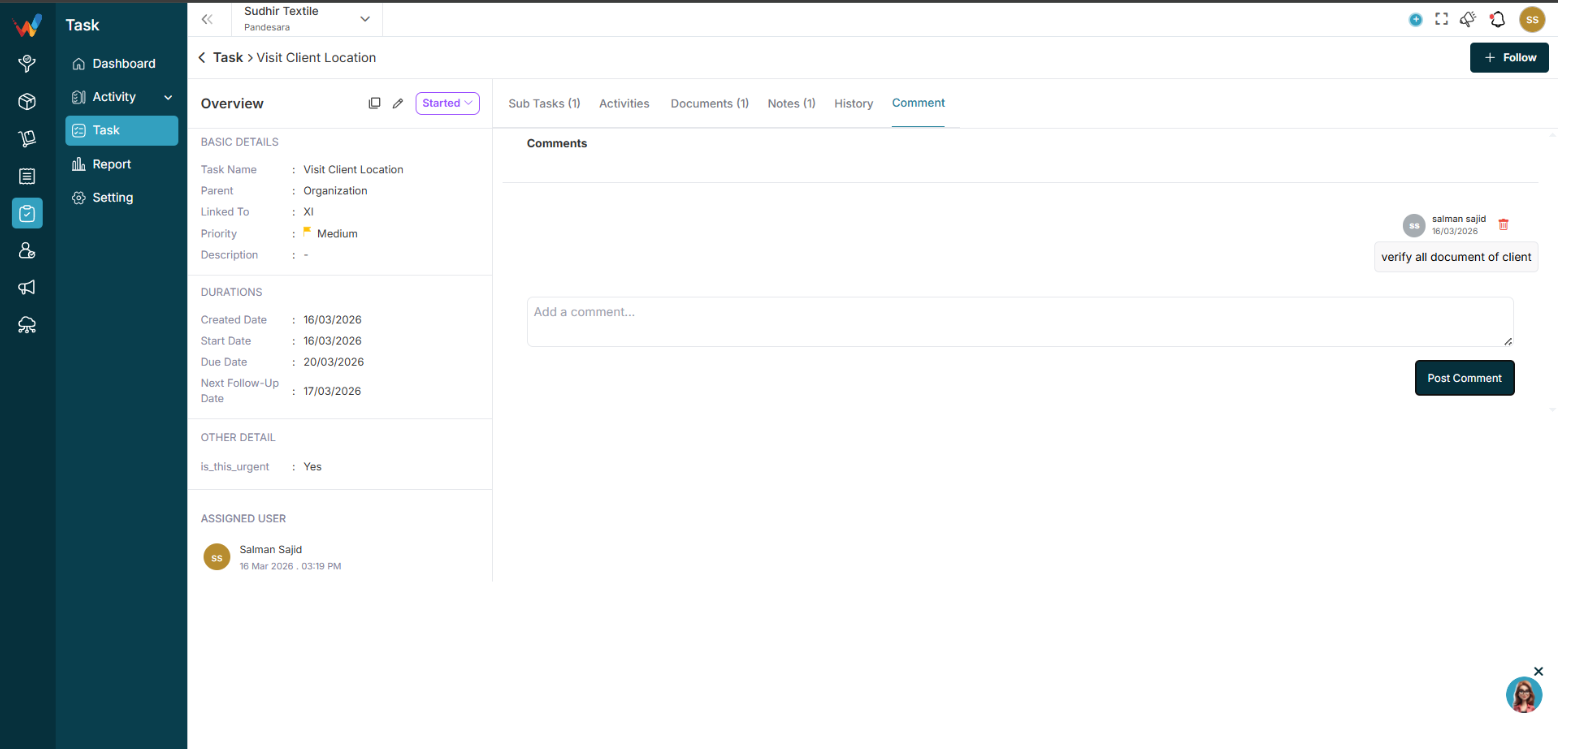
Comment Tab

Conversation-style section.
Features:
- Add comment
- Delete comment
- Time-stamped messages
Used for:
- Internal discussion
- Follow-up communication
- Task updates
Filter And Action
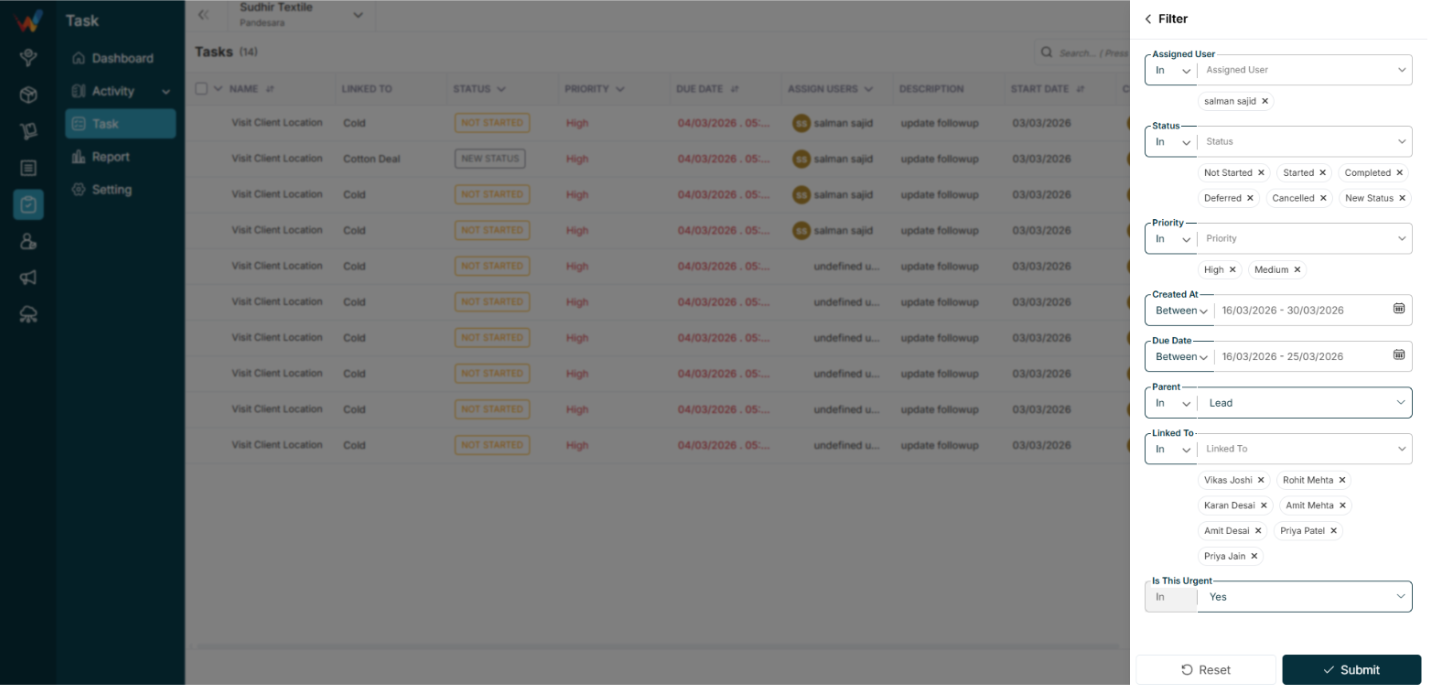
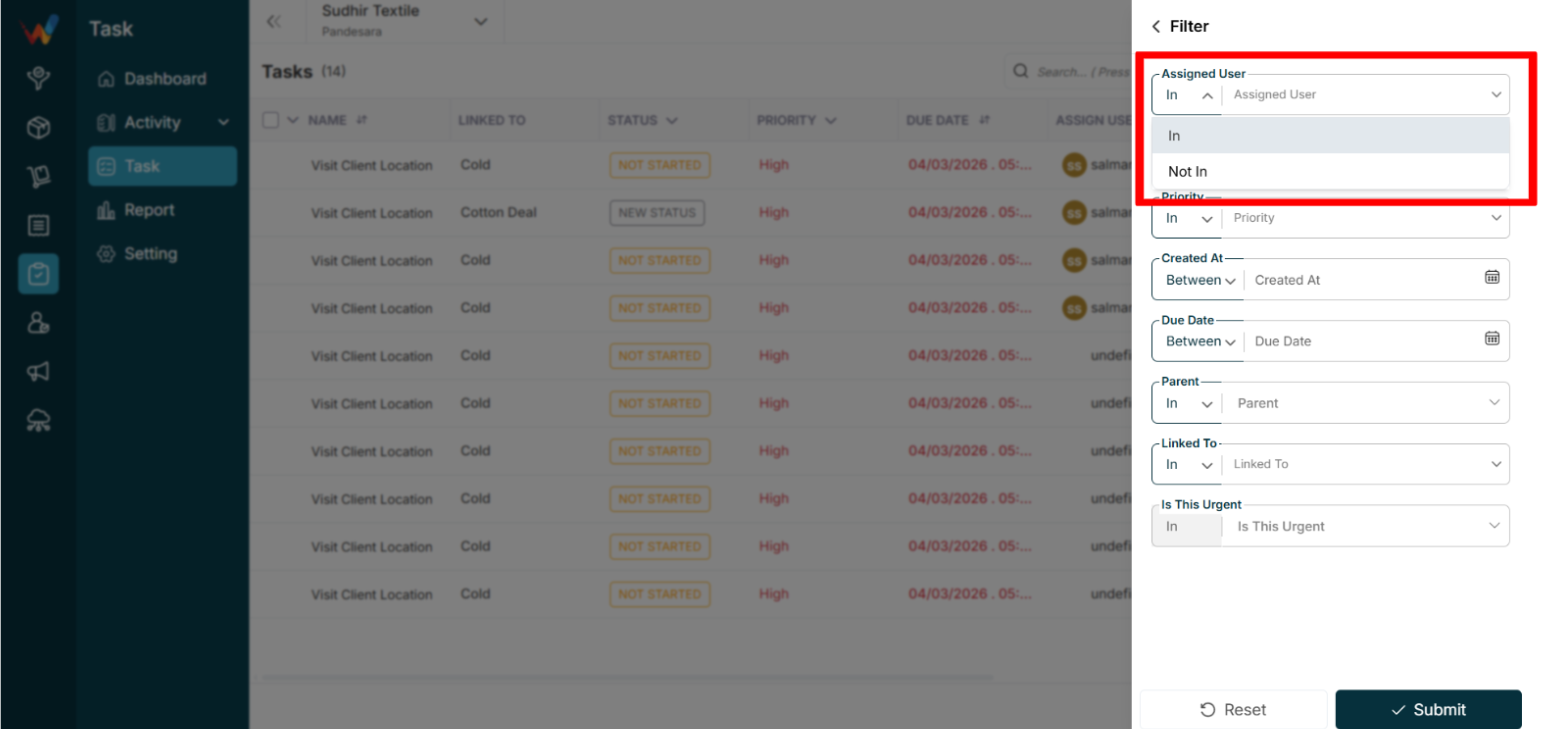
Filter Panel

1.1 Filters Available

- Assigned User
- Status
- Priority
- Created At (Between)
- Due Date (Between)
- Parent
- Linked To
1.2 Operator Support

- In – Displays records where the selected field value matches any of the specified values in the list.
- Not In – Displays records where the selected field value does not match any of the specified values in the list.
Kanban View

Columns
- Not Started
- Started
- Completed
- Deferred
- Cancelled

Each column shows a count (example: Started (14), Completed (4)).
Drag and drop is supported for status changes.
Task Action Menu (Three Dots)

3.1 Options
3.2 Important Note
A task can directly trigger activity creation (Call, Meeting, Visit).
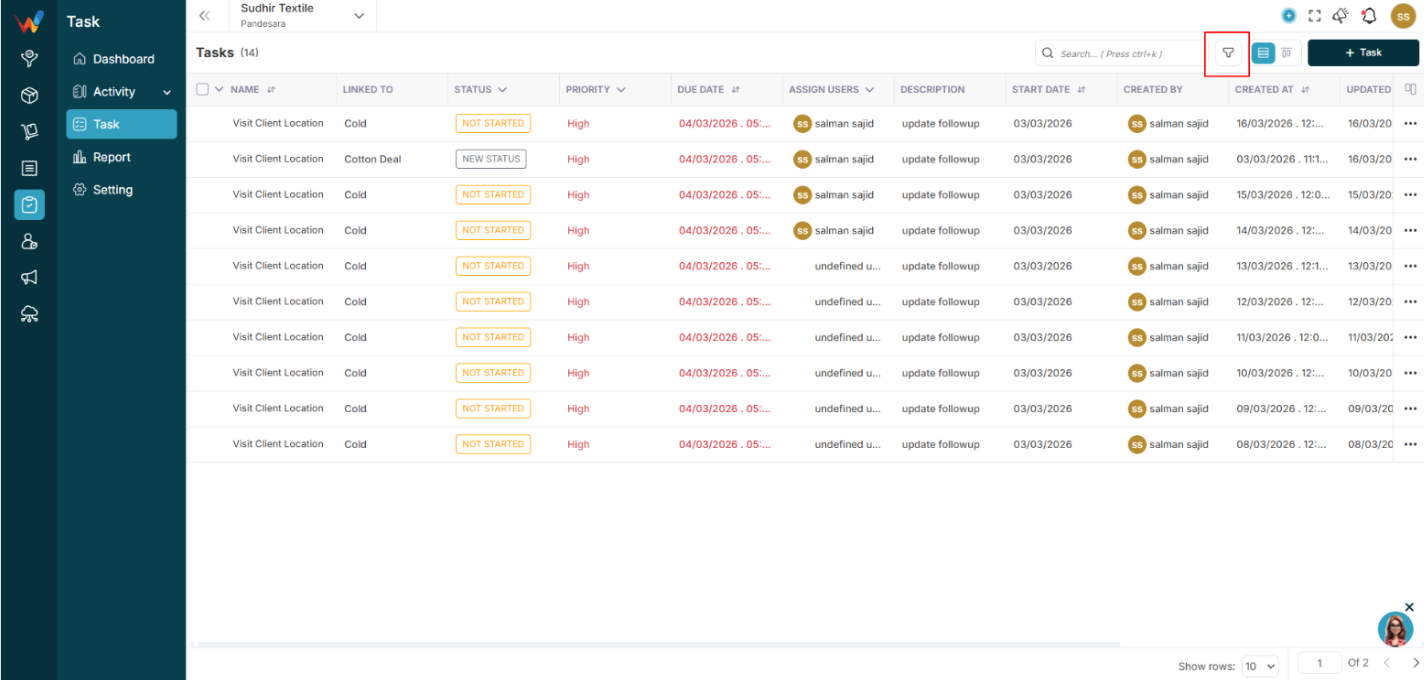
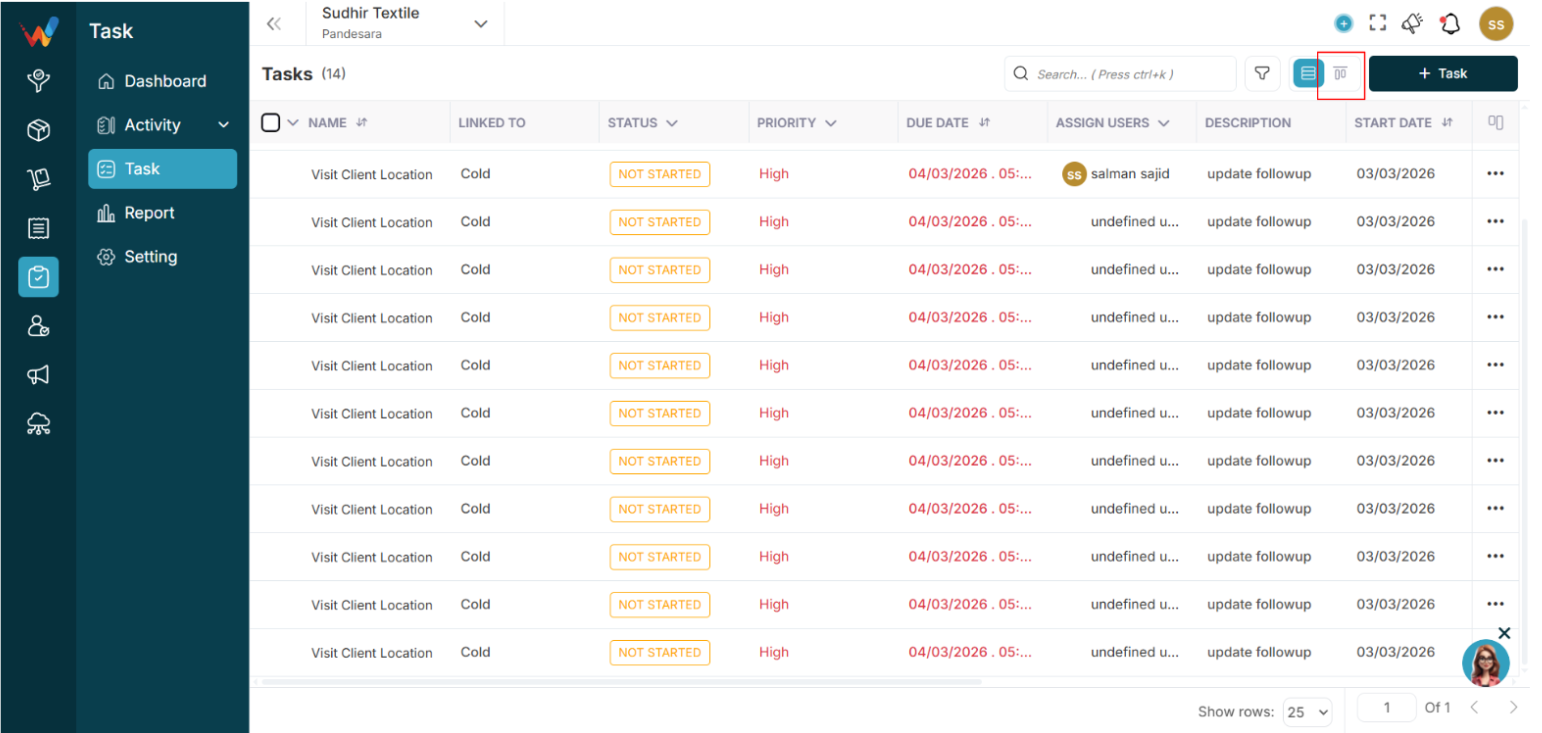
List View And Mass Activity
Navigation Path:
Task Module → Task

1.1 Top Section

- Search (Ctrl + K supported)
- Filter icon
- View toggle (List and Kanban)
- Task button
1.2 List View Columns

Default Columns
- Name
- Linked To
- Status
- Priority
- Due Date
- Assign Users
- Description
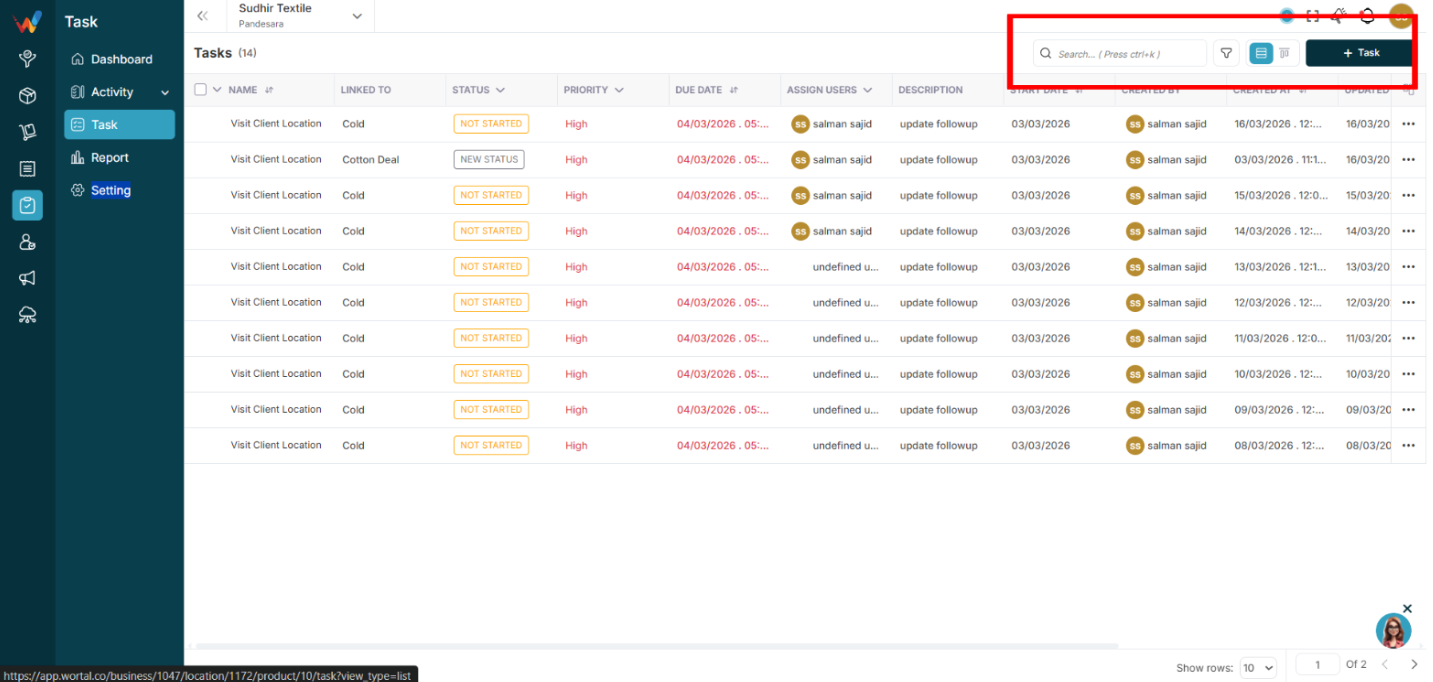
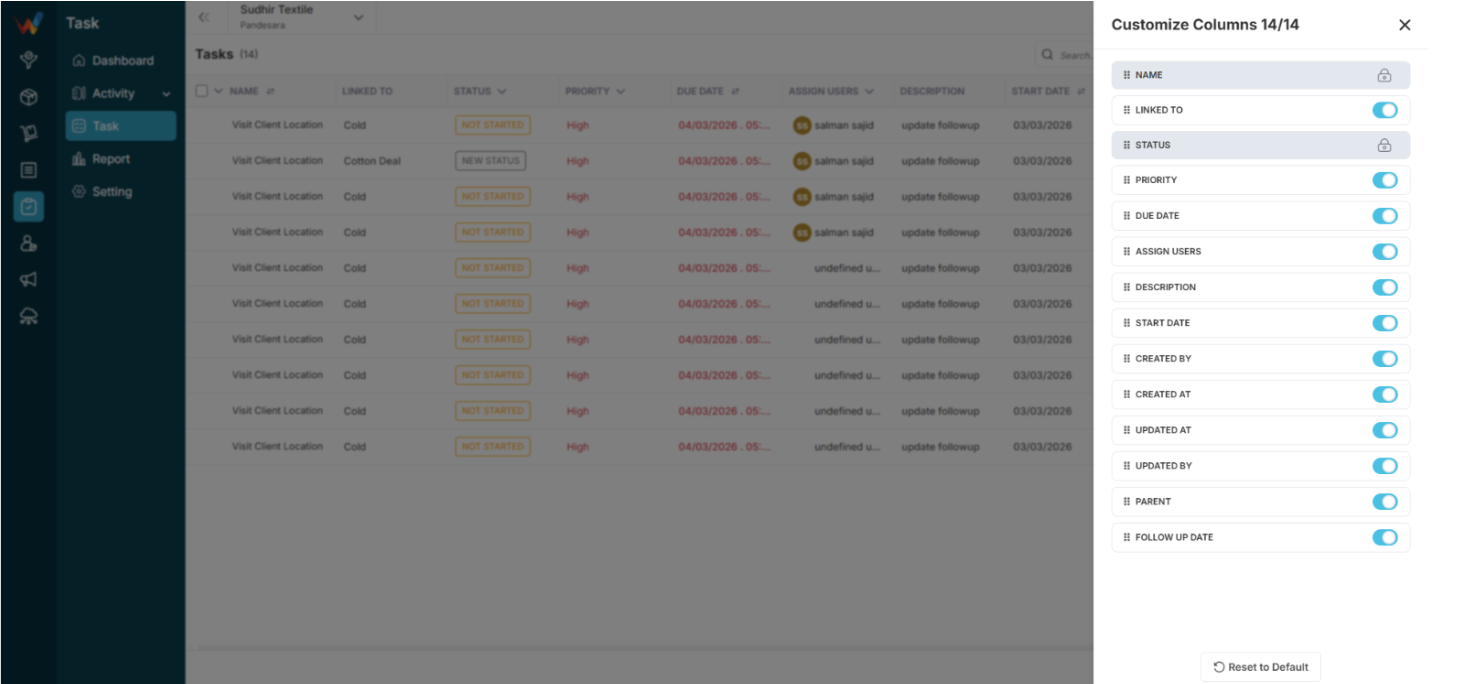
Customizable via:
- Customize Columns in the table header.
Available Extra Columns
- Start Date
- Created By
- Created At
- Updated At
- Updated By
- Parent
- Follow Up Date
Locked Columns
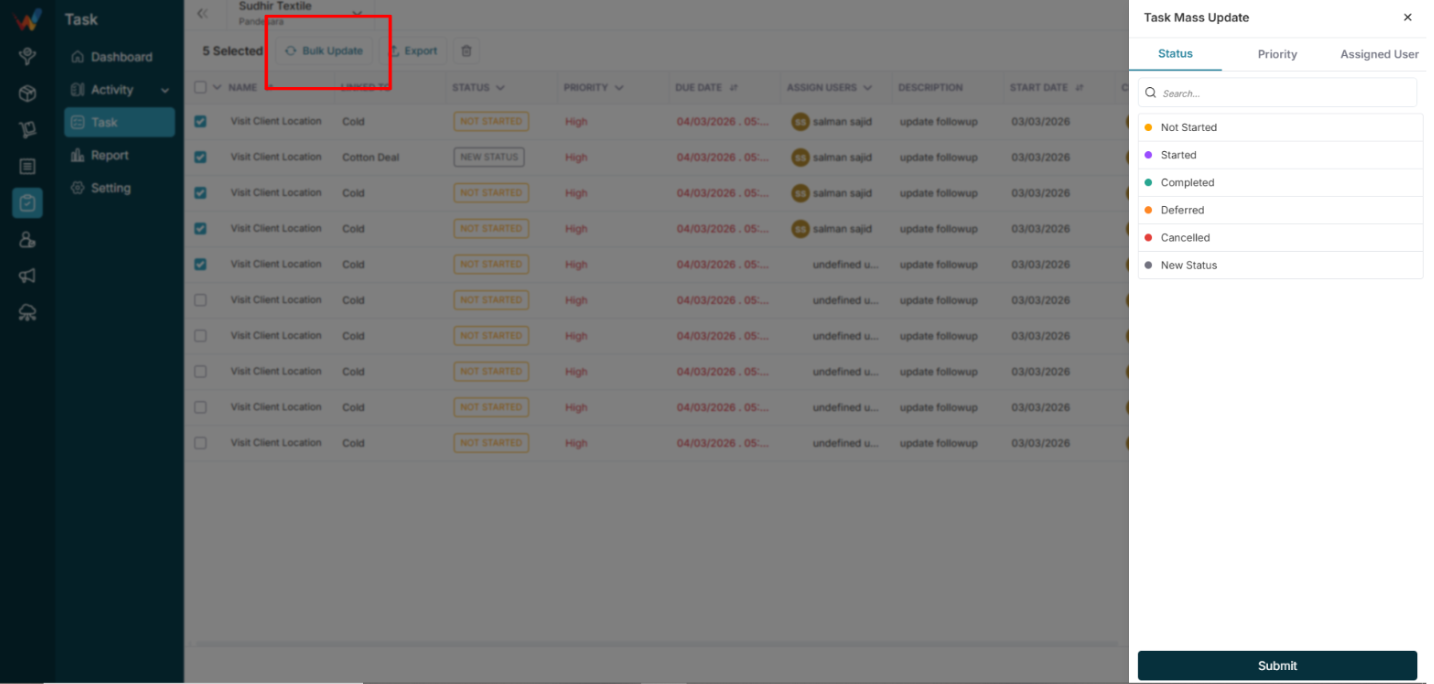
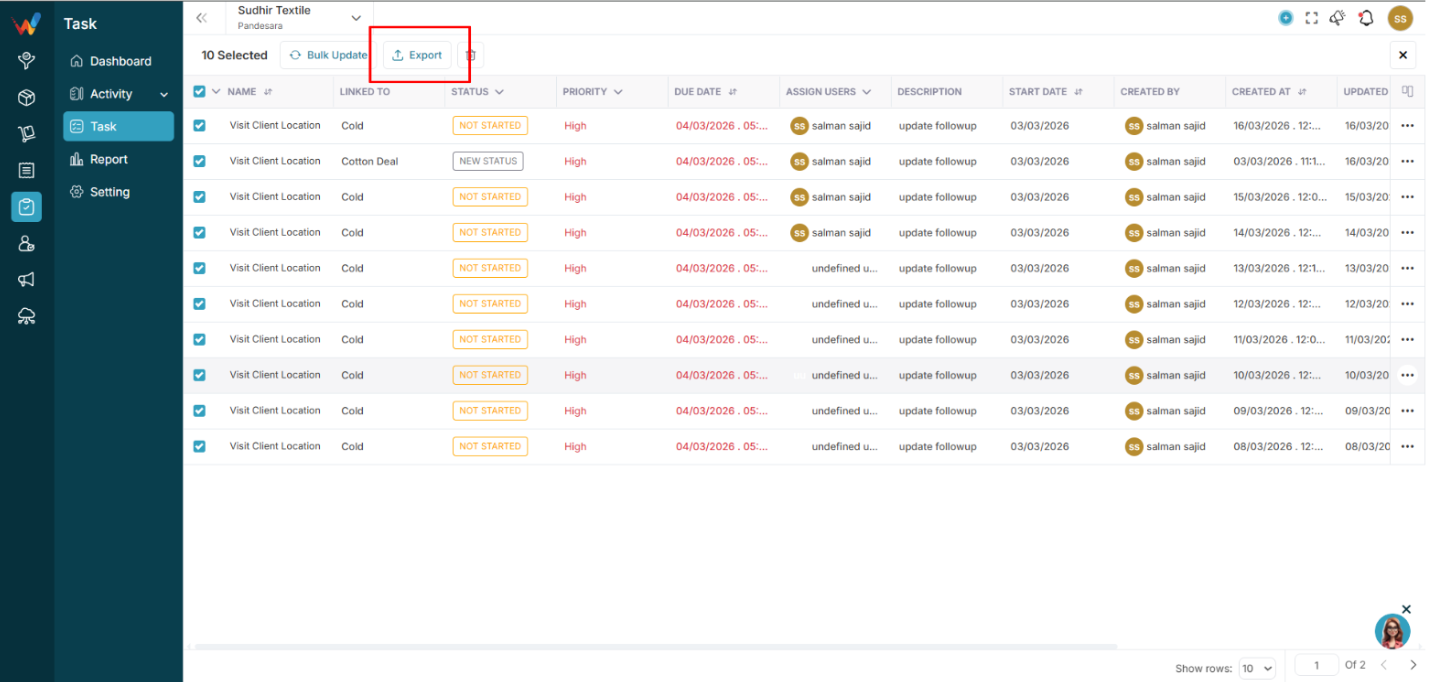
1.3 Bulk Selection

Checkbox selection enables:
The action bar shows:
“7 Tasks Selected”
Options:
Mass Update Screen

2.1 Tabs
- Status
- Priority
- Assigned User
2.2 Status Options
- Not Started
- Started
- Completed
- Deferred
- Cancelled
2.3 Priority Options
2.4 Assigned Users
- Multi-select is supported.
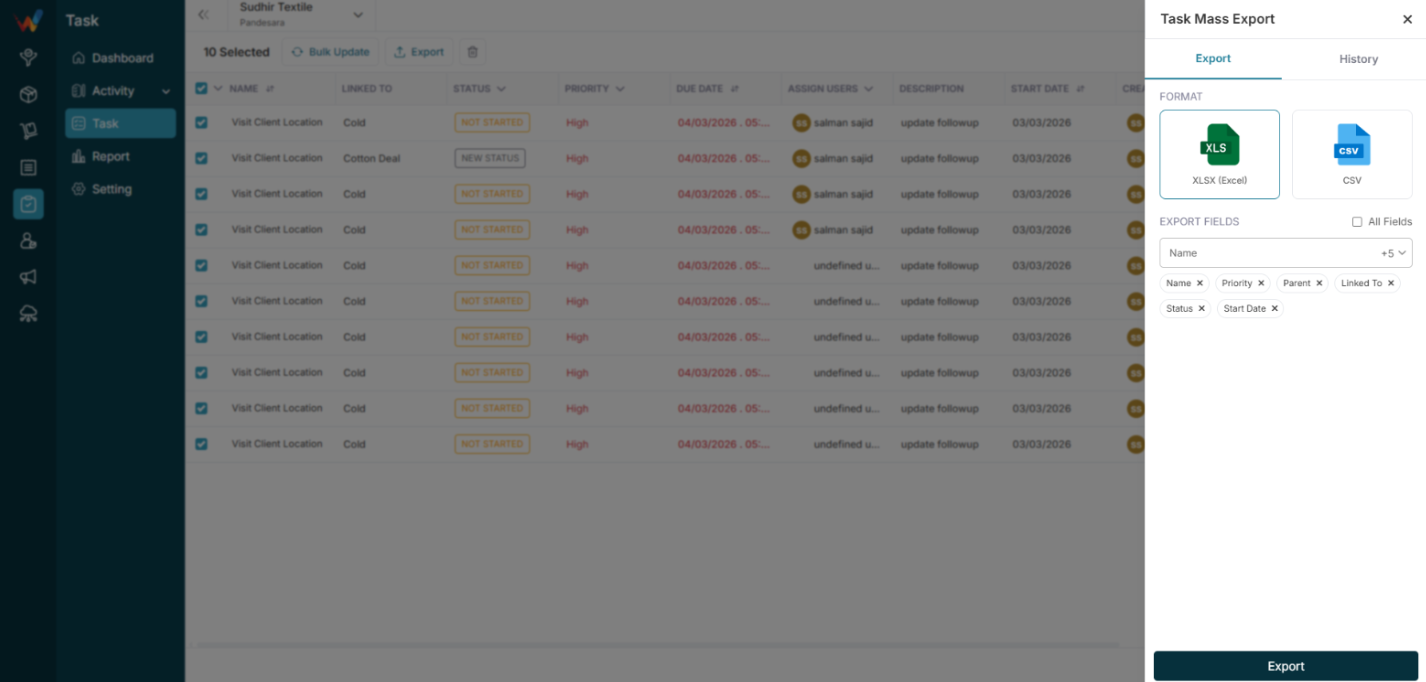
Mass Export

3.1 Formats

3.2 Selectable Fields
- Name
- Priority
- Parent
- Linked To
- Status
- Start Date
- More fields (as available)

Option:
Introduction
Task Module Overview
1.1 Purpose
The Task module helps businesses:
- Assign work
- Track progress
- Set deadlines
- Monitor team productivity
- Manage follow-ups
- Create recurring tasks
- Maintain a structured internal workflow
1.2 Module Connections
It connects with:
- Lead
- Deal
- Contact
- Order
- Independent (General Task)
Complete Guide
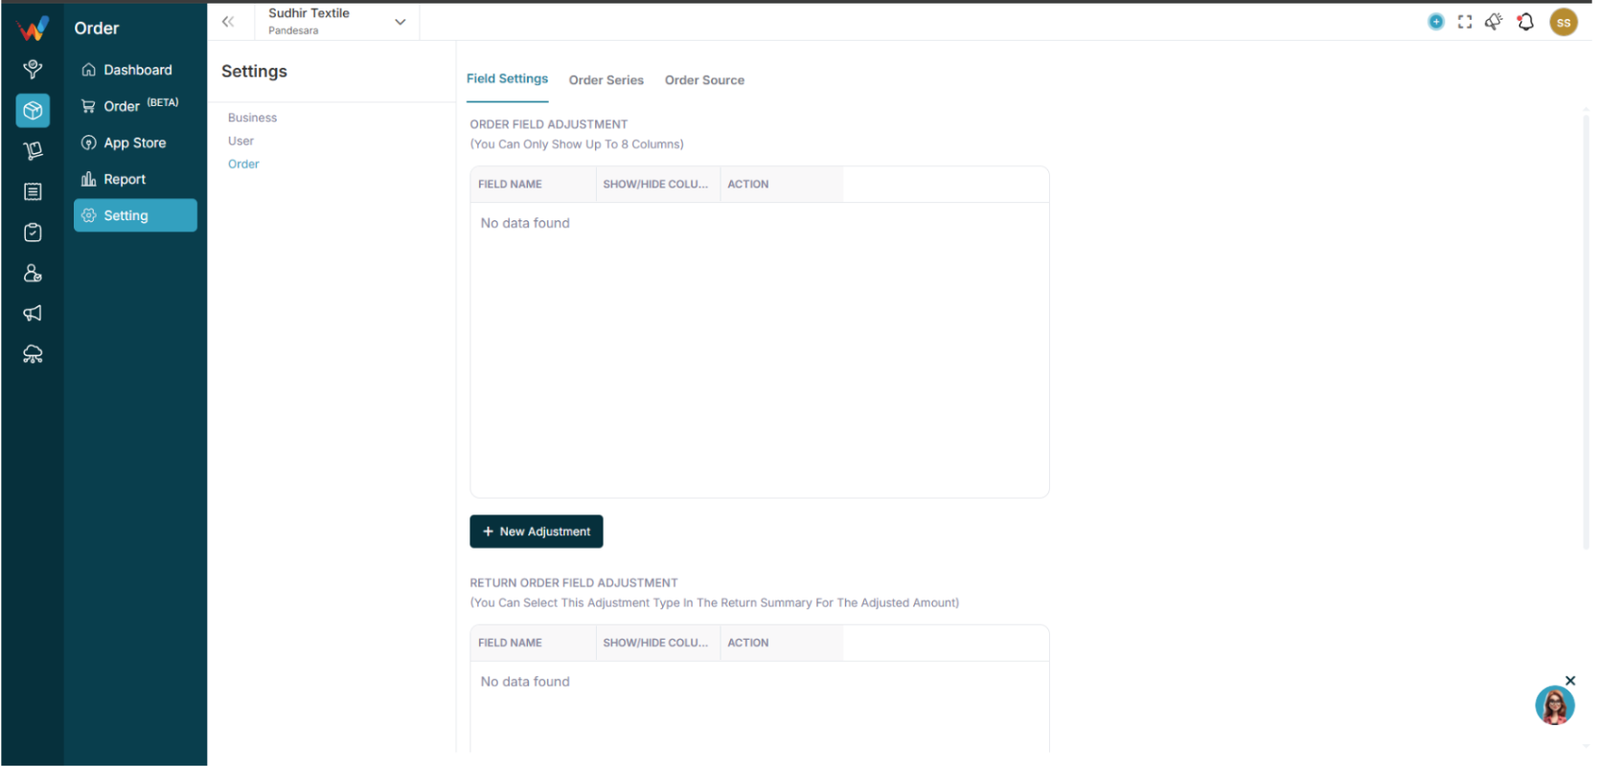
Location
Navigation Path:
Order Module → Setting → Click on Order

Tabs

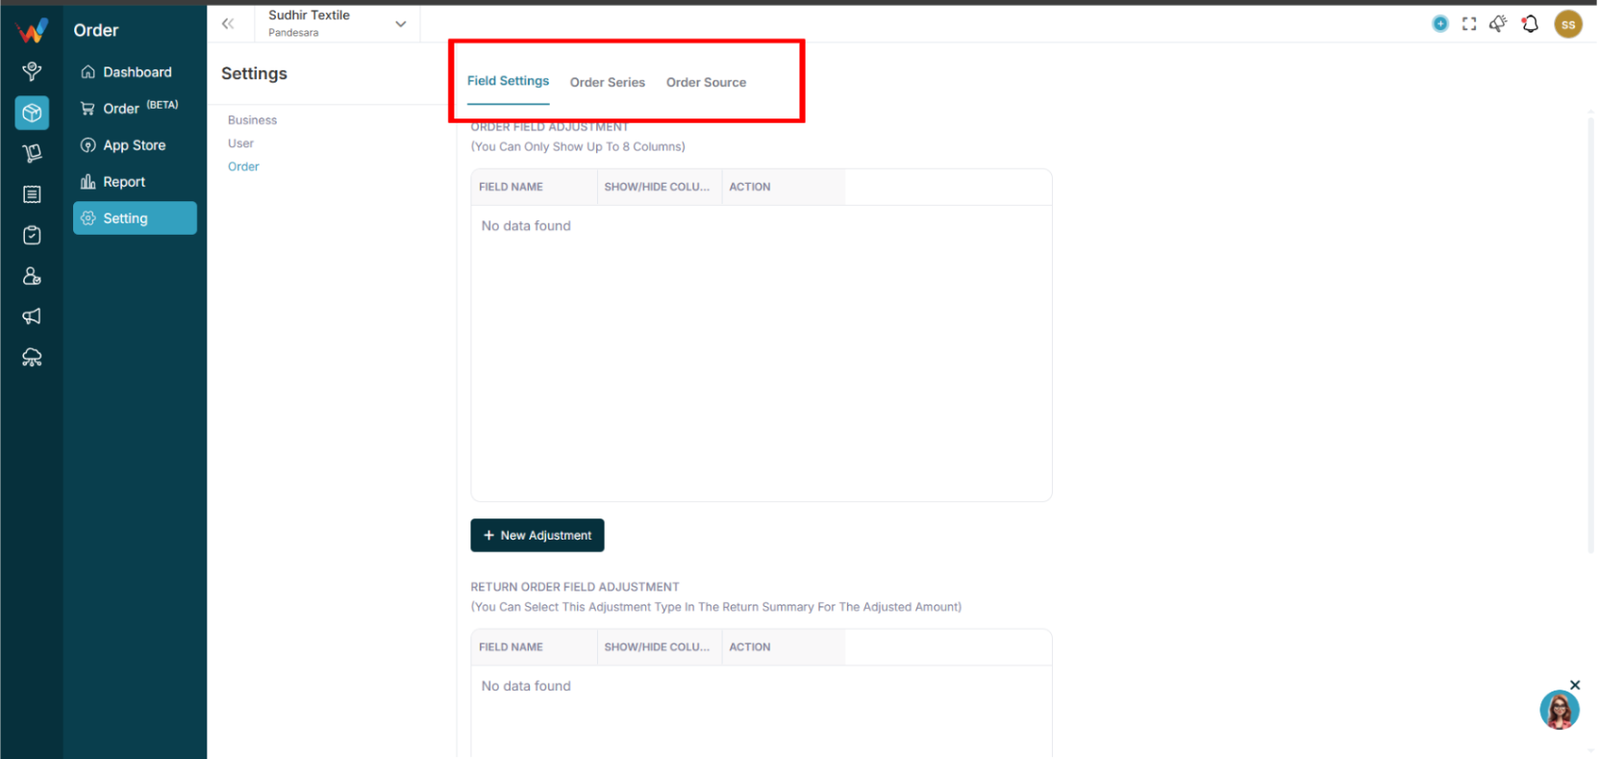
The Order Settings module contains the following tabs:
- Field Settings
- Order Series
- Order Source
Each tab controls a specific part of order system configuration.
Field Settings
3.1 Overview
Field Settings contains two sections:
- Order Field Adjustment
- Return Order Field Adjustment
3.2 Purpose
Allows businesses to create custom fields for:
- Order Create screen
- Return Create screen
3.3 Create New Field

Fields:
- Label (required)
- Type of Field (Text, Number, Date, etc.)
- Mandatory Field toggle
Validation:
- Maximum 50 characters allowed.
Use Cases:
- Transport Type
- Delivery Slot
- Sales Executive
- Internal Remarks
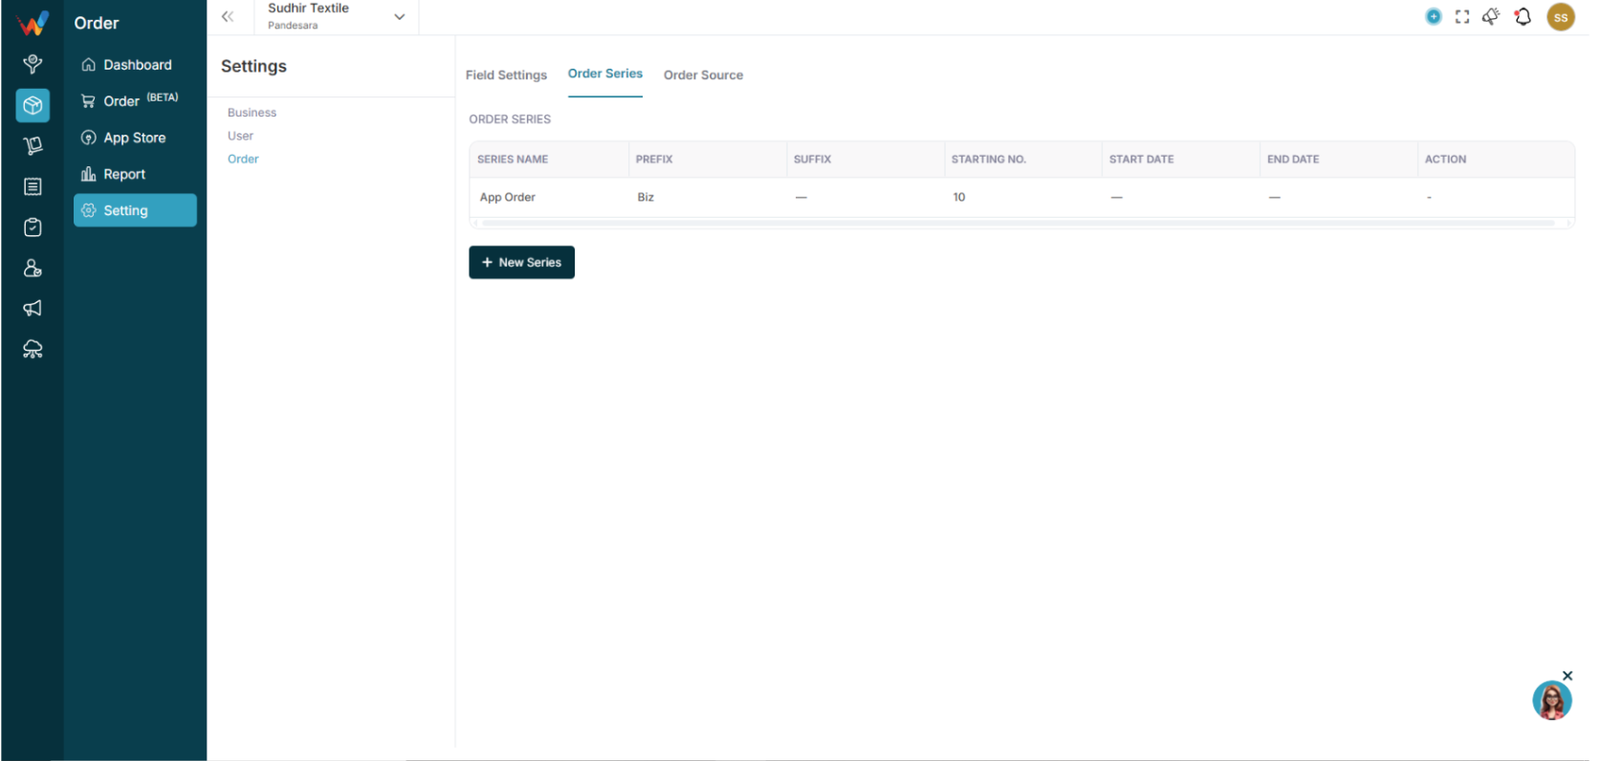
Order Series

4.1 Purpose
Used for automatic order numbering.
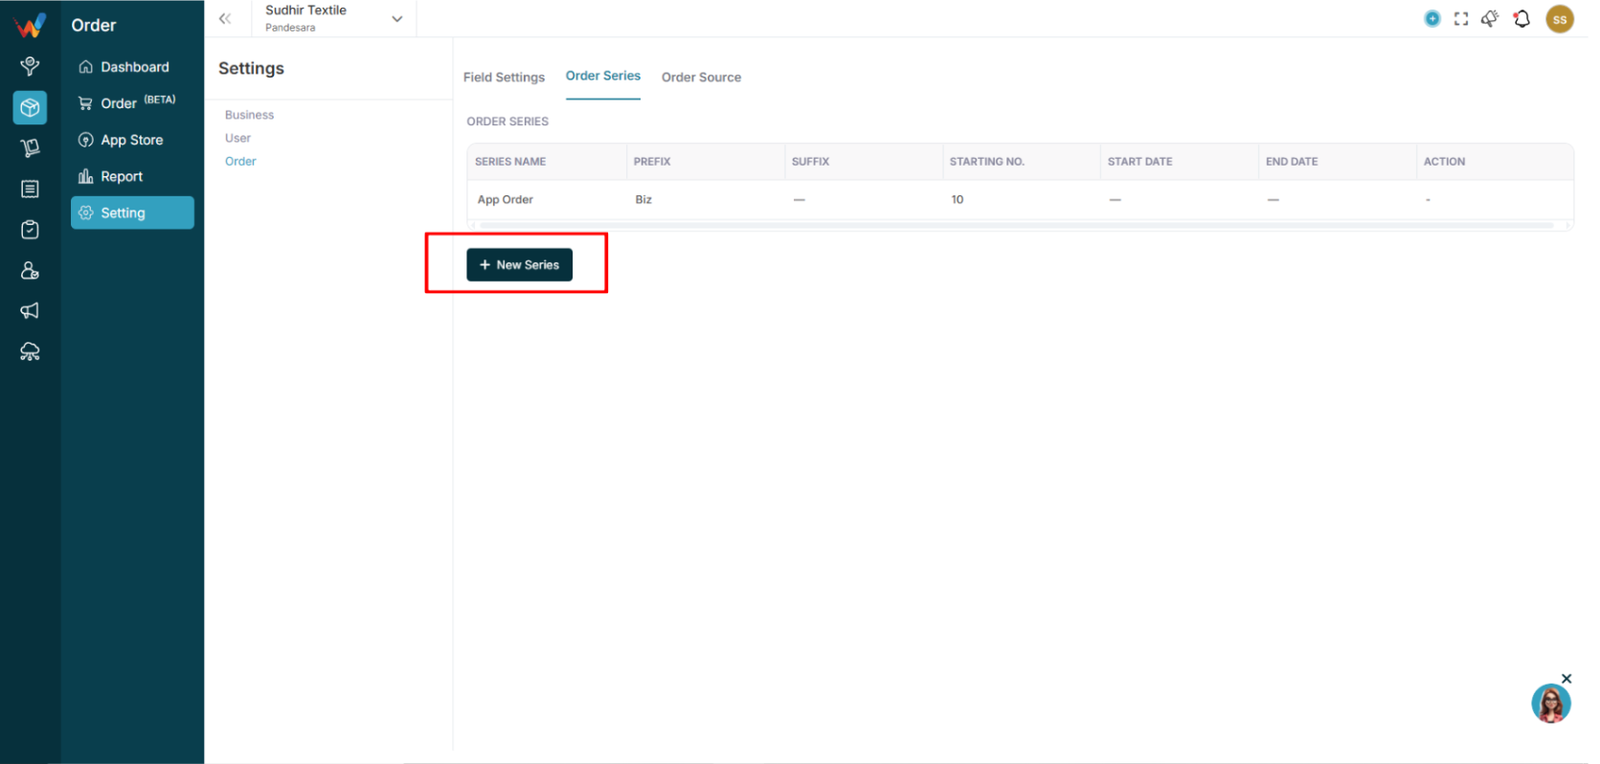
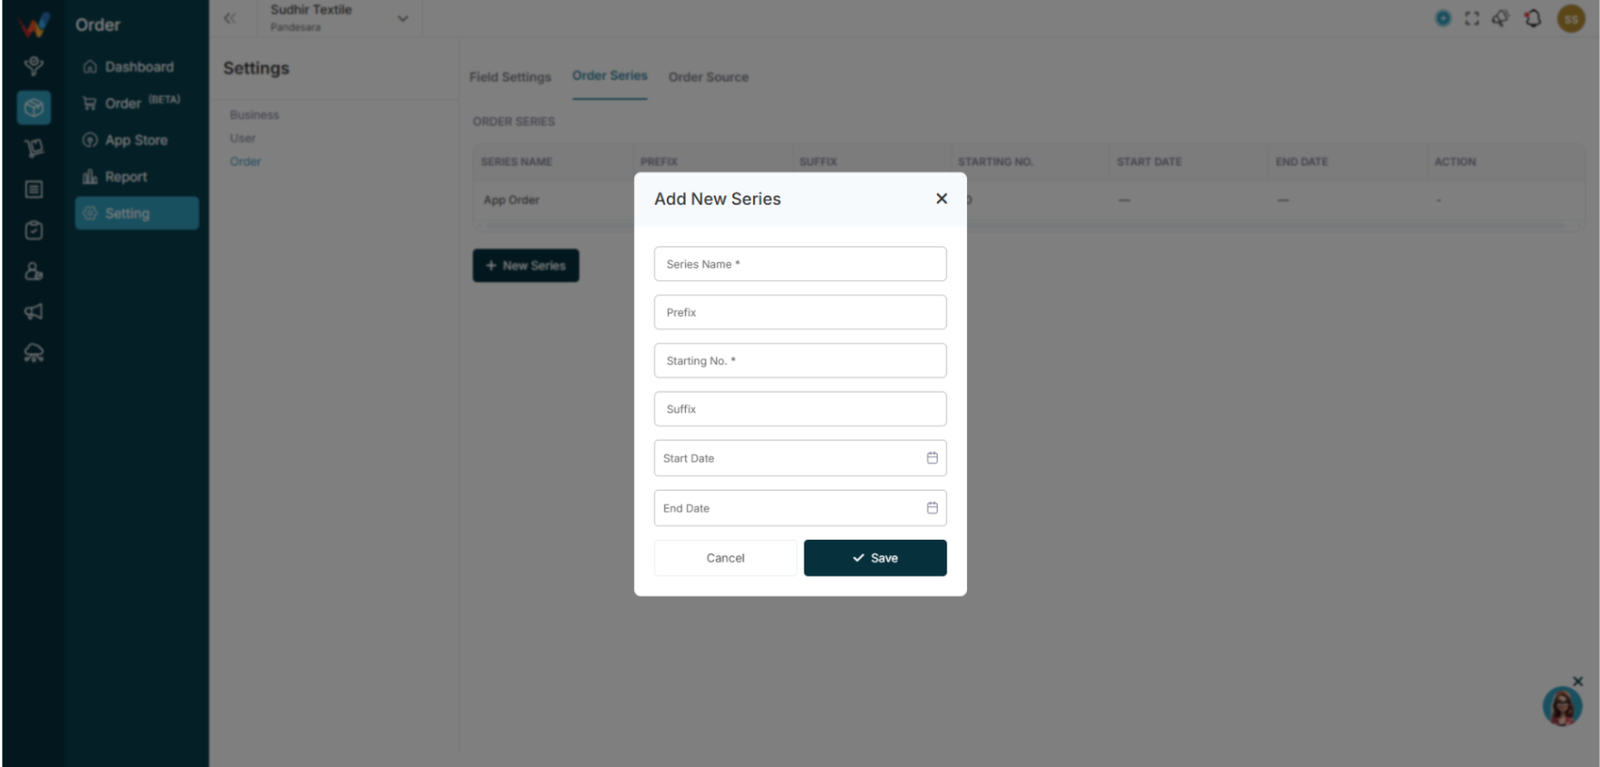
4.2 Add New Series

Fields:
- Series Name
- Prefix (optional)
- Starting No.
- Suffix (optional)
- Start Date
- End Date

Example:
Series Name: FY25
Prefix: OR
Starting No.: 1
Suffix: WO
Generated ID:
OR-1-WO
System Logic:
- Only the series within the active date range is used.
- The system auto-increments the number for each new order.
Order Source
5.1 Purpose
Defines where the order came from.
5.2 Source List
Examples:
- Shopify
- Myntra
- Office
- BizKart
Users can:

- Show or hide the Source column
- Add a new source
5.3 Add New Source
Field:
Use Cases:
- WhatsApp
- IndiaMART
- Direct Walk-in
- Export
Order Lifecycle And Status Logic
Order Status Logic
1.1 Fulfillment Status
- Unfulfilled: No action taken on the order
- Partially Fulfilled: Some items have been confirmed (available in stock)
- Fulfilled: Order fully confirmed
1.2 Payment Status
1.3 Order Lifecycle
Created
→ Production
→ Fulfillment
→ Shipment
→ Payment
→ Completed
Complete Order Lifecycle Flow
Order Created
→ Production
→ Fulfillment
→ Shipment
→ Payment
→ Return or Cancel
→ Completed
System Controls
- Fulfillment is restricted if there is no stock – (Note : user are able to complete Fulfillment with minute stock also )
- Return is restricted if the order is not fulfilled
- Payment cannot exceed the order amount
- Exchange auto-adjusts payable
System Logic
- Inventory reduces on fulfillment
- Payment updates outstanding balance
- Return adjusts stock (if enabled)
- Cancel stops lifecycle
- Completed marks final state
Common Mistakes
- Marking an order completed before payment
- Forgetting to fulfill items
- Not updating tracking ID
- Not recording return properly
- Deleting orders instead of cancelling
Order Return And Order Cancel
Return Management (Detailed Documentation)
1.1 Create Return Screen
1.1.1 Return Type
Options:
- RTO (Return to Origin)
- Return
Meaning:
RTO: Shipment is undelivered and returned by courier
Return: Customer sends the product back
1.2 Return Item Details
- Select items from fulfilled items
- Choose quantity to return
- Multiple items supported
System Logic:
Return quantity cannot exceed fulfilled quantity.
1.3 Exchange Item Details
After selecting return items, users can:
- Add exchange items
- Select new product
- Add quantity
Use case:
The customer returns a defective item and receives a new product.
1.4 Amount Summary
Auto-calculates:
- Return Gross Total
- Return Shipping Charge
- Round Off
- Return Amount
- Outstanding Amount
- Receivable Amount
System Logic:
If refund: reduces receivable
If exchange: adjusts balance difference
1.5 Return Details (Right Panel)
- Return ID (auto-generated)
- Return Date
- Tracking Number
- Shipping Carrier
- Attachment
- Notes
Click Submit to create the return.
Order Cancel Screen
2.1 Location
Order Detail → Cancel
2.2 Fields
- Date of Cancel
- Reason of Cancel
2.3 System Logic
- Order status changes to Cancelled
- Cannot fulfill a cancelled order
- Inventory is restored (if reserved) – (Note : Inventory is not reduced when an order is created.(because of this reason we not restored Inventory))
- Payment refund must be handled separately
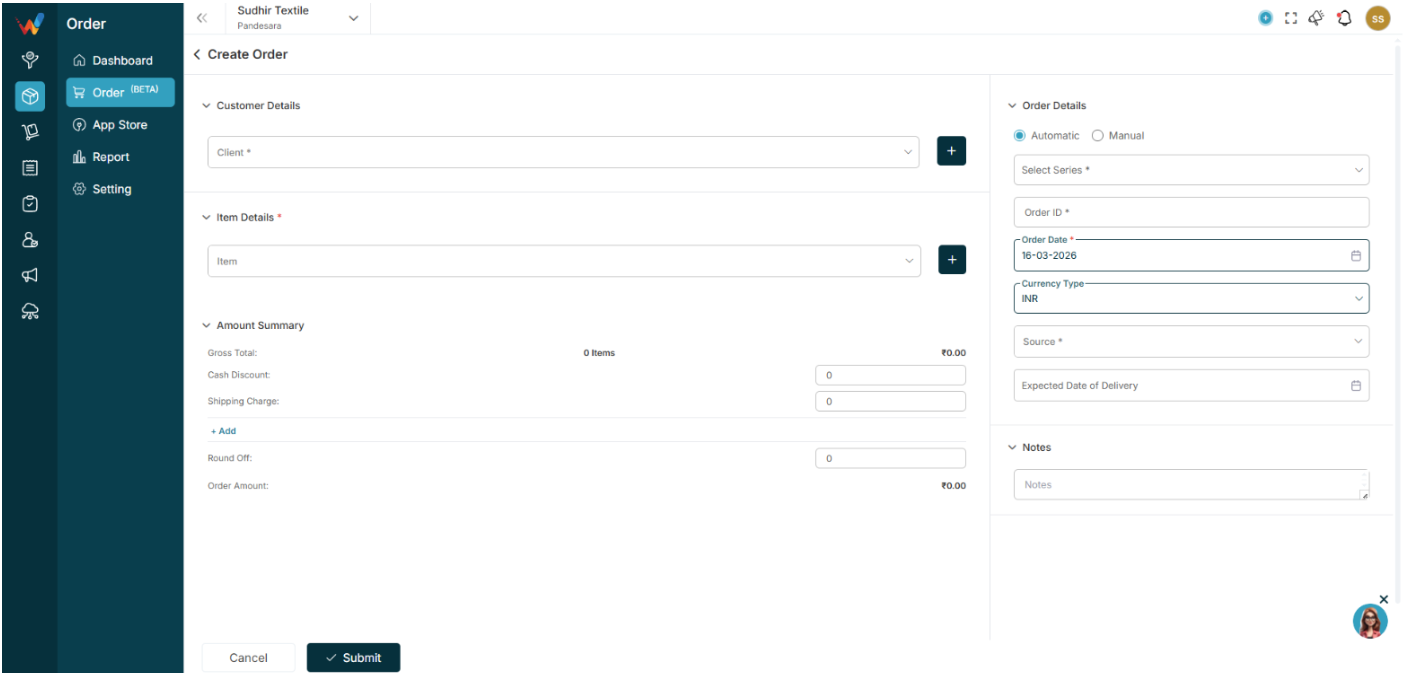
Create Order And Detail View
Create Orde
1.1 How to Open Create Order
Click + Order.

1.2 Screen Layout

The Create Order screen has two sections:
- Left side: Customer and Item
- Right side: Order Details
1.3 Customer Details
- Client (mandatory)
- Quick Add (plus) option
1.4 Item Details
- Add Item
- Multiple items supported
- Quantity and Rate defined
1.5 Amount Summary
Auto-calculates:
- Gross Total
- Discount
- Shipping Charge
- GST (IGST, CGST, SGST)
- Round Off
- Order Amount
1.6 Order Details
Order ID options:
- Automatic: System generates Order ID
- Manual: User enters Order ID
Fields:
- Series
- Order ID
- Order Date
- Currency
- Source (Office, Shopify, etc.)
- Expected Date of Delivery
- Notes
Click Submit to create the order.
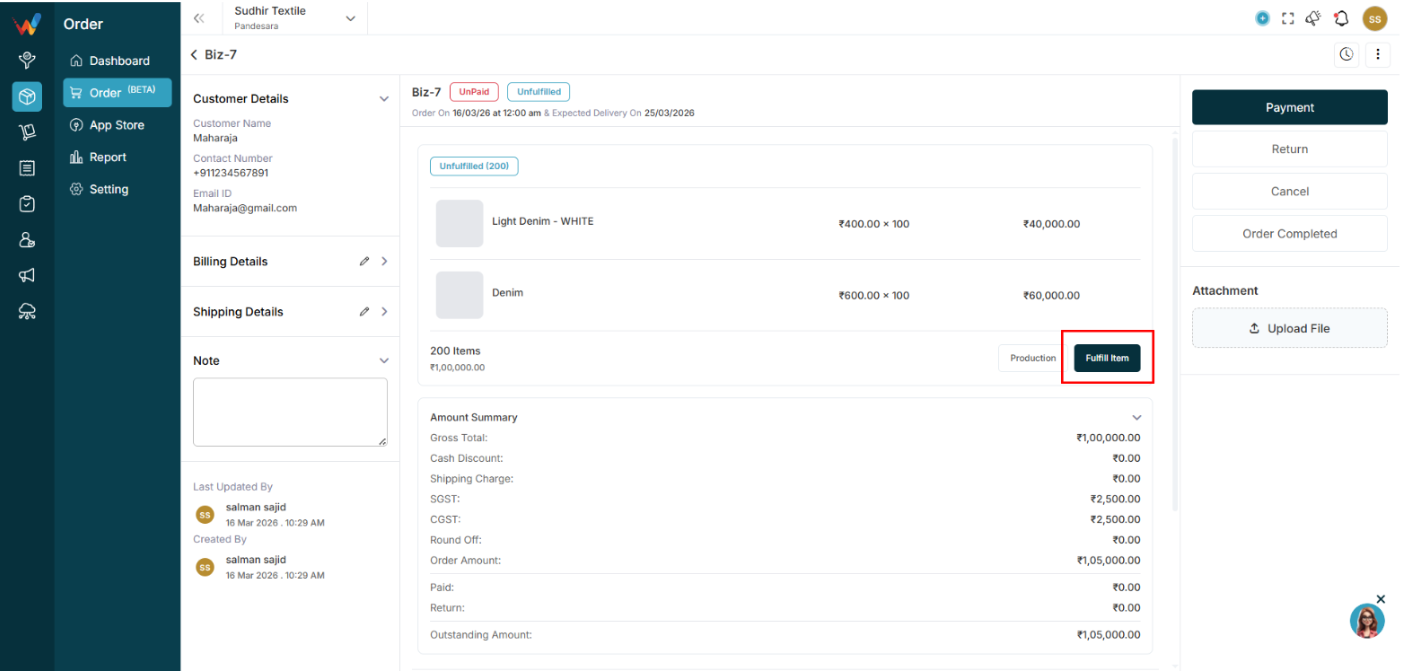
Order Detail View

When clicking an order, the top section shows:
- Order ID
- Payment Status
- Fulfillment Status
- Order Date
- Expected Delivery Date
2.1 Left Panel
- Customer Details
- Billing Details
- Shipping Details
- Notes
- Created By
- Last Updated By
2.2 Shipment Section
Shows:
- Shipment number
- Tracking ID
- Shipping Carrier
- AWB
- Dispatch Date
- Shipment Status
Items are listed with:
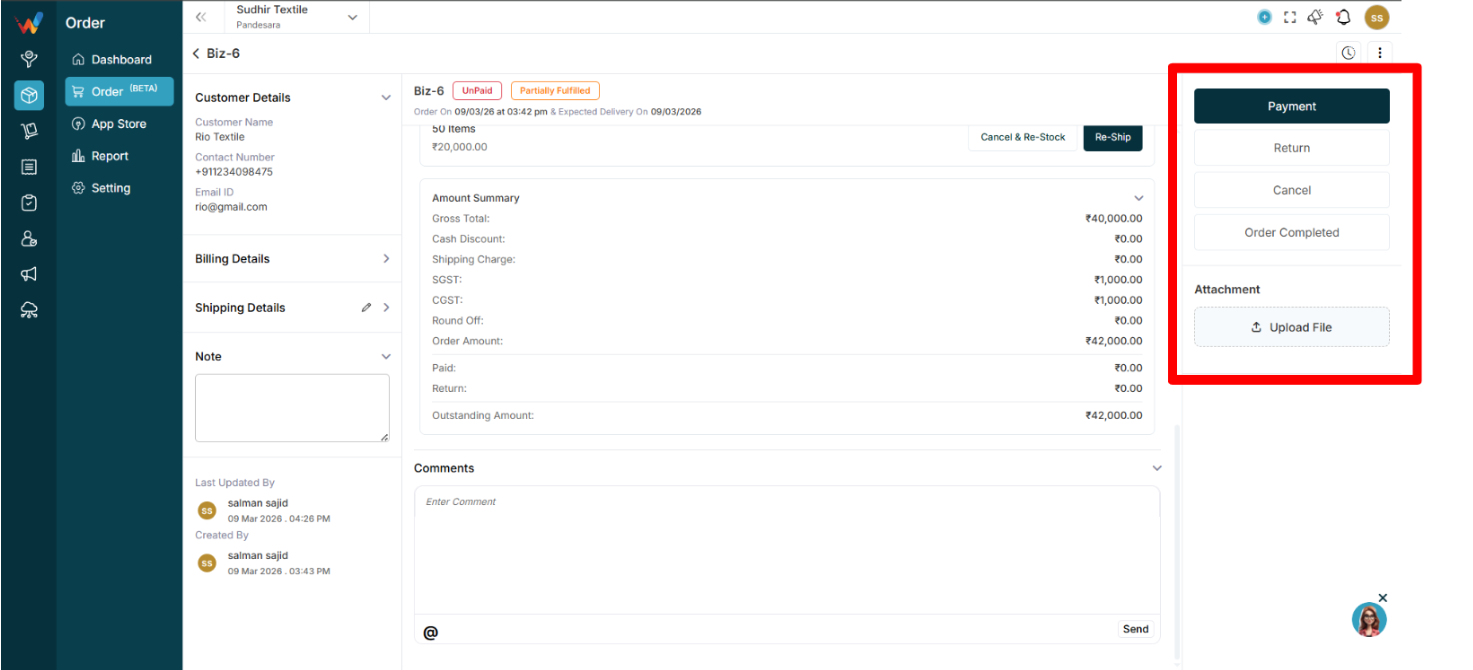
2.3 Amount Summary
Displays:
- Gross Total
- Discounts
- Shipping
- Tax breakup
- Order Amount
- Paid
- Return
- Outstanding Amount
Order Actions

Right side panel actions include:
- Payment
- Return
- Cancel
- Order Completed
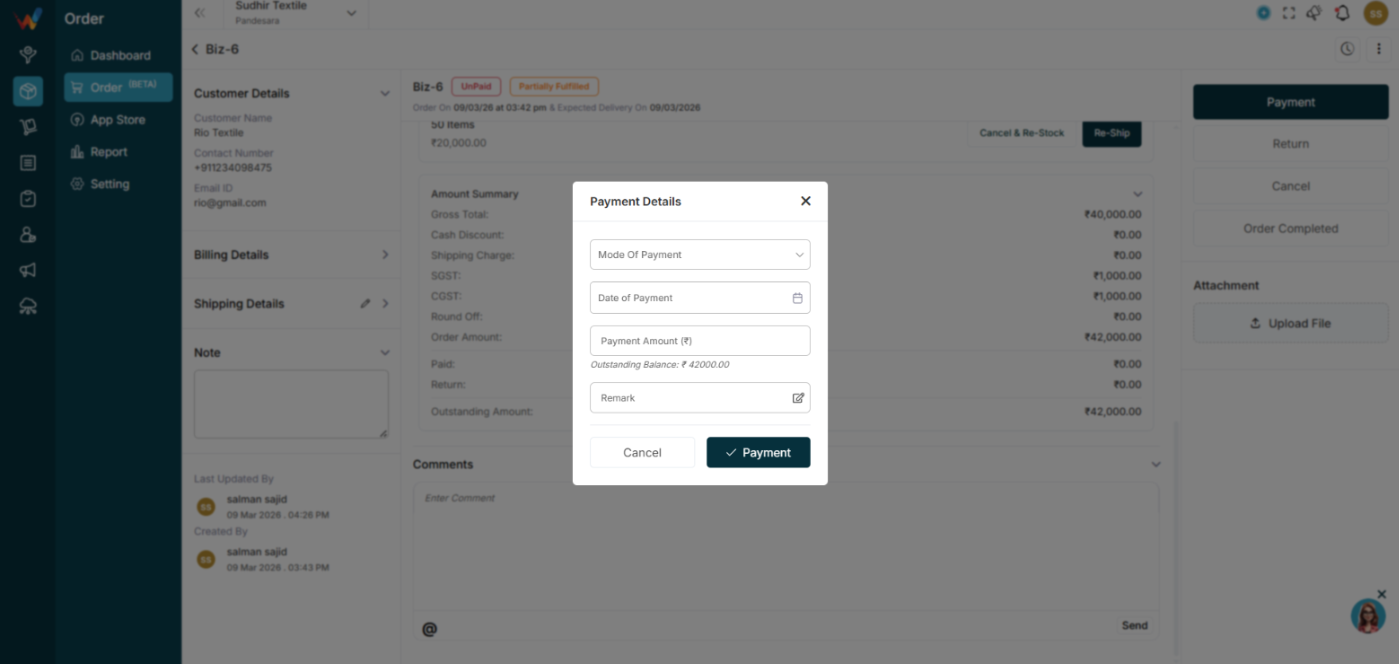
3.1 Payment
Open the Payment modal.

Fields:
- Mode of Payment
- Date
- Payment Amount
- Remark
System updates:
- Paid amount
- Outstanding balance
- Payment status
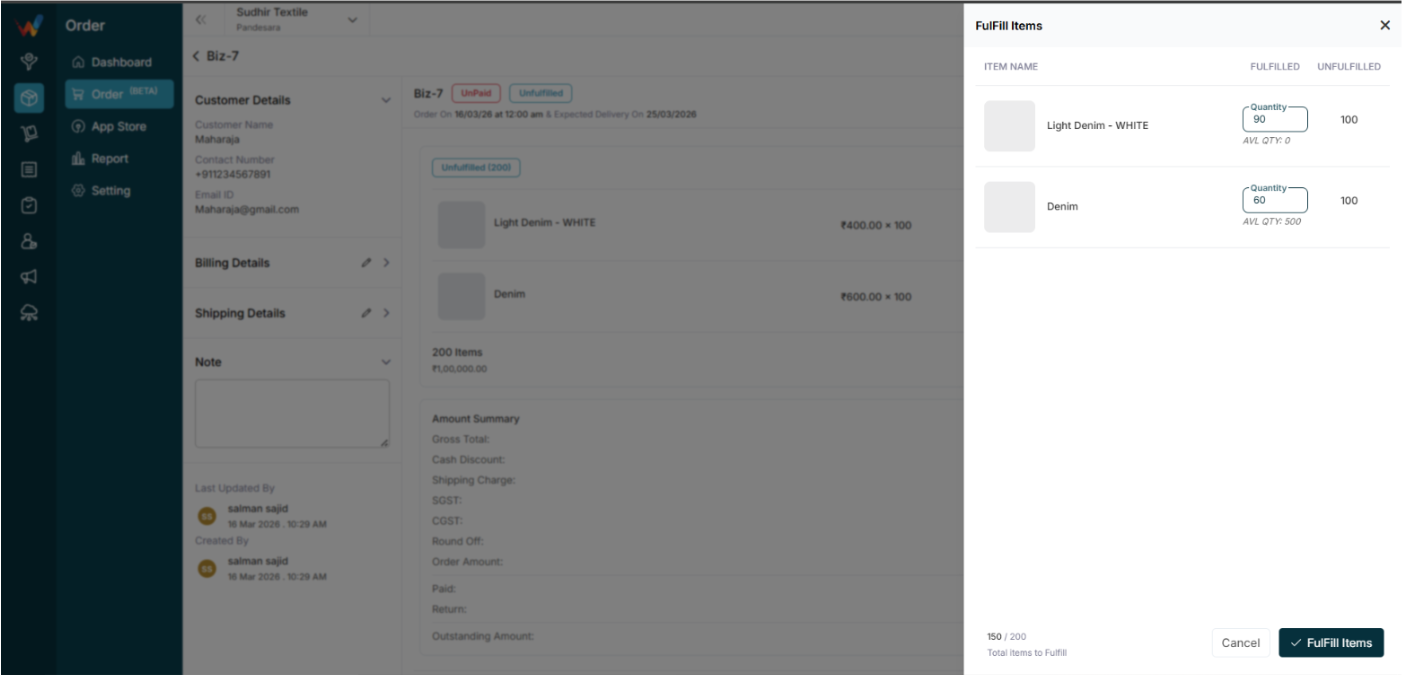
3.2 Fulfill Item


Users can:
- Fulfill partial quantity
- Track unfulfilled items
Status updates:
- Unfulfilled
- Partially Fulfilled
- Fulfilled
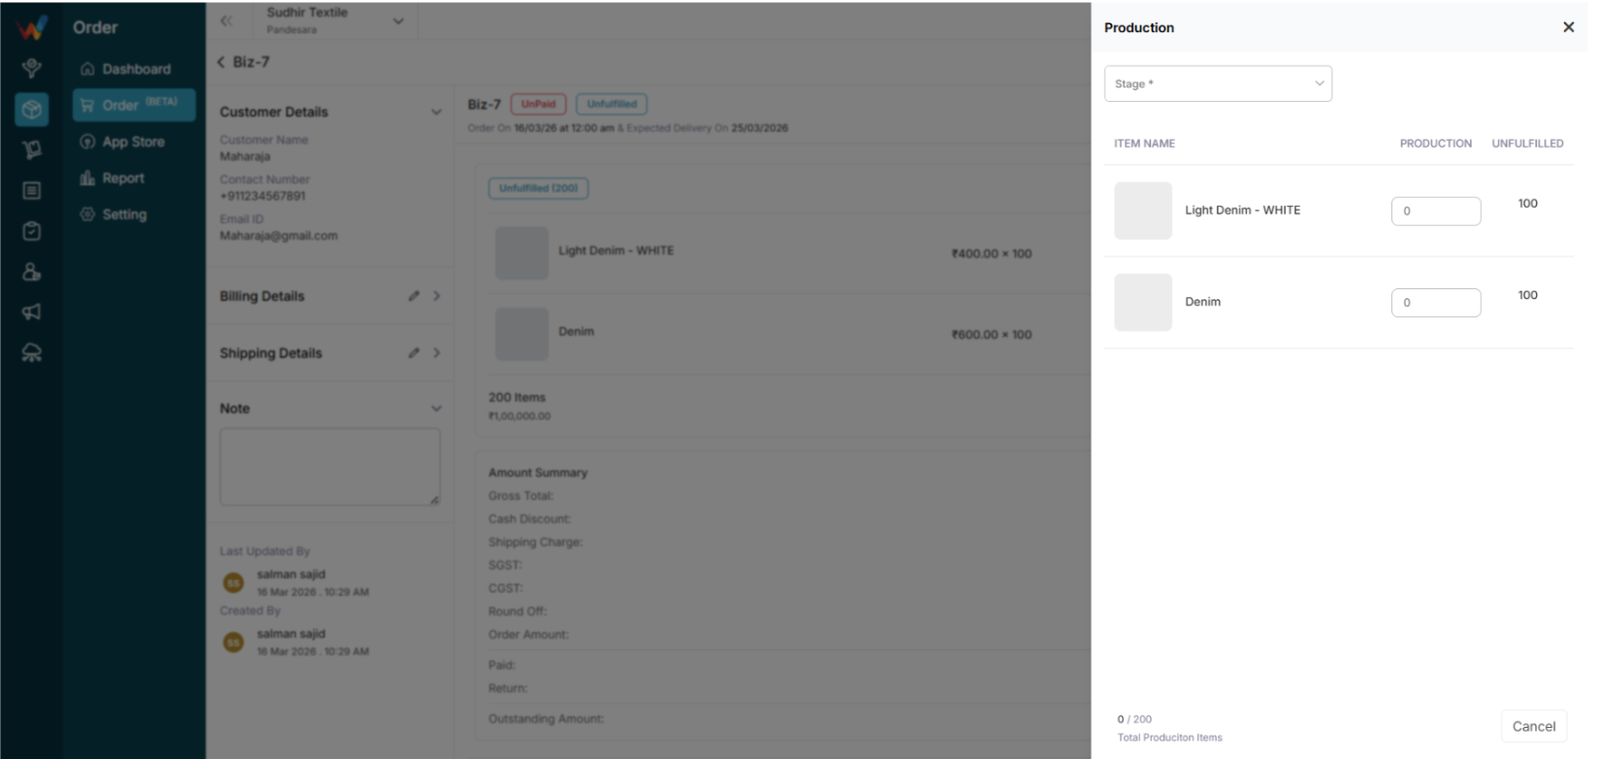
3.3 Production


If production is enabled:
- Select stage
- Enter production quantity
- Track production versus pending
3.4 Return
Click Return to open the Create Return screen.

Return options:
Fields:
- Fulfilled ID
- Reason of Return
- Return ID
- Return Date
- Tracking Number
- Shipping Carrier
- Notes
- Attachment
3.5 Cancel
Cancels the order before fulfillment.