Create Lead
Purpose of This Screen
Navigation Path:
Sales Module → Lead → Click on + Inquiry

The Create Lead screen is used to:
- Add a new enquiry manually
- Capture complete lead information
- Assign source and status
- Store contact and business details
- Mark recurring leads
- Maintain structured data from day one
This is the entry point of the sales pipeline.
Top Header Area
Back Arrow
Returns to Lead List without saving.
User Dropdown (Top Right)
Shows assigned user for the lead.
Settings Icon
Used for lead configuration and custom field settings.
Section: Basic Details
Lead Name * (Required)
Enter the full name of the contact or business.
Examples:
- Rajesh Patel
- Amit Textiles
Mandatory field.
Contact Number
Country code selector (default: +91)
Plus icon supports multiple contact numbers.
Best practice: always enter at least one valid number.
Email
Optional but recommended.
Plus icon supports multiple emails.
Source (Dropdown)
Examples:
- IndiaMART
- Google Ads
- Facebook
- WhatsApp
- Cold
- Offline
Important for marketing tracking.
Status (Default: New)
Pre-selected as “New”
Can be changed during creation if needed
Lead Type (Dropdown)
Used to categorize lead type (example internal categories: Hot, Warm, Cold)
Remark
Short note about the first conversation.
Example: “Looking for 500 pcs cotton shirts.”
Description
Detailed explanation of requirement for internal clarity.
Show Other Details (Expandable)
Use this section for advanced information.
Lead Details (Expanded)
Business Name
Company or firm name.
Website
Official website (if available).
Alias
Alternative name or short code for internal use.
Lead ID
Unique internal identifier (if manually assigned).
Product
Product being enquired for.
Examples: Cotton fabric, Saree print, Garments
Amount
Expected deal value.
Used for forecasting and reporting.
Special Dates
Optional checkbox for special date tracking (example: birth date, anniversary).
Address Section
Typical fields:
- House no / building name
- Road name / area / colony
- Landmark
- Country
- State
- City
- Pin code
Best practice:
Fill city and state correctly for location-based filtering.
Recurring Lead
Options:
If Yes:
Marks lead as recurring (repeat buyer pattern)
Other Details (Custom Fields)
All custom fields created in settings appear here.
Bottom Action Buttons
Cancel
Discards entered data.
Submit
Saves the lead.
After submission:
- Lead appears in Lead List
- Assigned status is applied
- Owner is assigned (based on system logic)
Step-by-Step Workflows
Scenario 1: Manual Entry from Phone Call
Click + Lead
Enter lead name
Enter contact number
Select source = Cold / Call
Keep status = New
Add a short remark
Click Submit
Scenario 2: High Value Business Lead
Fill basic details
Expand “Show Other Details”
Add business name
Enter product
Enter expected amount
Fill address
Submit
Common Mistakes and Best Practices
Common mistakes
Not selecting source
Not writing remark
Leaving amount empty for high-value leads
Skipping business name for B2B leads
Best practices
Always enter: source, product, remark
For serious enquiries: fill amount, business name, and address
Mark recurring if it is a repeat buyer
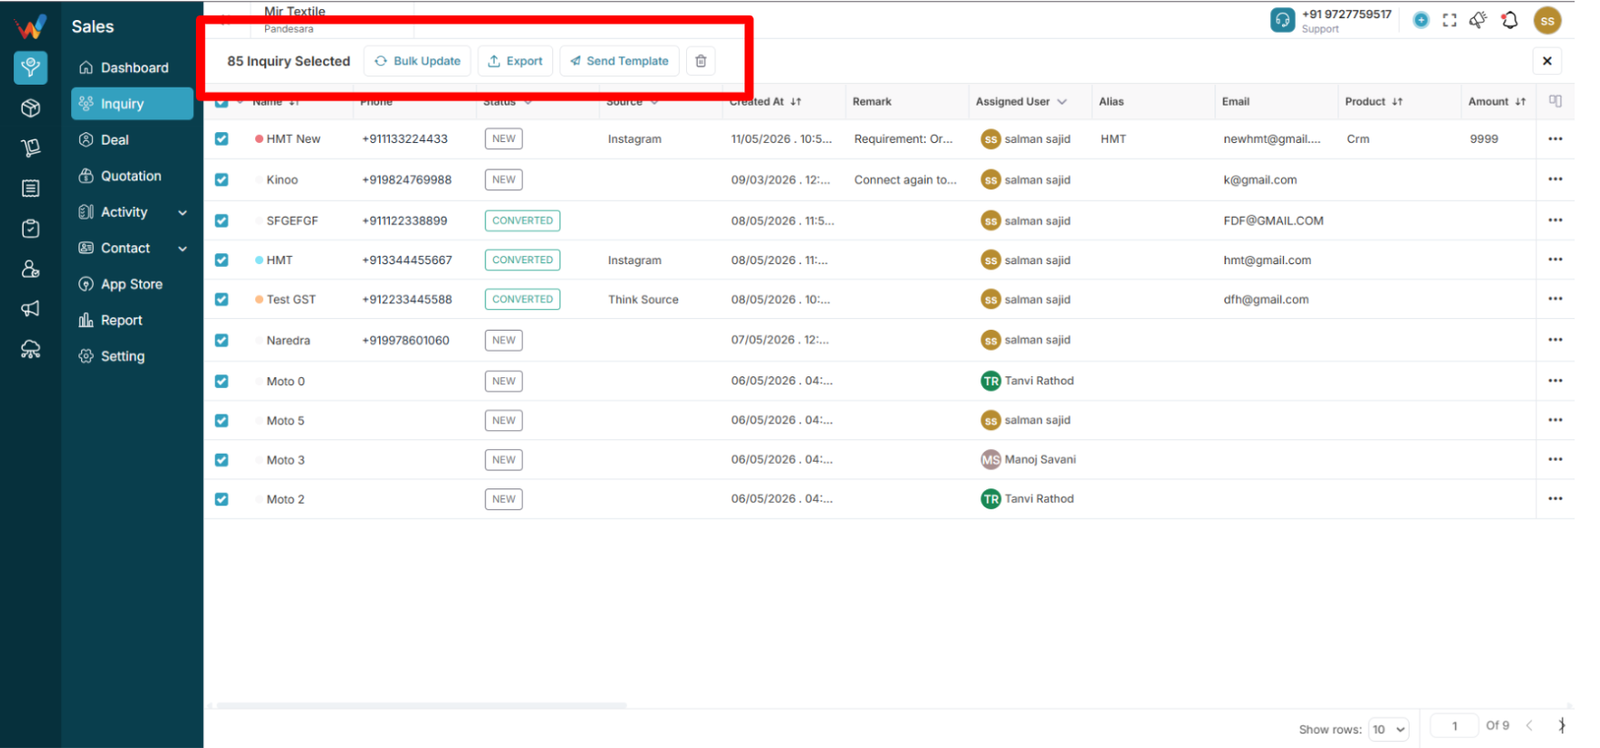
Bulk Actions (Mass Operations)
Bulk Actions Bar

When multiple leads are selected, a bottom action bar appears with options like:
- Update
- Delete
- Export
- Send Template
Example label:
“10 Leads Selected”
Bulk Update (Lead Mass Update Panel)
How to Open
Select leads → Click Update → Side panel opens
Tabs in Mass Update
Status Tab
Change status for all selected leads in one action.
Example:
Select 50 leads → change status to “Contact in Future”
Assigned User Tab
Reassign selected leads to another user.
Example:
Reassign 100 IndiaMART leads to a new sales executive
Source Tab
Update lead source in bulk.
Example:
Move “Cold” leads to “Campaign”
Click Submit to apply changes to all selected leads.
Bulk Export (Lead Mass Export)
Export Tab
Choose format:
Select fields to export, such as:
- Name
- Account name
- Alias
- Email
- Contact number
- Website
- Custom fields
Click Export to download the file.
Export History Tab
Shows:
- File name
- Exported leads count
- Exported by
- Date and time
- Status (Completed)
Previously exported files can be downloaded again.
Import Lead (Bulk Upload)
How to Open
Click + Lead → Import Lead
Import Tab
Steps:
- Download template (Excel format)
- Upload file (.xls / .xlsx)
- Max limit: 1000 entries per upload
- Select file → Upload
Import History Tab
Shows:
- File name
- Leads imported
- Leads skipped
- Errors found
- Uploaded by
- Date and time
- Status (Completed / Error)
If errors occur, the system shows error count for correction.
Lead Table
(Column-by-Column Explanation)

Each row represents one lead.
Checkbox
Select leads for bulk actions.
Top checkbox selects all visible leads.
Name
Click Lead name to open Lead Detail.
Sortable (A–Z / Z–A).
Phone
Shows the primary contact number.
Status (Editable Directly From List)
Status can be updated directly from the list:
Click the status label to select a new status.
Typical statuses:
- New
- Assigned
- Contact in Future
- In Process
- Dead
Changing status updates the lead immediately.
Source
Shows enquiry source, such as:
- IndiaMART
- Google Form
- Facebook
- WhatsApp
- Cold
- Offline
- Others (based on setup)
Created At
Shows lead creation date and time.
Sortable.
Useful for:
- Daily tracking
- Lead ageing
Remark
Shows the latest remark for quick context without opening Lead Detail.
Assigned User (Editable From List)
Assigned user can be changed from the list:
Click assigned user and select another user.
Ownership updates immediately.
Updated At
Shows last modification date.
Useful for identifying inactive leads.
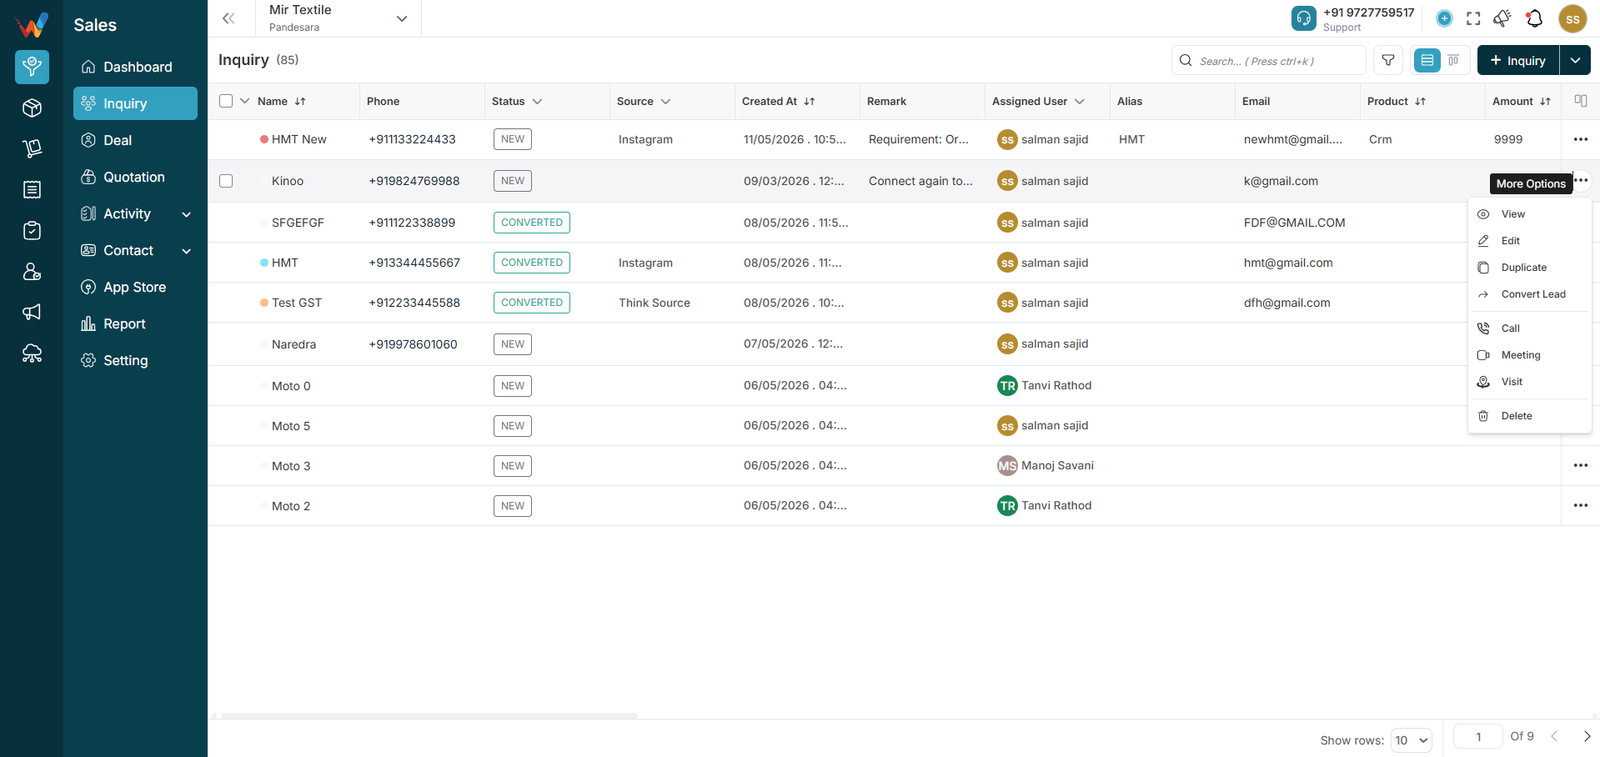
Row Action Menu (⋮ Three-Dot Menu)

Available Actions
- View
- Edit
- Duplicate
- Convert Lead
- Call
- Meeting
- Visit
- Delete
Action Definitions
View
Opens Lead Detail screen.
Read-only if permissions are restricted.
Edit
Opens Edit Lead form.
Editable fields commonly include:
- Lead name
- Business name
- Status
- Product
- Contact details
- Source
- Other configured fields
After saving, the table updates immediately.
Duplicate
Creates a copy of the existing lead:
- Same details
- New ID
- Status reset to default
Used for repeat leads.
Convert
Converts a lead into a deal:
- Lead details are carried forward
- New deal ID is created
- Stage may be selected as required
Used for qualified leads that are ready to enter the revenue pipeline.
Call / Meeting / Visit
Opens the relevant logging panel linked to the lead.
After saving, the activity appears in Lead Activities.
Delete
Deletes the lead (typically with confirmation).
After confirmation, the lead is removed permanently.
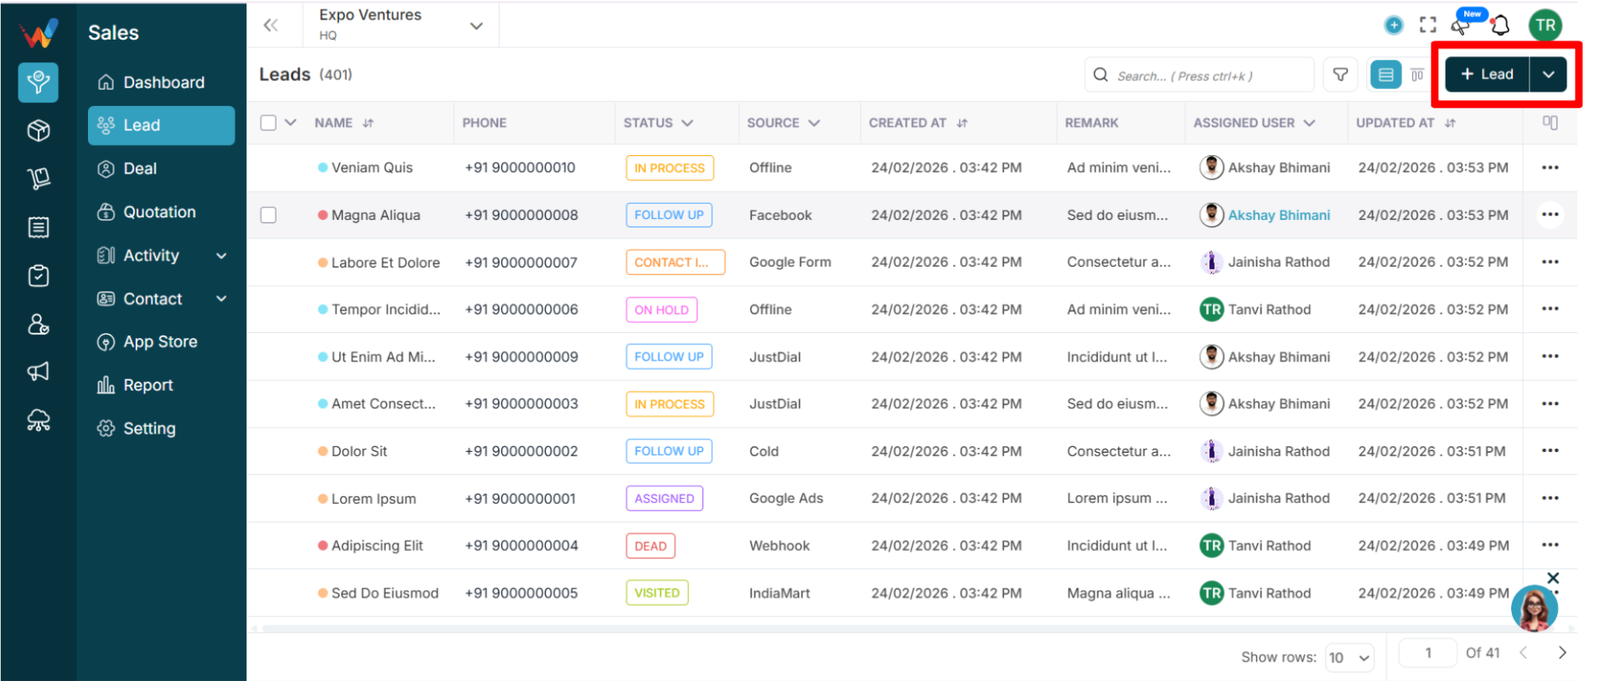
Lead List View
Purpose of This Screen
Navigation Path:
Sales Module → Inquiry Or Lead

The Lead List screen is the main workspace to:
- View all leads
- Search and filter leads
- Change lead status instantly
- Assign or reassign users
- Perform bulk updates
- Add, import, and export leads
- Take quick actions (Call, Meeting, Visit)
- Customize columns
- Check key lead info at a glance
If leads are managed daily, this is the primary screen used most often.
Top Action Area
Search Bar (Ctrl + K)
Search by:
- Name
- Phone number
- Email
- Business name
Shortcut:
Press Ctrl + K for instant search
Filter Button (Funnel Icon)
Use filters to narrow the list by:
- Status
- Source
- Assigned user
- Date range
- Custom fields
- Other available filters (based on configuration)
After applying filters, only matching leads appear.
View Toggle (List Icon)
Switch between:
- List View
- Kanban View (Card View)
This changes layout only and does not change lead data.
Column View / Customize Columns
Click the column icon to open Customize Columns. You can:
- Enable or disable columns
- Reorder columns
- Reset to default
Notes:
Locked columns (🔒) cannot be removed.
Extra fields can include: Alias, Email, Product, Amount, Business Name, Address, and others.
+ Lead Button
Options:
- Add Lead (manual entry)
- Import Lead (bulk upload via Excel)
Introduction
This document explains how the Lead Module works in WORTAL CRM, including the lead lifecycle, the Lead List (Table View), creating a lead, and the Lead Detailed View.
Covering:
- Lead List (Web Version)
- Create Lead
- Lead Detail
- Convert to Deal
What is the Lead Module?
The Lead Module is the entry point of the sales process in WORTAL CRM. It is used to capture, manage, track, and qualify enquiries received from multiple sources such as IndiaMART, WhatsApp, calls, Google Ads, Facebook, offline campaigns, and more.
A Lead represents a new enquiry or buyer interest that has not yet become a confirmed sales opportunity.
This module ensures:
- No enquiry is missed
- Every follow-up is tracked
- Sales team accountability is maintained
- Owners have full visibility on progress
- Qualified leads are converted into Deals in a structured manner
Core Features of Lead Module
The Lead Module allows users to:
- View all leads in a centralized list
- Search and filter leads
- Update lead status
- Assign or reassign users
- Perform bulk updates
- Import and export leads
- Log calls, meetings, and visits
- Schedule follow-ups
- Store notes and documents
- Track full activity history
- Convert leads into deals
Lead Lifecycle Flow
Lead
→ Follow-up (Call / Meeting / Visit)
→ Qualification
→ Status Update
→ Conversion to Deal
→ Revenue Opportunity
Daily Workflow Guide
Salesperson Workflow
Login
Check new leads and follow-ups
Call leads
Update status from list
Add remark
Set follow-up (inside Lead Detail)
Owner Workflow
Filter → Created Today
Check new leads count
Filter by status to check progress
Bulk reassign if needed
Sort by Updated At to find inactive leads
Common Mistakes and Best Practices
Common mistakes
Not assigning leads
Not updating status
Writing remarks in WhatsApp but not in CRM
Leaving too many leads in “New” status
Best practices
Every lead must have:
- Status
- Assigned user
- Follow-up date
- Remark
No lead should remain “New” for more than 1 day