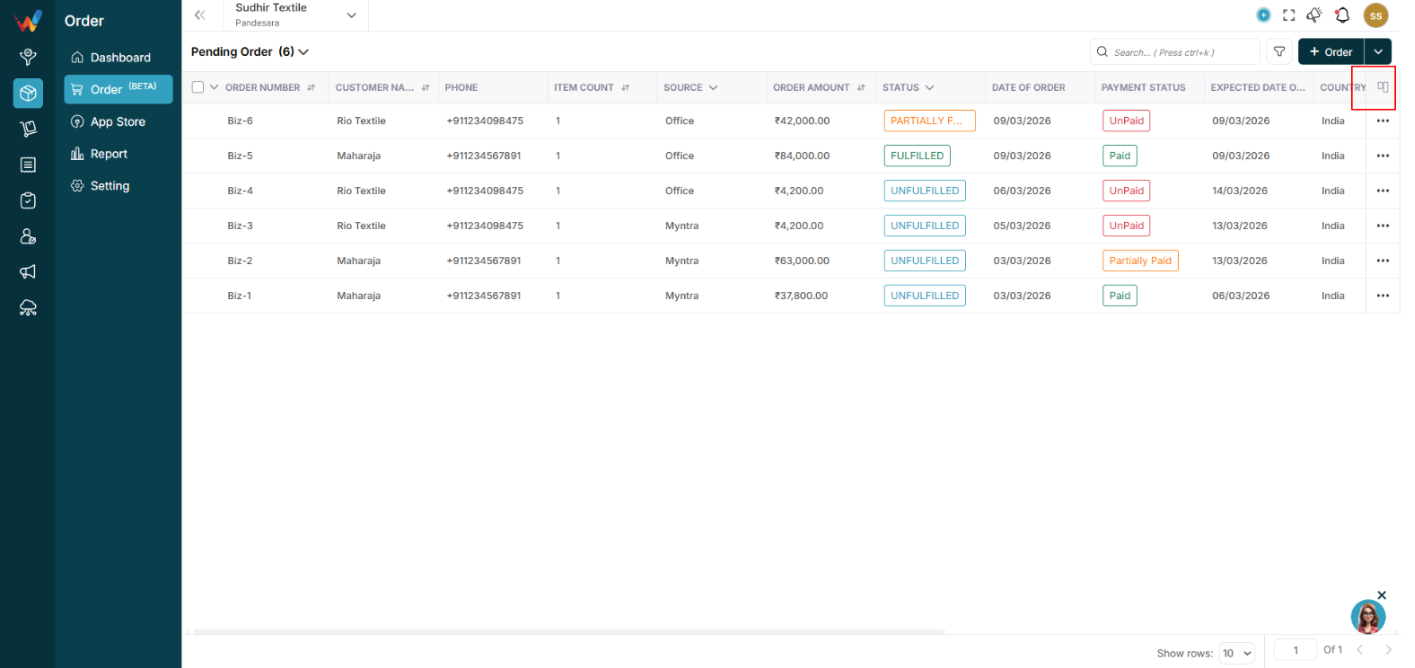
List View
Navigation Path:
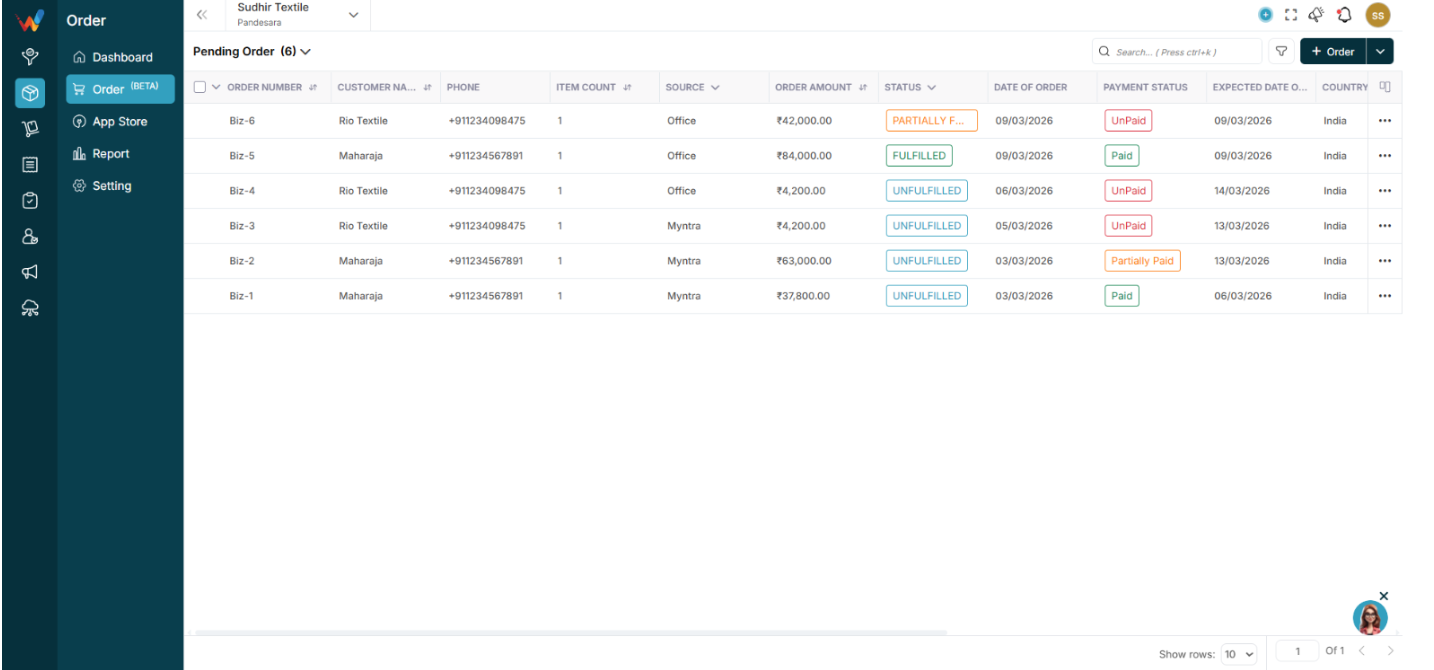
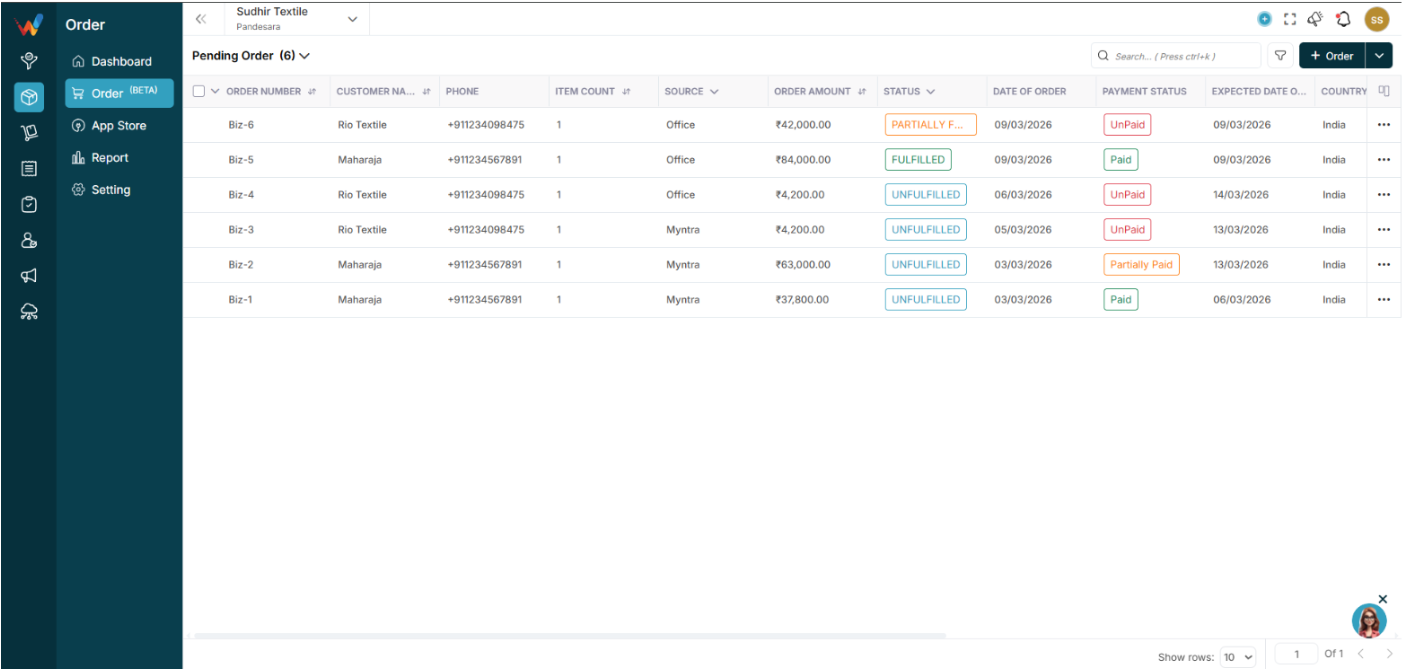
Order Module → Order

1.1 Top Left Dropdown (Order Views)

- Pending Order
- Completed Order
- Cancelled Order
- All Orders
This allows quick filtering by lifecycle stage.
1.2 Table Columns

Default visible columns:
- Order Number
- Customer Name
- Phone
- Item Count
- Source
- Order Amount
- Status (Unfulfilled, Fulfilled, Partially Fulfilled)
- Date of Order
- Payment Status (Paid, Unpaid, Partial)
Columns can be customized.
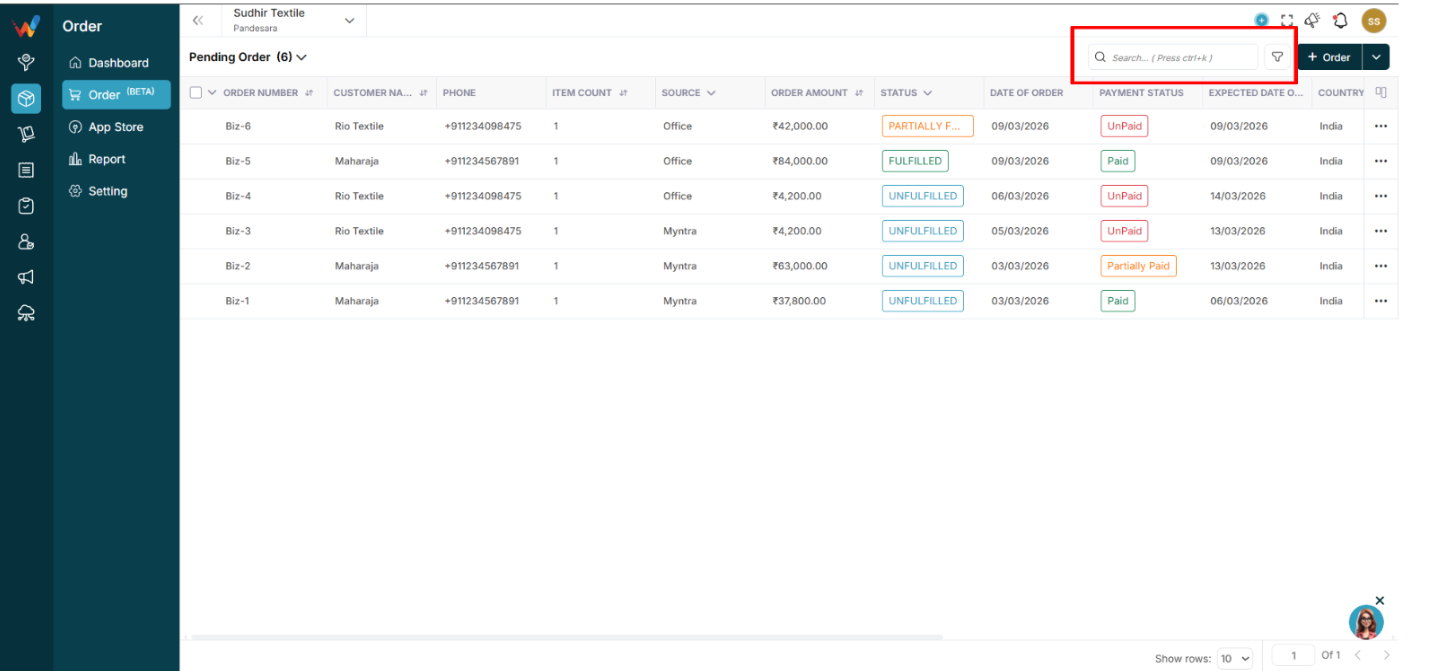
1.3 Search
Shortcut: Ctrl + K

The search bar supports:
- Order ID
- Customer Name
- Phone
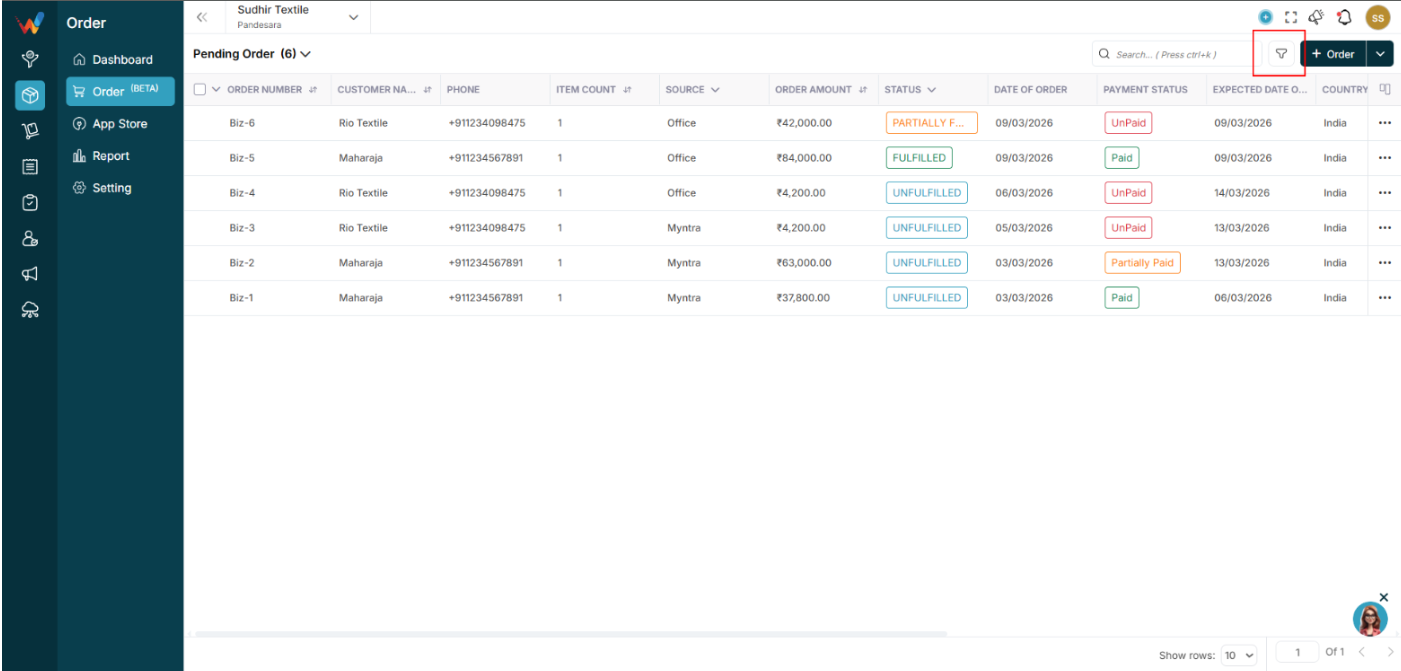
1.4 Filter Panel

Available filters:

- Item
- Created Date
- Expected Delivery Date
- Source
- Status
- Country
- State
- City
- Currency Type
- Mode of Payment
- Payment Status
Buttons:
- Reset: Clears filters
- Submit: Applies filters
1.5 Customize Columns

Users can:
- Show or hide fields
- Reset to default
- Reorder columns
This improves reporting flexibility.
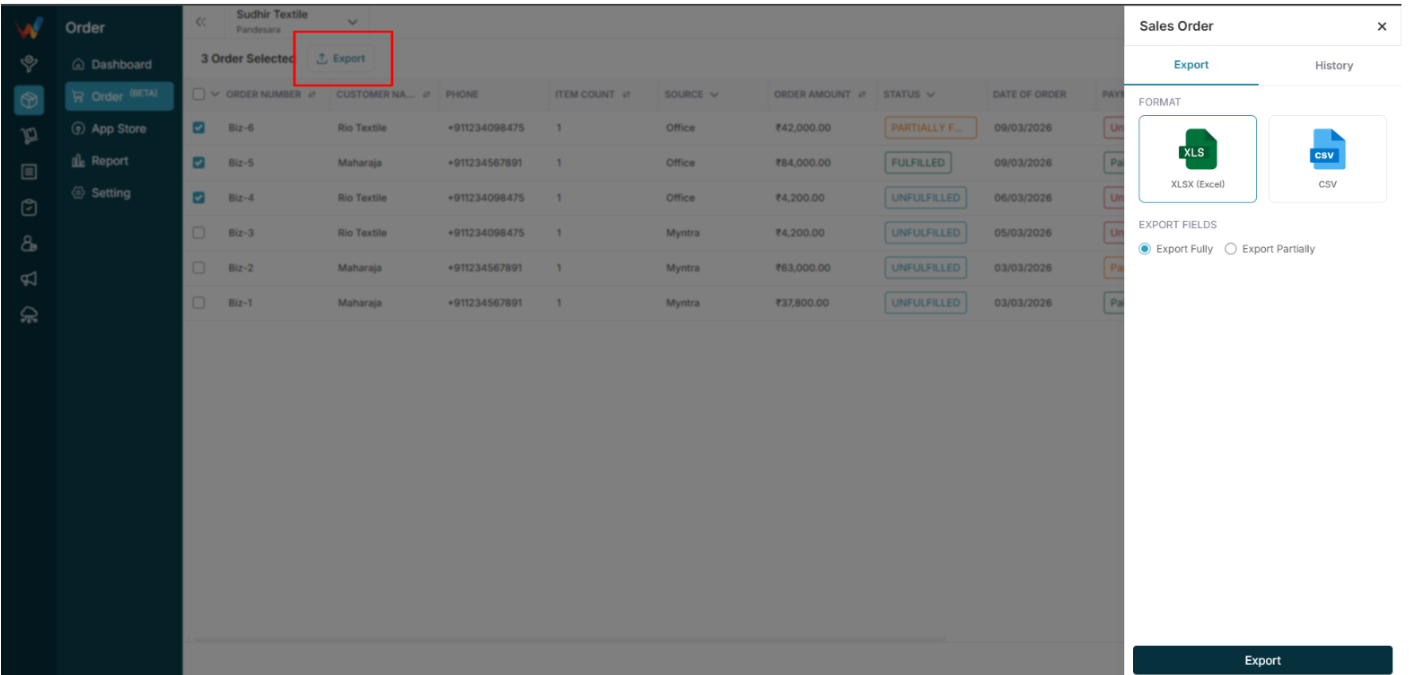
1.6 Bulk Selection and Export

Users can select multiple orders to export reports.
Export formats:
Options:
- Export Fully
- Export Partially
Introduction
Introduction to the Order Module
Navigation Path:
Order Module → Order
The Order Management module allows businesses to:
- Create and manage sales orders
- Track fulfillment status
- Manage payments
- Handle returns (RTO and Return)
- Monitor shipping and production
- Export order reports
- Track the order lifecycle end-to-end
This module bridges:
Sales → Inventory → Dispatch → Payment → Return.
Transfer Entry
1.1 Edit Button (Transfer Entry)
Used to update the transfer entry.
Common Use Cases
- Correct quantity
- Update warehouse selection
- Modify details
1.2 Delete Option (Transfer Entry)
Used to remove the transfer entry.
Important:
Deleting this entry will update stock levels.
Recommended Practice:
Allow deletion only to authorized users.
Add Transfer
The Transfer screen is used to record stock movements.
By Clicking the “Transfer” Button, the Following Functions Apply:
2.1 Transfer Details (Form)
Enter basic transfer information:
- Transfer Date: Date of stock movement
- Invoice No: Unique reference number
2.2 Transfer Item (Movement Direction)
Defines stock movement direction.
Transfer From
Select source details:
- Branch Name
- Warehouse Name
Transfer To
Select destination details:
- Branch Name
- Warehouse Name
Purpose:
Specifies where stock moves from and to.
2.3 Item Details (Form)
Add items being transferred.
To add multiple items, click + New Row.
2.4 Remark (Form)
Used for additional notes.
2.5 Submit / Cancel / Back
- Submit: Saves the transfer entry.
- Cancel: Exits without saving.
- Back: Returns to the previous screen.
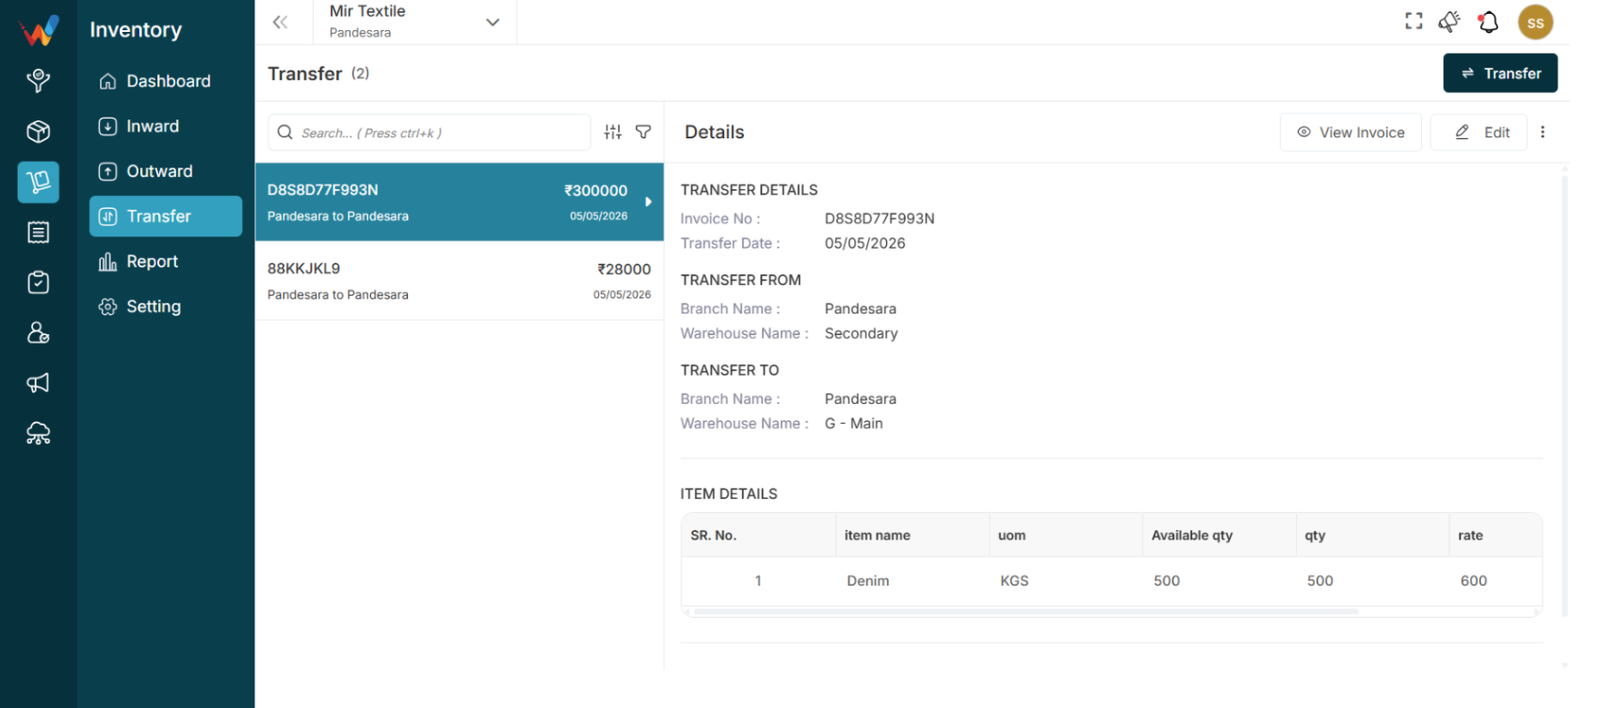
Transfer Details And Invoice View
Transfer Details View
This screen displays complete information for the selected transfer entry.
1.1 Viewing Details
Selecting a transfer entry displays all related details.
1.2 Transfer Details
Shows the basic transfer information.
Fields Available
- Invoice No: Unique reference number
- Transfer Date: Date of stock movement
1.3 Transfer From
Indicates where stock is moved from.
Fields Available
- Branch Name: Source branch
- Warehouse Name: Source warehouse
1.4 Transfer To
Indicates where stock is moved to.
Fields Available
- Branch Name: Destination branch
- Warehouse Name: Destination warehouse
Purpose:
Clearly defines stock movement direction.
1.5 Item Details
Displays items included in the transfer.
Columns Available
- Sr. No.: Item sequence
- Item Name: Name of product
- UOM: Unit of measurement
- Available Qty: Current stock before transfer
- Qty: Quantity transferred
- Rate: Item value per unit
- Amount: Total item value
Purpose:
Provides stock and value breakdown.
1.6 Remarks
Displays additional notes.
View Invoice
Used to preview the transfer invoice.
Purpose:
Allows review or printing of transfer details.
2.1 Invoice Preview
Shows the full transfer invoice including:
- Business details
- Transfer information
- Item details
- Totals
Purpose:
Allows you to verify the transaction before sharing or printing.
2.2 Edit Button (Invoice Preview)
Used to modify the invoice details.
Purpose:
Allows corrections without leaving the preview screen.
2.3 Download Button
Used to download the invoice.
Purpose:
Helps save the invoice for records or sharing.
2.4 Print Button
Used to print the invoice.
Purpose:
Allows quick physical copy generation.
2.5 Close Button
Closes the invoice preview.
Purpose:
Returns to the previous screen.
Introduction And List View
Introduction to Transfer Module
The Transfer module is used to move stock between warehouses or branches.
1.1 Common Use Cases
- Stock movement between branches
- Warehouse stock movement
Transfer – List View

Navigation Path:
Inventory Module → transfer
2.1 Purpose of Transfer List View
Displays all stock transfer entries. Each entry typically includes:
- Invoice Number
- Transfer Direction
- Amount
- Date
2.2 Transfer Direction
The Transfer Direction shows the movement of stock between locations.
Explanation
Stock moved from one location to another location.
Example
If the record displays HQ to Surat, then:
- Stock moved from HQ
- Stock moved to Surat
If the record displays Surat to HQ, then:
- Stock moved from Surat
- Stock moved to HQ
Purpose:
Provides instant visibility of stock movement without opening details.
2.3 Search Bar
Used to quickly find transfer records.
Shortcut: Ctrl + K
How to Use
- Enter Invoice No or Amount.
2.4 Sort Function
Used to arrange transfer records.
Available Options
- Invoice Date
- Transfer Date
- Updated Date
- Voucher Number
- Amount
Sort Order
Apply: Confirms sorting
Reset: Clears selection
Purpose:
Helps organize transfer records easily.
2.5 Filter Panel
It helps you find exactly what you’re looking for by filtering out unnecessary results.
Available Filters
- Item Name
- Amount
- Transfer Date
How to Use
- Open the Filter Panel.
- Enter filter details.
- Click Submit.
- Click Reset to clear filters.
Purpose:
Allows viewing only relevant transfers.
Business Logic And Business Example
Workflow and System Logic (Overall Configuration Flow)
Admin configures:
- Field Settings
- Voucher Series
- Enable E-Invoice and E-Way Bill
- Add credentials
- Add transporters
- Add sales persons
After configuration:
- Invoice Creation
- IRN Generation
- E-Way Bill Generation
- Transport compliance
- Reporting
Real Business Example
A textile business needs:
- Financial year-based invoice numbering
- E-Invoice generation above threshold
- E-Way Bill for inter-state dispatch
- Assigned sales person for each invoice
Admin sets:
- Voucher Series: FY2025-26
- Enables E-Invoice and E-Way Bill
- Adds GSP credentials
- Adds transporter master
- Maps sales team
The system becomes GST-compliant and audit-ready.
Best Practices
- Always verify GSTIN before saving credentials
- Use financial year-based voucher series
- Enable services only after credential verification
- Maintain updated transporter master
- Restrict access to configuration settings
Common Mistakes
- Entering incorrect GSP credentials
- Forgetting to set a default voucher series
- Generating E-Invoice without enabling configuration
- Not updating transporter ID
- Deleting a series after invoices are created
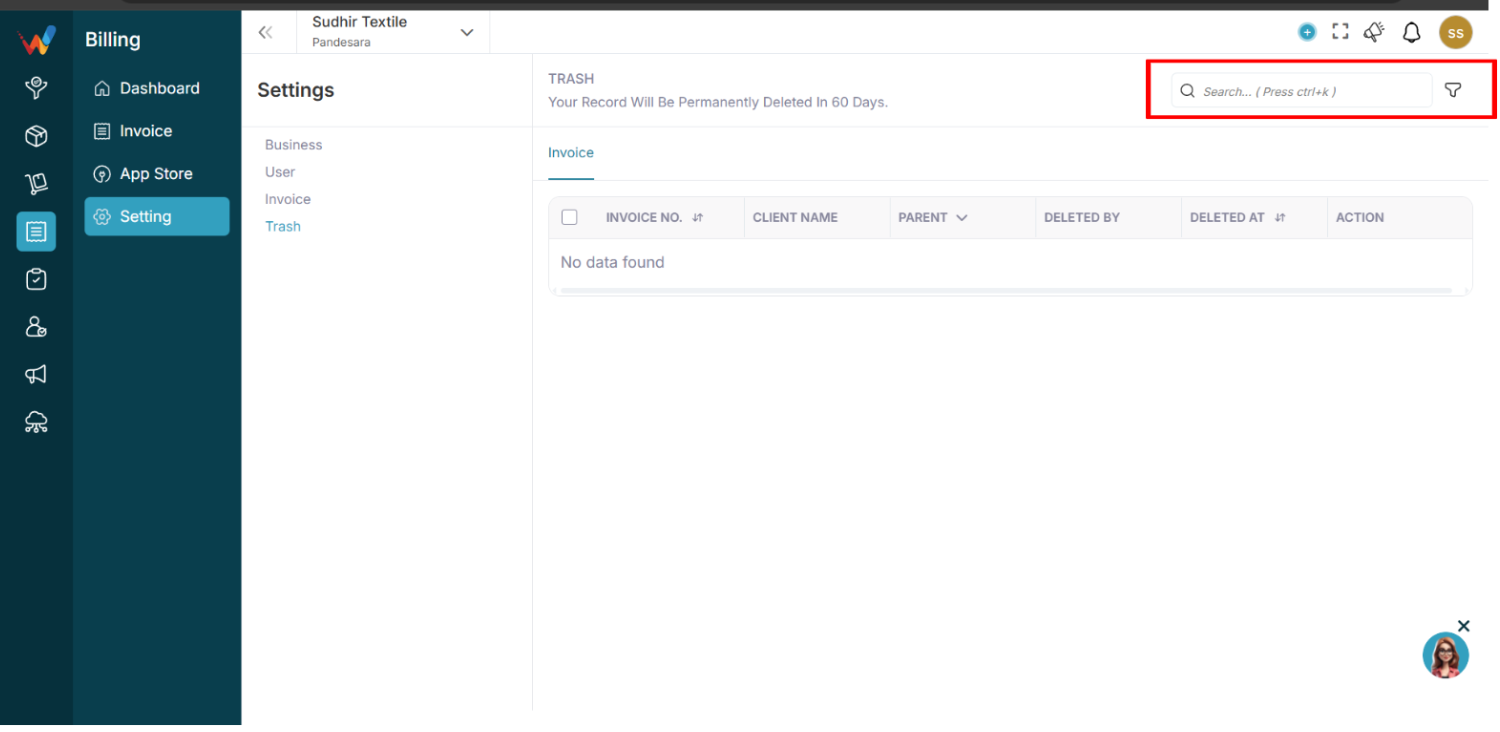
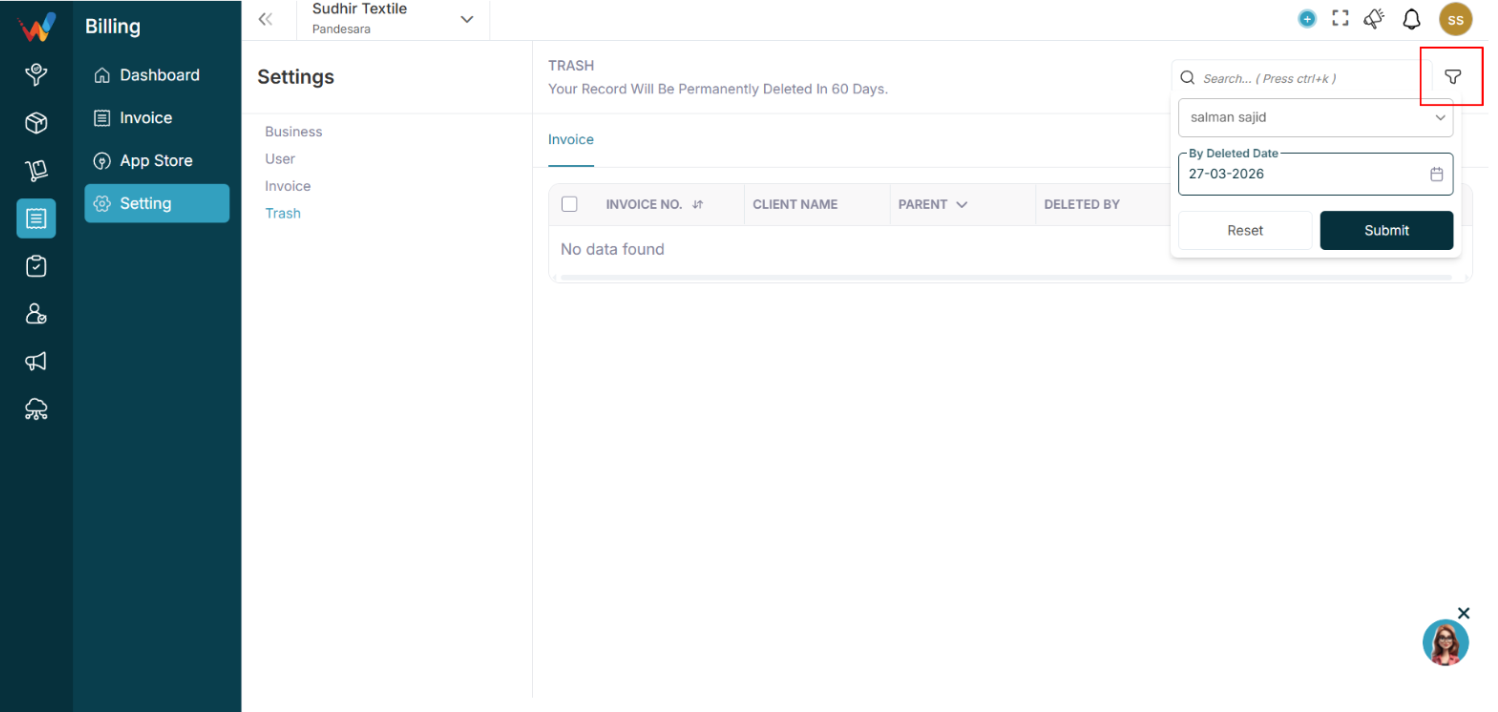
INVOICE TRASH MANAGEMENT
(Settings: Invoice → Trash)
Header Notice
“Your Record Will Be Permanently Deleted in 60 Days.”
This informs users that deleted invoices have a retention window.
Data Table Structure
The Trash table includes the following columns:
- Invoice No.
- Client Name
- Parent
- Deleted By
- Deleted At
- Action
Each deleted invoice record appears here until restored or auto-deleted.
Search and Filter

Navigation Path:
Billing Module → Setting → Trash
8.1 Search Bar
Shortcut: Ctrl + K
Search deleted invoices by:
- Invoice number
- Client name
8.2 Filter Panel

Available filters:
Filter Flow:
- Click Filter icon
- Select Deleted By (user)
- Select Deleted Date
- Click Submit
Reset clears all applied filters.
Workflow and System Logic
9.1 Invoice Deletion Flow
- User deletes invoice
- System moves invoice to Trash
- Invoice is marked as soft-deleted
- Retention timer starts (60 days)
9.2 During Trash Period
The invoice:
- Cannot be used for reporting
- Cannot generate E-Invoice or E-Way Bill
- Is not visible in the active invoice list
- Retains metadata (who deleted, when deleted)
9.3 After 60 Days
System automatically:
- Permanently deletes invoice
- Removes record from database
- Cannot be recovered
Restore Logic
If Restore option is available:
- User clicks Restore
- Invoice moves back to Invoice List
- Retention timer stops
- Invoice becomes active again
If no restore option exists, deletion is final after 60 days.
Real Business Example (Trash)
Scenario:
An accountant accidentally deletes invoice FY/25/26-101.
Instead of being permanently removed, the invoice:
- Moves to Trash
- Shows Deleted By: Accountant
- Shows Deleted Date: 15 Feb 2026
Within 60 days, Admin can:
- Review deletion
- Restore if needed
After 60 days, the invoice is permanently erased.
Best Practices (Trash)
- Restrict delete permissions to authorized users
- Regularly review Trash for accidental deletions
- Restore important invoices before the 60-day limit
- Maintain internal approval before deleting invoices
Common Mistakes (Trash)
- Assuming invoice is permanently deleted immediately
- Forgetting 60-day auto-deletion rule
- Not checking Trash after accidental deletion
- Deleting invoices before confirming E-Invoice cancellation
Compliance Consideration
For GST-compliant businesses:
- Do not delete invoices after IRN generation without cancellation
- Ensure E-Invoice or E-Way Bill is properly cancelled before deletion
- Keep audit trace for statutory review
Transportation And Sales Person
1.1 Purpose
Maintain a master list of transporters for E-Way Bill usage.
1.2 Add Transporter
Steps:
Fields:
- Transporter Name
- Transporter ID
- Contact Number
- Email
System Logic:
- Transporter appears in the E-Way Bill dropdown.
- Reduces manual entry errors.
Sales Person
2.1 Purpose
Assign sales persons to invoices for tracking and reporting.
2.2 Add Sales Person
Fields:
- Sales Person Name
- User Mapping
- Email
- Contact Number
System Logic:
- Sales person is selectable during invoice creation.
- Helps performance reporting.
- Useful for commission tracking.
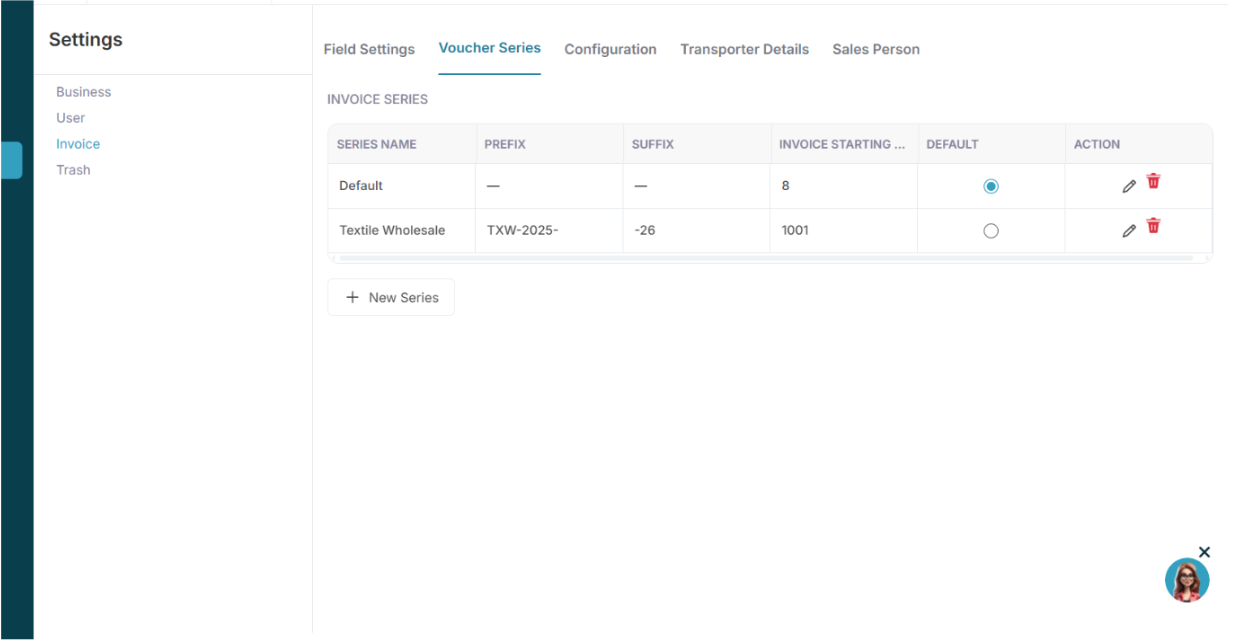
Voucher Series And Configuration
1.1 Purpose

Voucher Series controls invoice numbering logic.
Each series can define:
- Series Name
- Prefix
- Suffix
- Starting Number
- Default status
1.2 Add New Series
Steps:
Fields:
- Series Name
- Invoice No. (starting number)
- Prefix
- Suffix
- Set as Default
Example:
Series Name: FY2025-26
Prefix: FY-
Suffix: -2025-26
Starting No.: 1
System Logic:
Invoice number format becomes:
FY-1-2025-26
FY-2-2025-26
Auto-increment occurs on each new invoice.
Only one series can be default at a time.
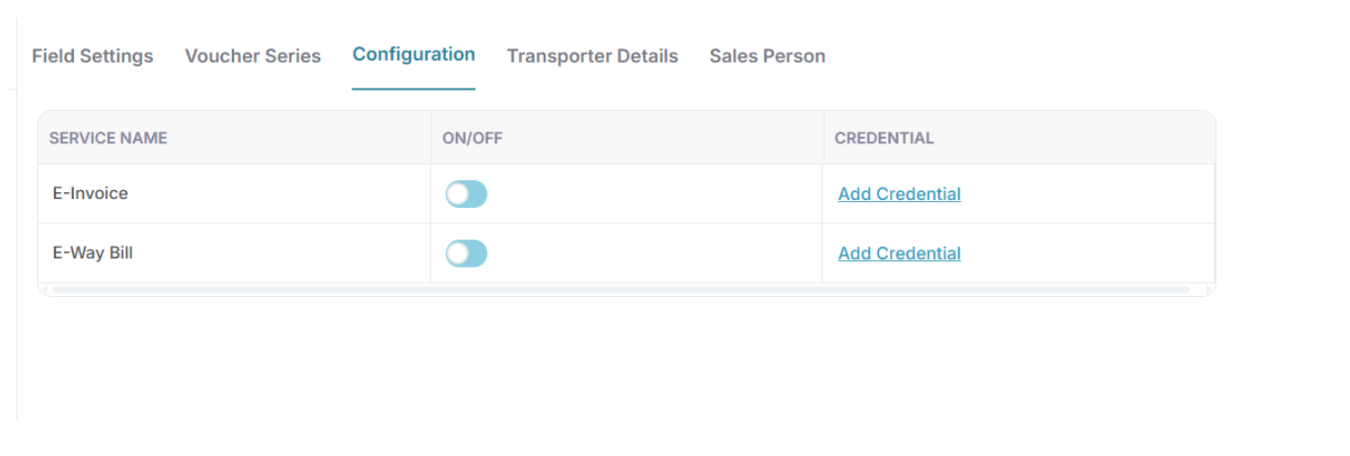
Configuration (E-Invoice and E-Way Bill Services)

References:
Create API Credentials
Attachment link provided in your content (Slack file)
2.1 Purpose
This tab enables or disables government integrations.
Services available:
Each service has:
- ON or OFF toggle
- Credential configuration
2.2 Enabling E-Invoice or E-Way Bill
Steps:
- Toggle the service ON
- Click View Credential
- Enter required details
- Click Save
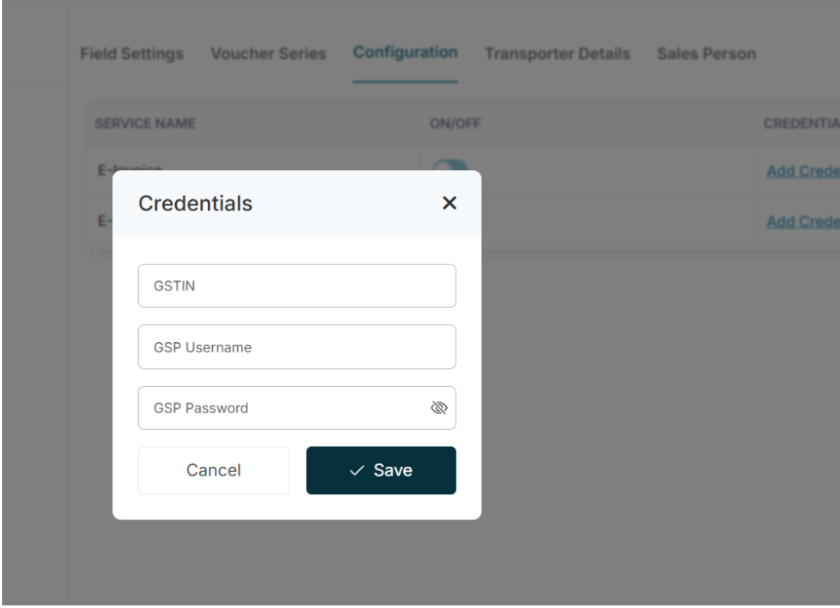
Credential Configuration

3.1 Required Fields
- GSTIN
- GSP Username
- GSP Password
These credentials are obtained from the GST E-Way Bill portal.
3.2 How to Create a GSP Account (Process Summary)
Log in to:
https://www.ewaybillgst.gov.in
Go to Registration → For GSP
- Click Add/New
- Select GST Provider: Quicko Infosoft Pvt. Ltd.
- Create Username and Password
Use these credentials inside the Wortal Billing Configuration.
3.3 System Logic
When an E-Invoice or E-Way Bill is generated:
- System validates credentials
- API call is made to the GSP provider
- Government portal validates request
- IRN or E-Way Bill number is returned
- Result is linked to the invoice
If credentials are invalid, the system returns an authentication error.
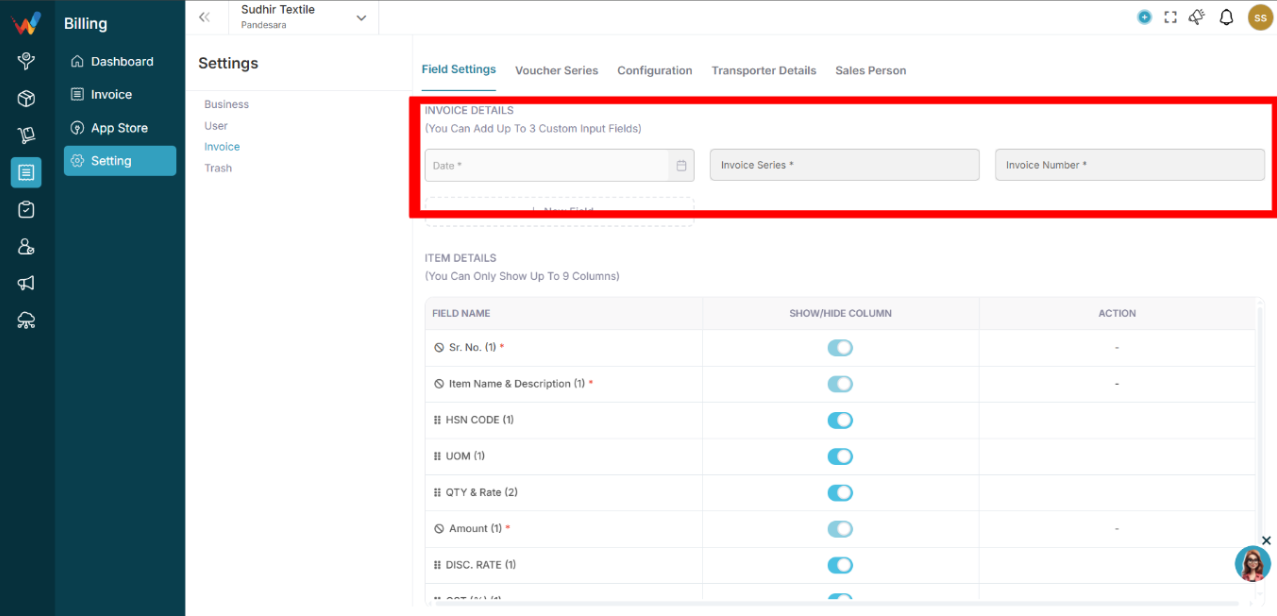
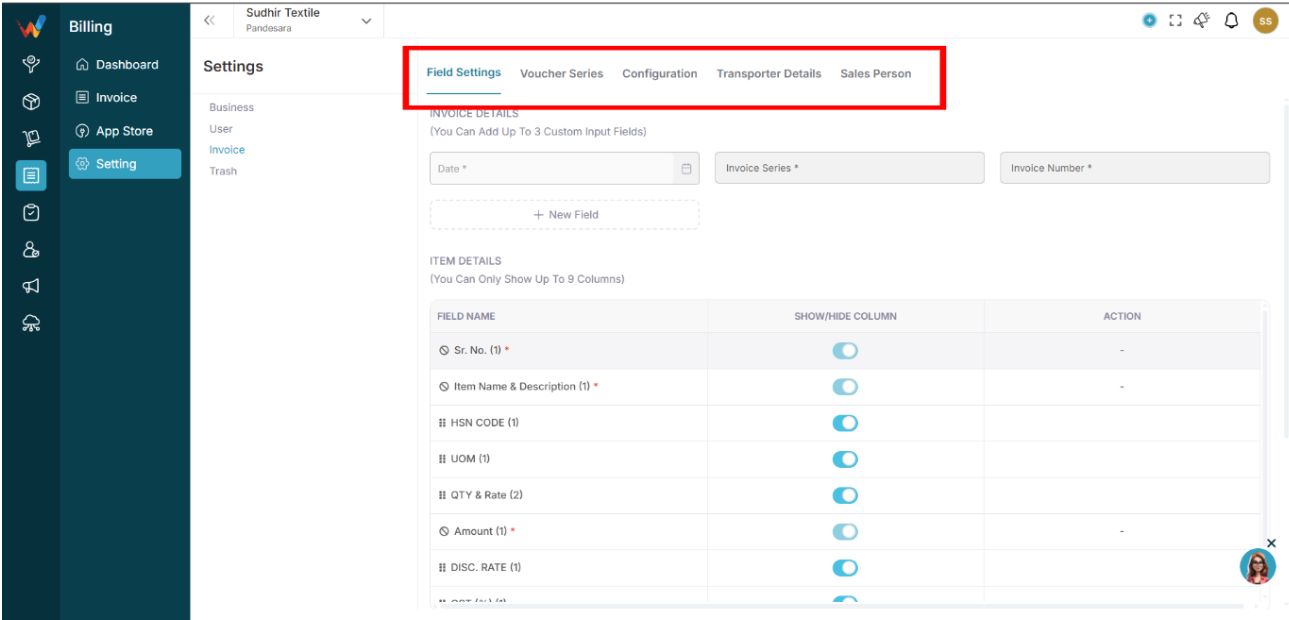
Field Settings
1.1 Purpose
Field Settings controls:
- Invoice header fields
- Custom input fields
- Item table columns
- Item adjustments
It allows system-level customization of the invoice format.
1.2 Invoice Details Section

Fields available:
- Date
- Invoice Series
- Invoice Number
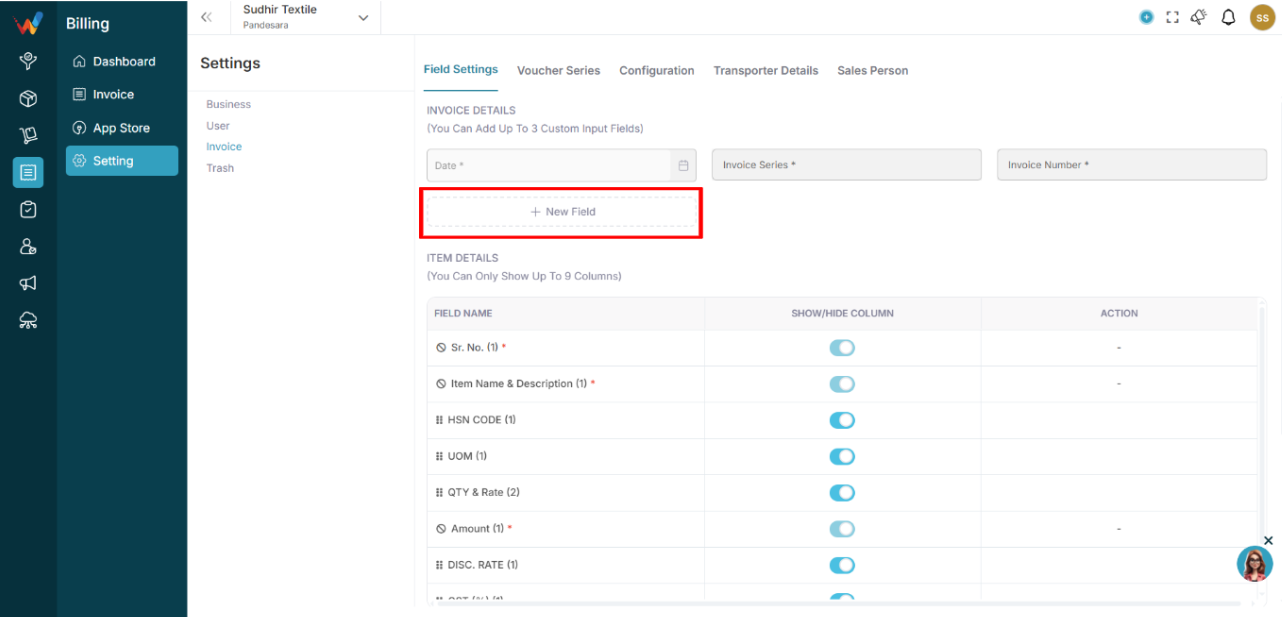
You can also:
- Add up to 3 custom input fields
- Define label
- Define field type (Text, Number, Dropdown, Date)
- Mark field as mandatory
Custom Field Creation Flow

- Click New Field
- Enter Label
- Select Field Type
- Mark as Mandatory (optional)
- Click Create
System Logic
- Custom fields appear on the Create Invoice screen.
- Mandatory fields must be filled before submission if you want to make that field mandatory.
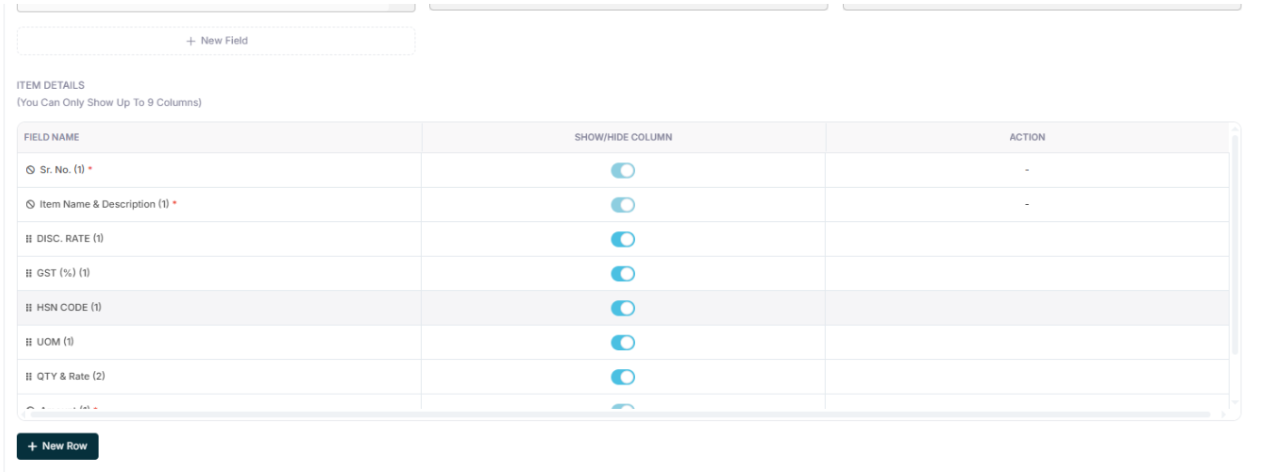
1.3 Item Details Section

You can control visible columns in the item table.
Available fields:
- Sr. No.
- Item Name and Description
- HSN Code
- UOM
- Qty and Rate
- Amount
- Discount Rate
- GST Percent
- Net Amount
Rules:
- Maximum 9 columns allowed.
- Toggle ON or OFF to show or hide columns.
- The system recalculates automatically based on visible tax structure.
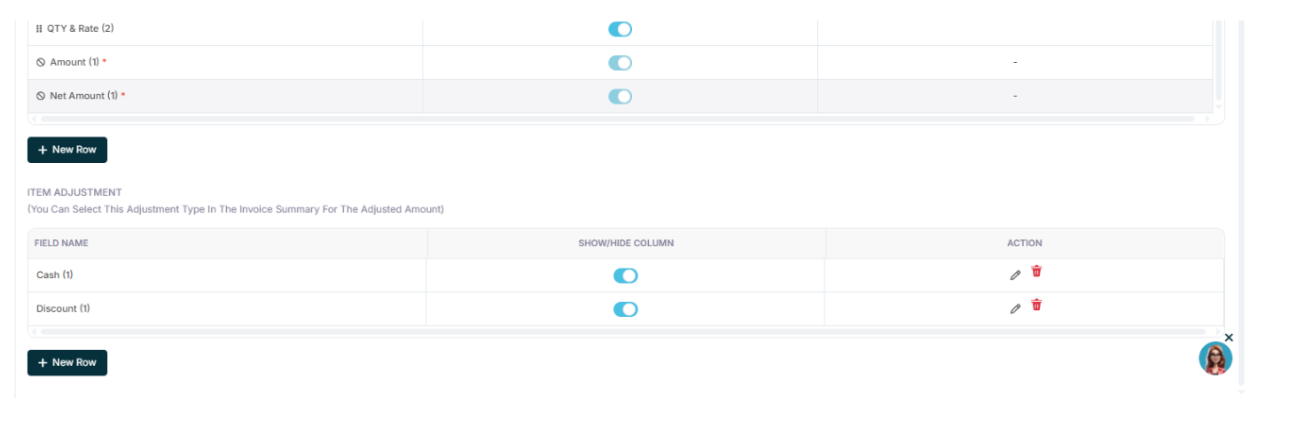
1.4 Item Adjustment Section

Allows configuration of adjustment types such as:
- Cash
- Discount
- Additional Charges
Each adjustment can be:
- Shown or hidden
- Edited
- Deleted
Adjustments appear in the invoice summary calculation area.
Configuration Tabs Overview
Navigation Path:
Billing Module → Setting → Invoice

The Invoice Settings module contains the following tabs:
- Field Settings
- Voucher Series
- Configuration
- Transporter Details
- Sales Person