Inward details And Actions
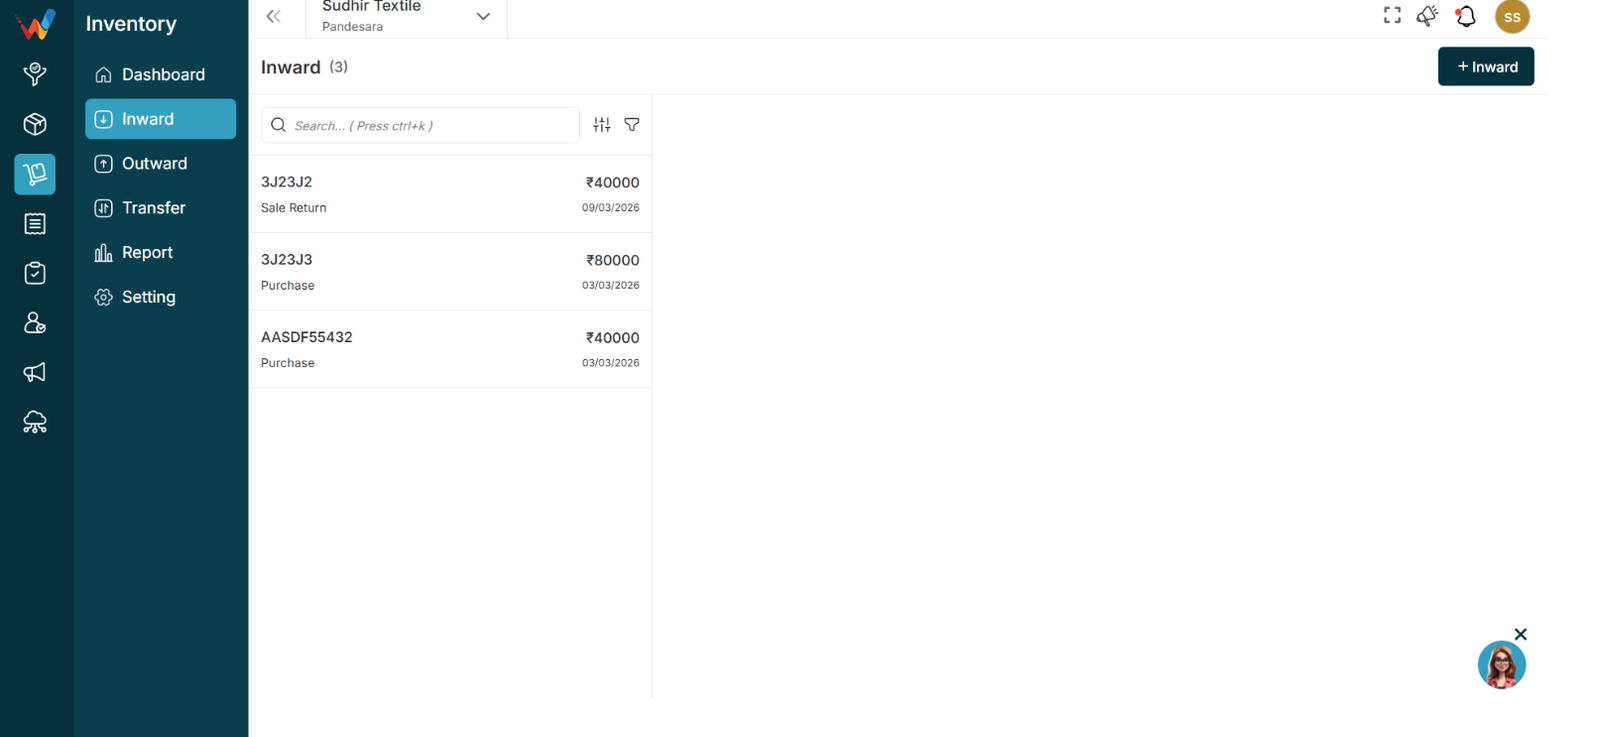
Inward – List View

Navigation Path:
Billing Module → Inward
1.1 Purpose of Inward List View
Displays all inward transactions. Each entry includes:
- Invoice Number
- Transaction Type
- Amount
- Date
Purpose:
Provides a complete record of stock entries.
1.2 Search Bar
Used to quickly find inward transactions.

Shortcut: Ctrl + K
How to Use
- Enter the invoice number or reference.
1.3 Sort Function
Used to arrange inward records.


Available Options
- Invoice Date
- Transfer Date
- Updated Date
- Invoice Number
- Invoice Type
- Amount
Sort Order
Purpose:
Helps organize and analyze records efficiently.
1.4 Filter Panel
It helps you find exactly what you’re looking for by filtering out unnecessary results.

Available Filters
- Item Name
- Amount
- Transfer Type
- Invoice Date
- Transfer Date
How to Use
- Open the Filter panel.
- Enter filter details.
- Click Submit.
- Click Reset to clear filters.
Inward Details View
This screen displays complete information for the selected inward transaction. It helps you review stock entries and verify transaction details.
When you click on an invoice, all related details will be displayed.

2.1 Inward Details
This section shows the basic transaction information.
Fields Available
- Invoice No: Unique invoice reference
- Group Type: Type of transaction (for example, Purchase)
- Date of Inward: Date when stock was added
- Date of Invoice: Invoice creation date
Purpose:
Helps identify and validate the transaction.
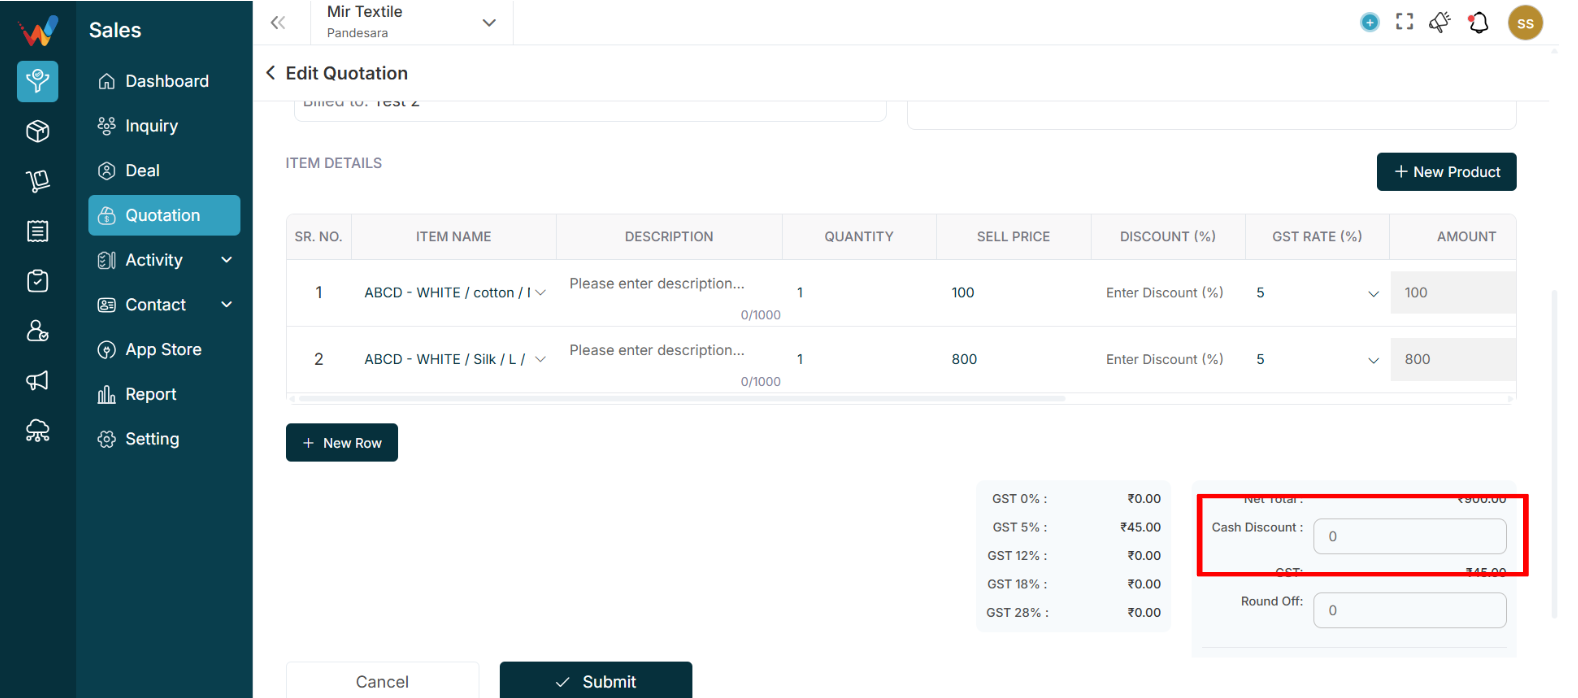
2.2 Item Details
This section shows all items included in the inward entry.
Columns Available
- Sr. No.: Item sequence number
- Item Name: Name of the product
- Warehouse Name: Warehouse where stock was added
- UOM: Unit of measurement
- Qty: Quantity received
- Rate: Item price per unit
- Amount: Total value of the item
Purpose:
Provides stock and financial breakdown.
2.3 Remarks

This section displays additional notes related to the transaction.
Purpose:
Used to store comments or special details.
2.4 Edit Button
Used to update the inward transaction.
Navigation Path:
Inventory Module → Inward → Click on + Edit

Common Use Cases
- Correct quantity
- Update rate
- Modify invoice details
2.5 Delete Option

Used to remove the inward transaction.
Important:
Deleting this entry will update stock levels.
Recommended Practice:
Allow deletion only to authorized users.
Introduction
The Inward module is used to record stock additions.
1.1 Common Use Cases
- Purchases
- Stock adjustments
- Returned items
Inventory Details
Inventory Dashboard

Navigation Path:
Inventory Module → Dashboard
1.1 Purpose of Dashboard
The Dashboard provides a quick overview of your inventory status. It helps you monitor stock levels and identify issues early.
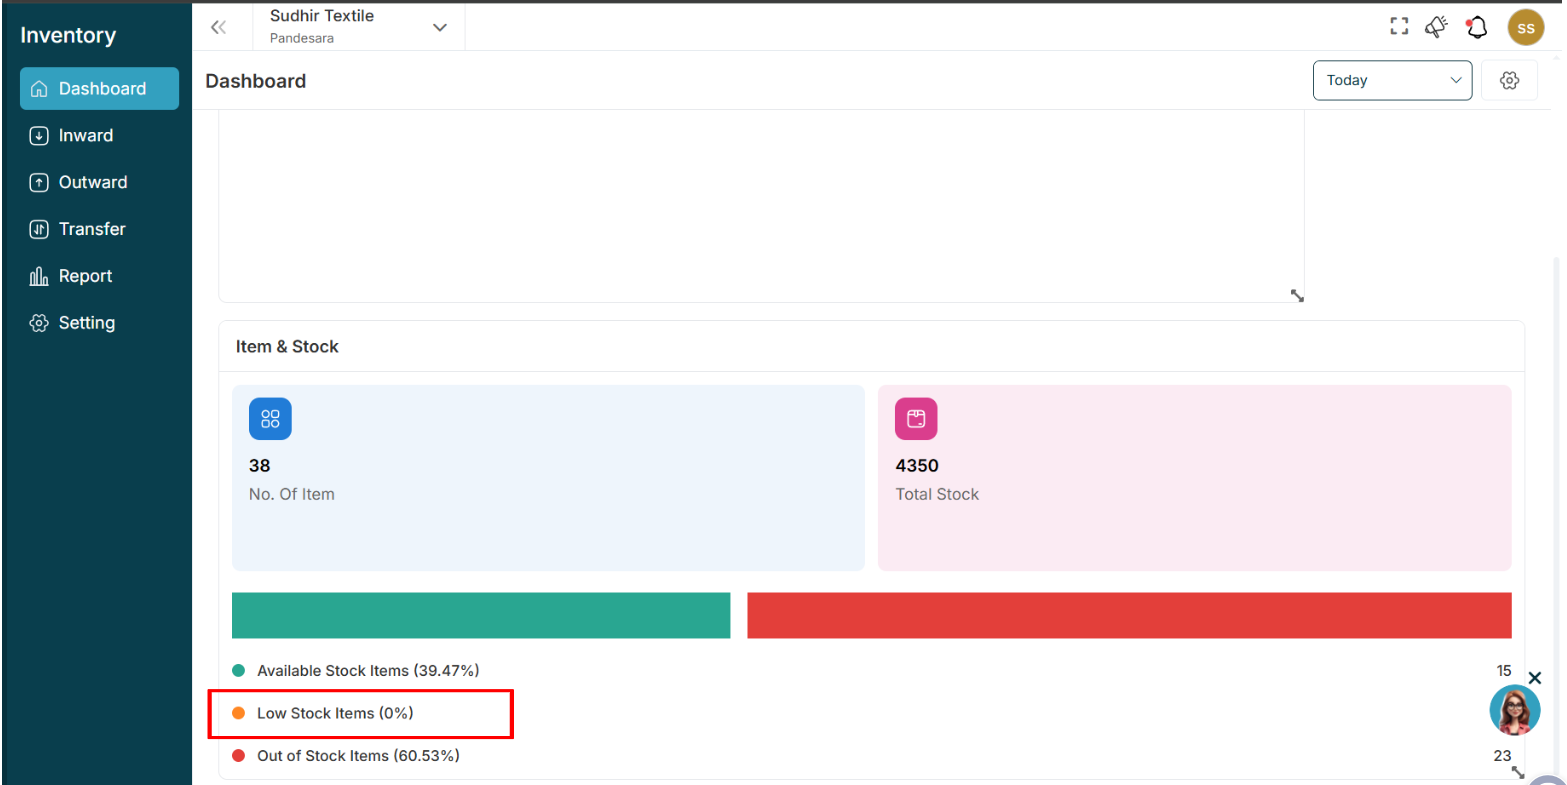
1.2 Low Stock Item

This section displays items that are nearing their minimum stock level.
Purpose
Helps you take action before stock runs out.
How to Use
- Review the listed items.
- Add stock if required using an Inward entry.
1.3 Item and Stock
This section displays key inventory numbers:
- Number of Items: Total number of products
- Total Stock: Total quantity across all items
Purpose
Provides instant visibility into your inventory size.
1.4 Stock Status
This section shows stock distribution:
- Available Stock
- Low Stock
- Out of Stock
Purpose
Helps you quickly understand inventory health.
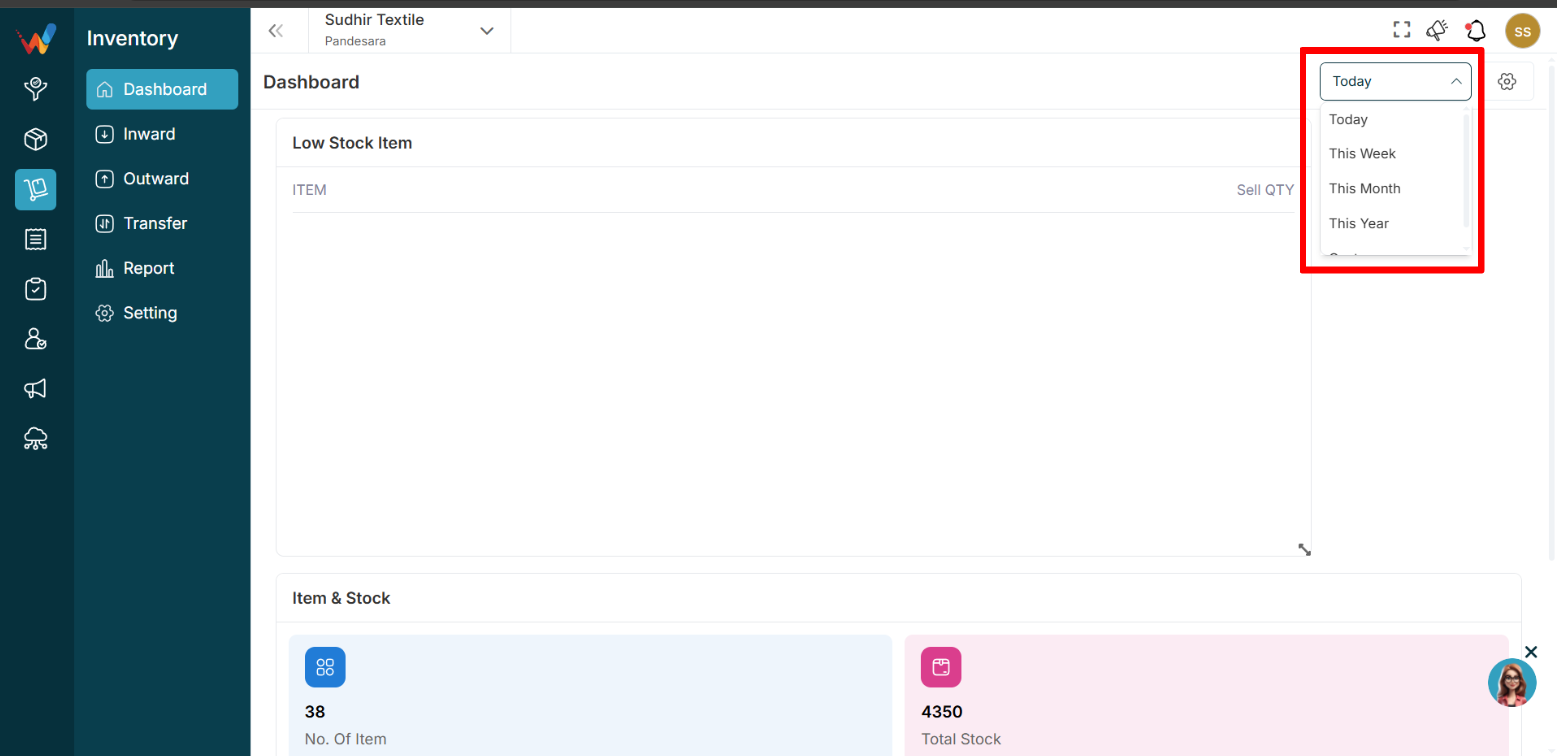
1.5 Date Filter (Top Right)
Allows you to view dashboard data for different time periods.

Options Available
- Today
- This Week
- Month
- This Year
- Custom Range
How to Use
- Click the dropdown.
- Select the desired time period.
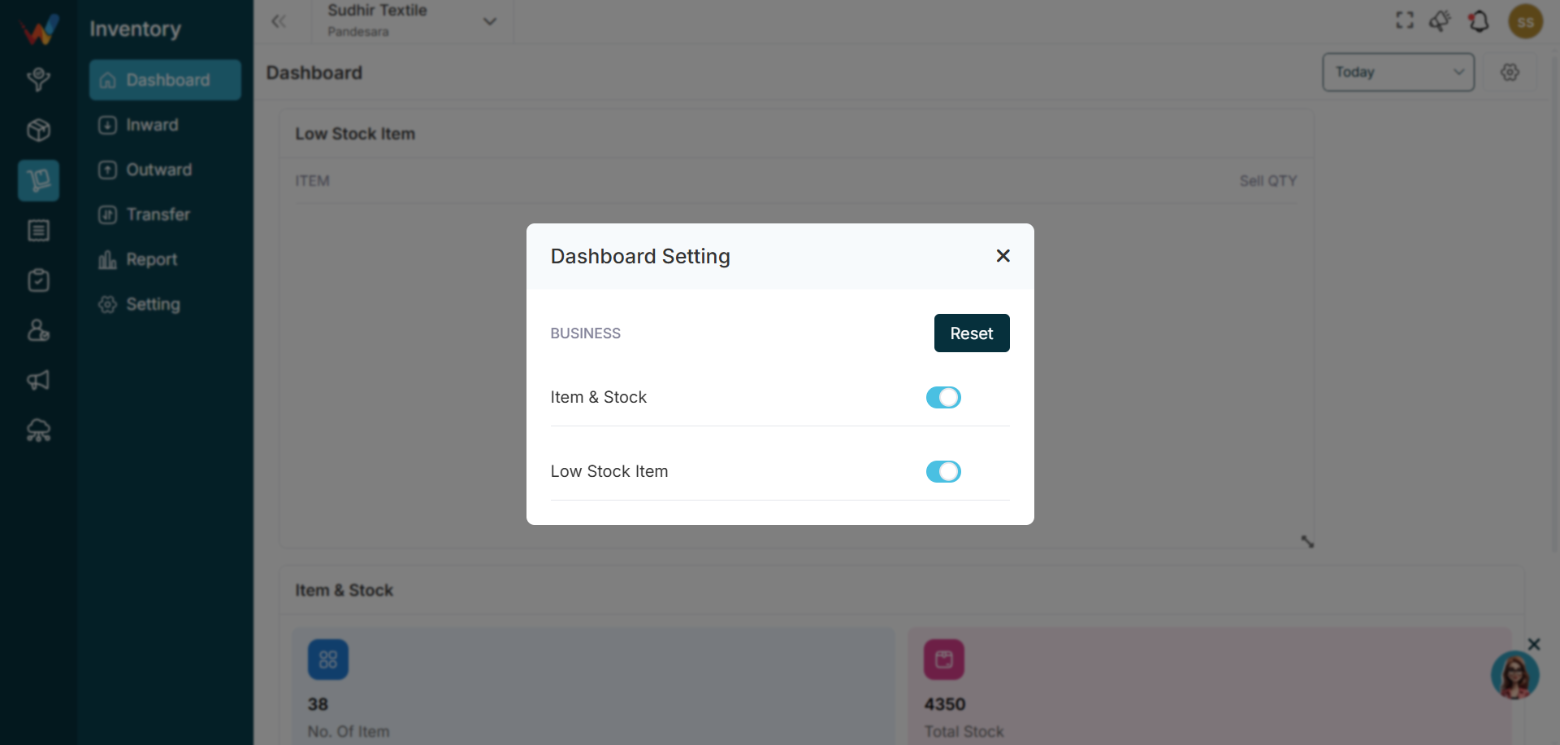
1.6 Dashboard Settings
Used to control which widgets appear on the Dashboard.

Available Controls
- Item and Stock
- Low Stock Item
- Reset
Purpose
Allows users to personalize the Dashboard view.
How to Use
- Toggle On to show a widget.
- Toggle Off to hide a widget.
- Click Reset to restore the default layout.
Introduction
1.1 Introduction of Inventory Module
The Inventory Module is used to manage and track stock movement across warehouses, branches, and production units within Wortal CRM. It provides real-time visibility of item quantities, stock availability, inward and outward movements, and transfers.
This module ensures that product availability and stock accuracy are maintained at all times.
Trash Management & Security
Why Trash Is Important in Textile Business
Textile sales teams often:
- Delete wrong leads accidentally
- Remove duplicate buyers
- Delete quotations mistakenly
Without Trash:
- Permanent data loss
- Reporting mismatch
- Revenue tracking issues
With Trash:
- Safe recovery
- Audit tracking
- Owner control
Example Scenario
Salesperson deletes a lead by mistake.
Owner checks Trash → restores lead.
Follow-up continues without data loss.
Recommended Practice
- Only Admin should permanently delete
- Sales team should restore instead of re-creating
- Review Trash weekly
- Monitor frequent deletions
Common Mistakes
- Permanently deleting without checking
- Not restoring before 60 days
- Ignoring branch filter
- Allowing delete permission to everyone
How Trash Impacts Reports
Deleted records:
- Do not appear in active reports
- Appear in Trash until 60 days
- After permanent deletion → fully removed
Security Recommendation
For enterprise textile clients:
- Restrict Delete permission
- Enable only Restore for managers
- Permanent delete only by Admin
Complete Guide
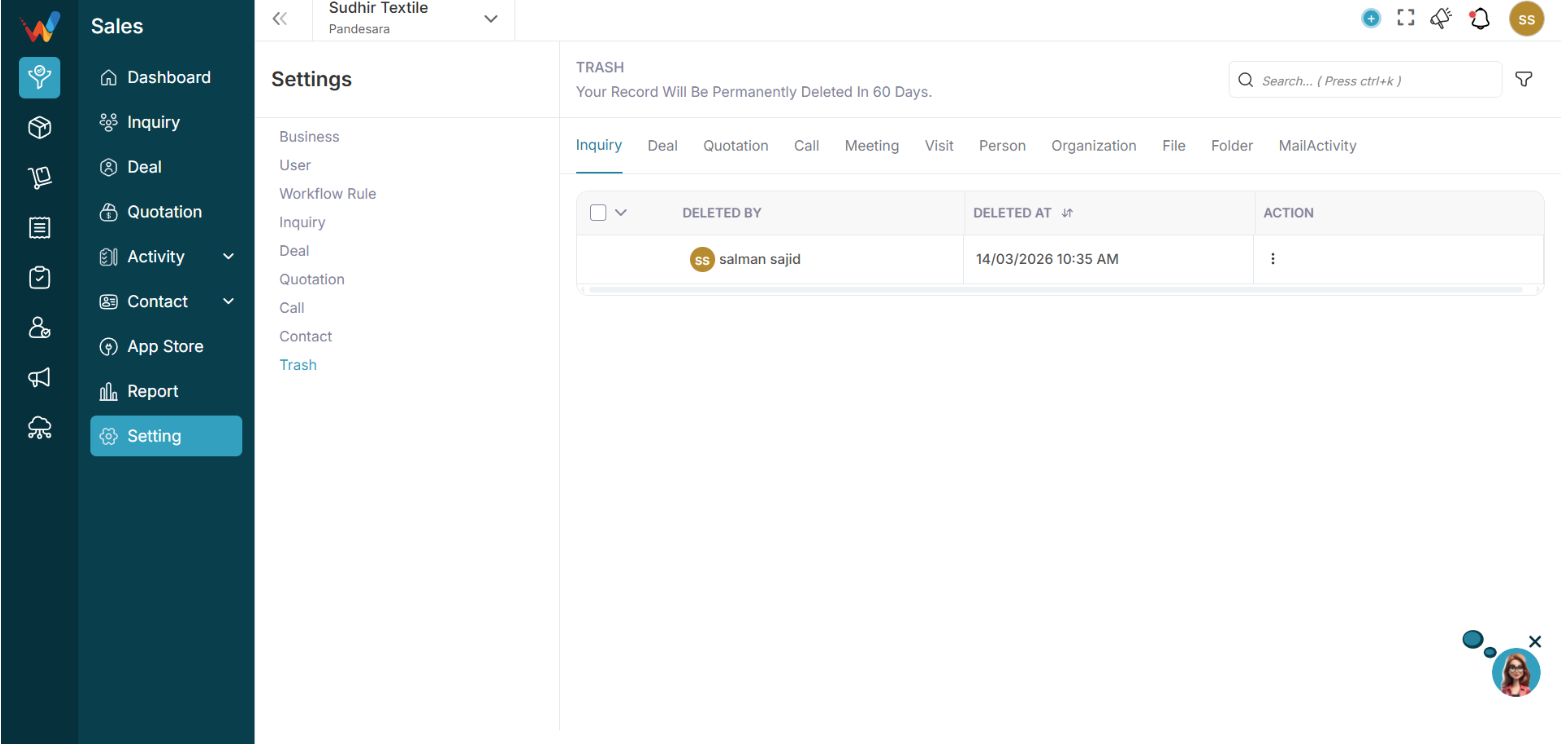
Trash – Navigation

Navigation Path:
Sales Module → Settings → Trash
You will see this message:
Your record will be permanently deleted in 60 days.
This means:
- Deleted records are not removed immediately
- They stay in Trash for 60 days before permanent deletion
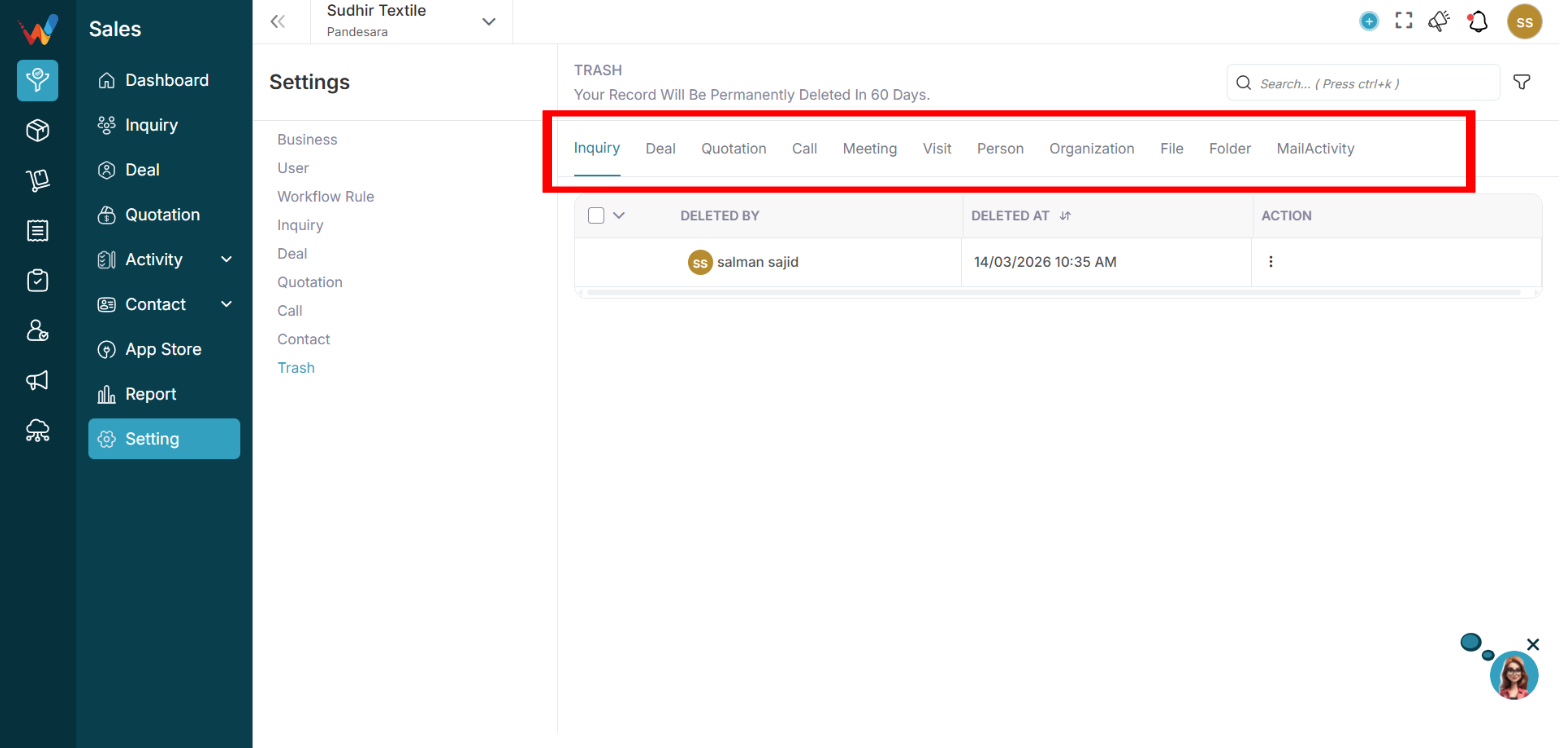
Available Trash Tabs (Deleted Records by Module)
Inside Trash, you can view deleted records for:

- Lead
- Deal
- Quotation
- Call
- Meeting
- Visit
- Person
- Organization
- File
- Folder
- Mail Activity
Each tab shows deleted records of that module.
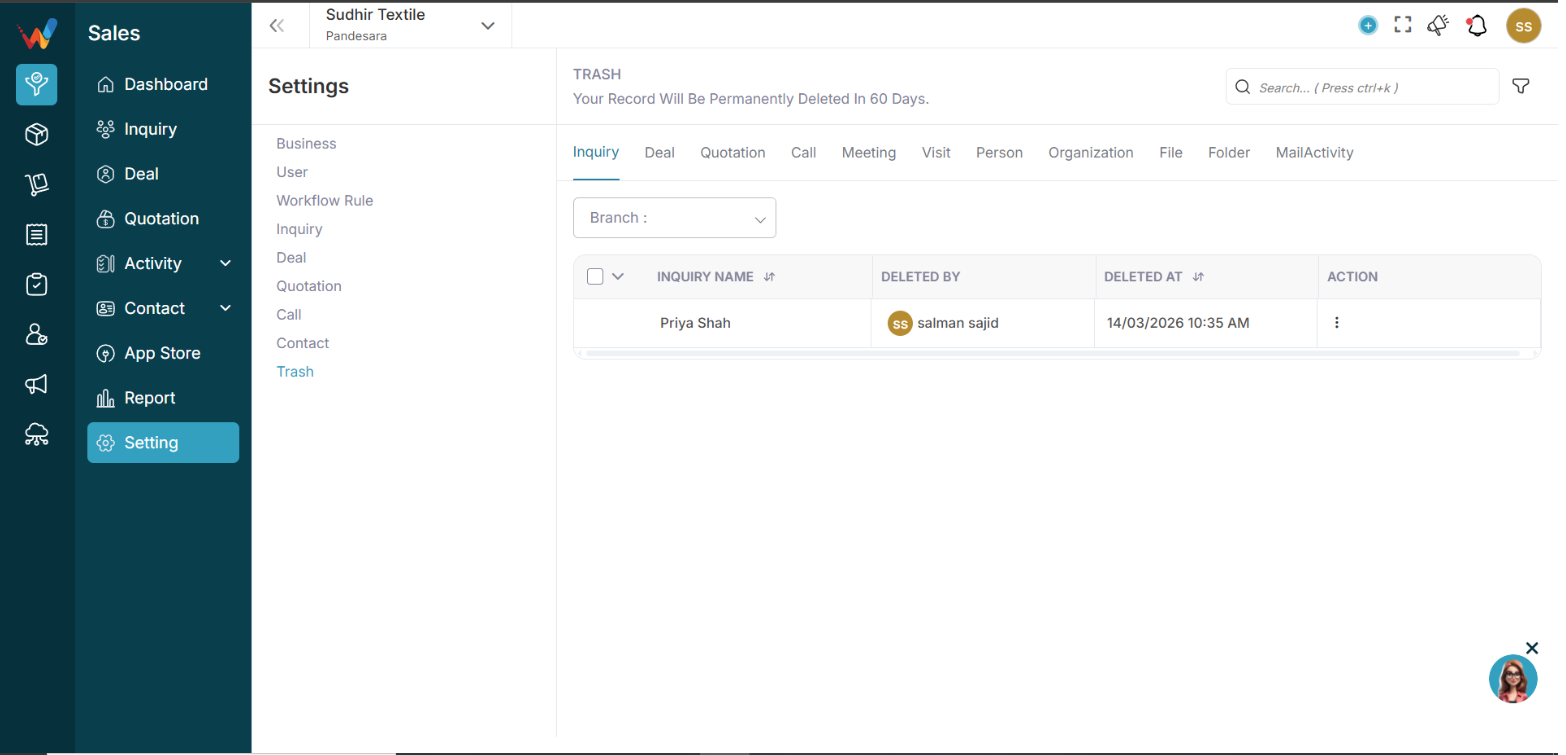
What Information Is Visible
Example: Lead tab columns

- Lead Name — Name of deleted lead
- Deleted By — User who deleted
- Deleted At — Date and time
- Action — Restore or Delete
This ensures full audit transparency.
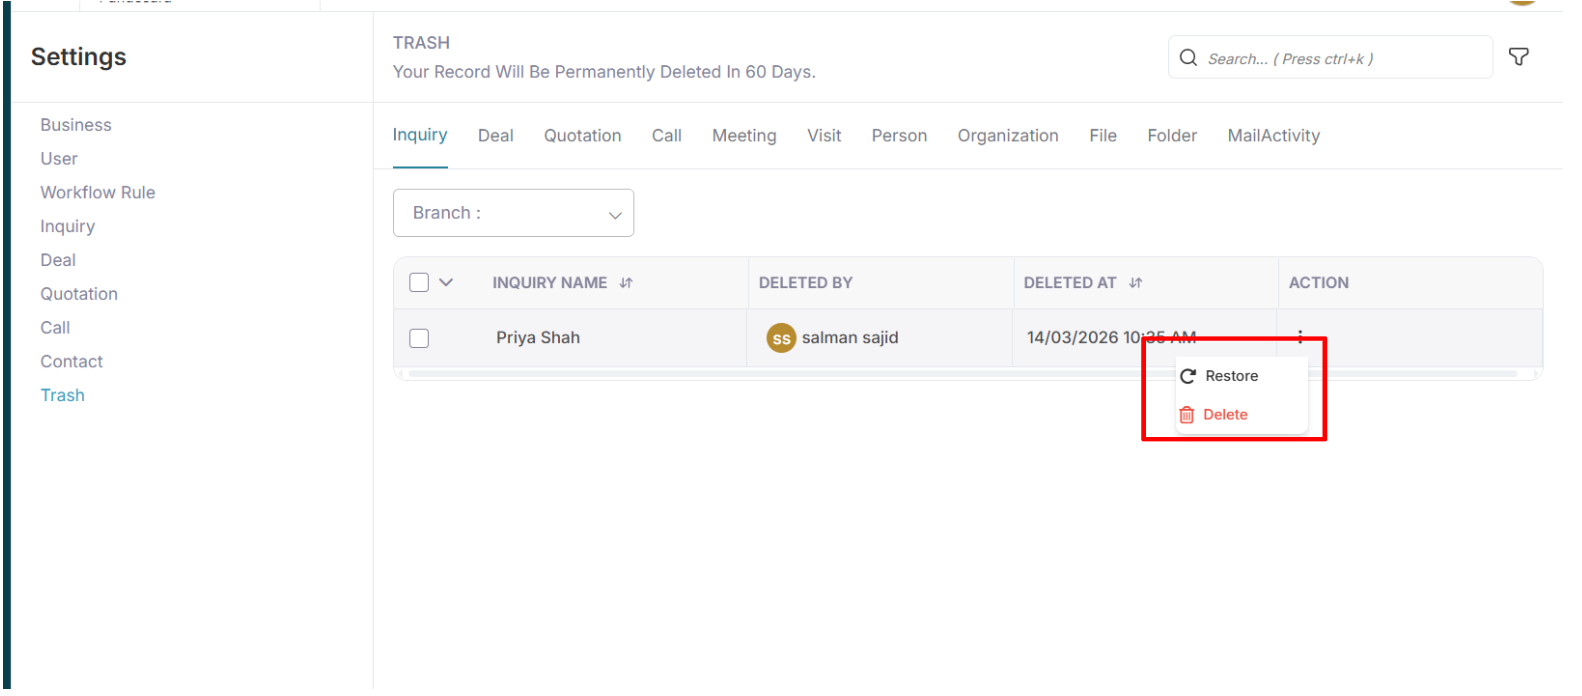
Restore Record

4.1 To Restore
Click:
3 dots
Select:
Restore
The record will:
- Move back to the original module
- Retain original data
- Retain activity history
Permanent Delete
If you select:
🗑 Delete
The record will be:
- Permanently removed
- Not recoverable
- Fully erased from the system
Otherwise, the system auto-deletes the record after 60 days.
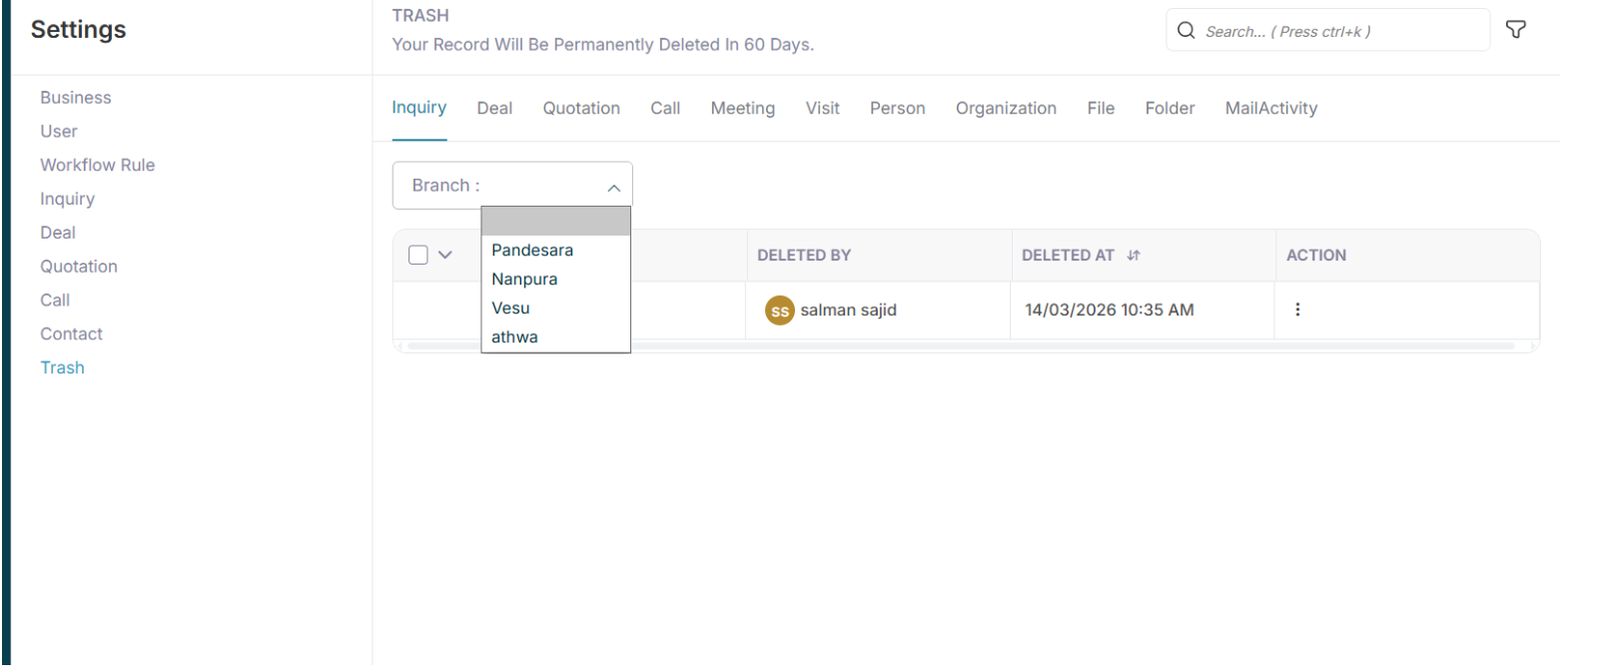
Branch Filter
You can filter trash records by branch.

Branch dropdown shows:
This helps in:
- Branch-wise data control
- Multi-location management
Introduction
Introduction to Trash Management
1.1 Trash Management
The Trash module ensures:
- Safe deletion
- Data recovery option
- Audit visibility
- 60-day safety buffer
This directly affects:
- Protection from accidental deletions
- Owner level control on data removal
- Clean and accurate audit trail
- Reporting reliability
Contacts Structure & Best Practices
Why Contact Customization is Important
Without structured contact fields:
- Random data entry
- No buyer segmentation
- No credit tracking
- Weak reporting
With proper setup:
- Categorize buyers
- Track high-value clients
- Filter by business type
- Target marketing campaigns
Common Mistakes
- Too many unnecessary fields
- Not marking important fields mandatory
- Mixing person and organization data
- No buyer categorization
Final Checklist
- Person fields defined
- Organization fields defined
- Mandatory fields set
- Sales team trained
- Reporting filters tested
Complete Guide
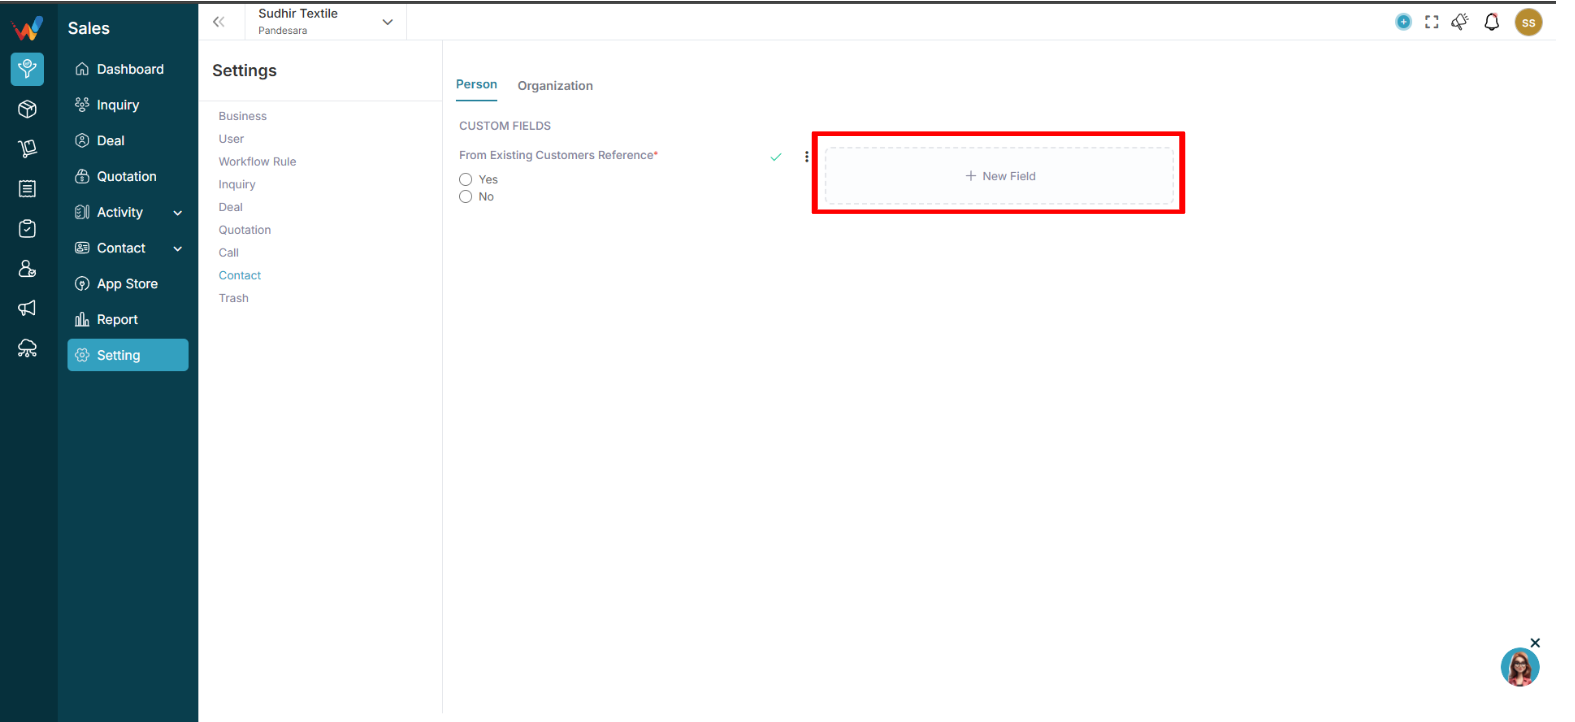
Contact Settings – Navigation

Navigation Path:
Sales Module → Settings → Contact
You will see two tabs:
Each tab allows custom field creation.
Person (Individual Contact)
2.1 When to Use Person
Used when:
- Dealing with an individual buyer
- Contact person inside a company
- Sales representative
- Distributor contact
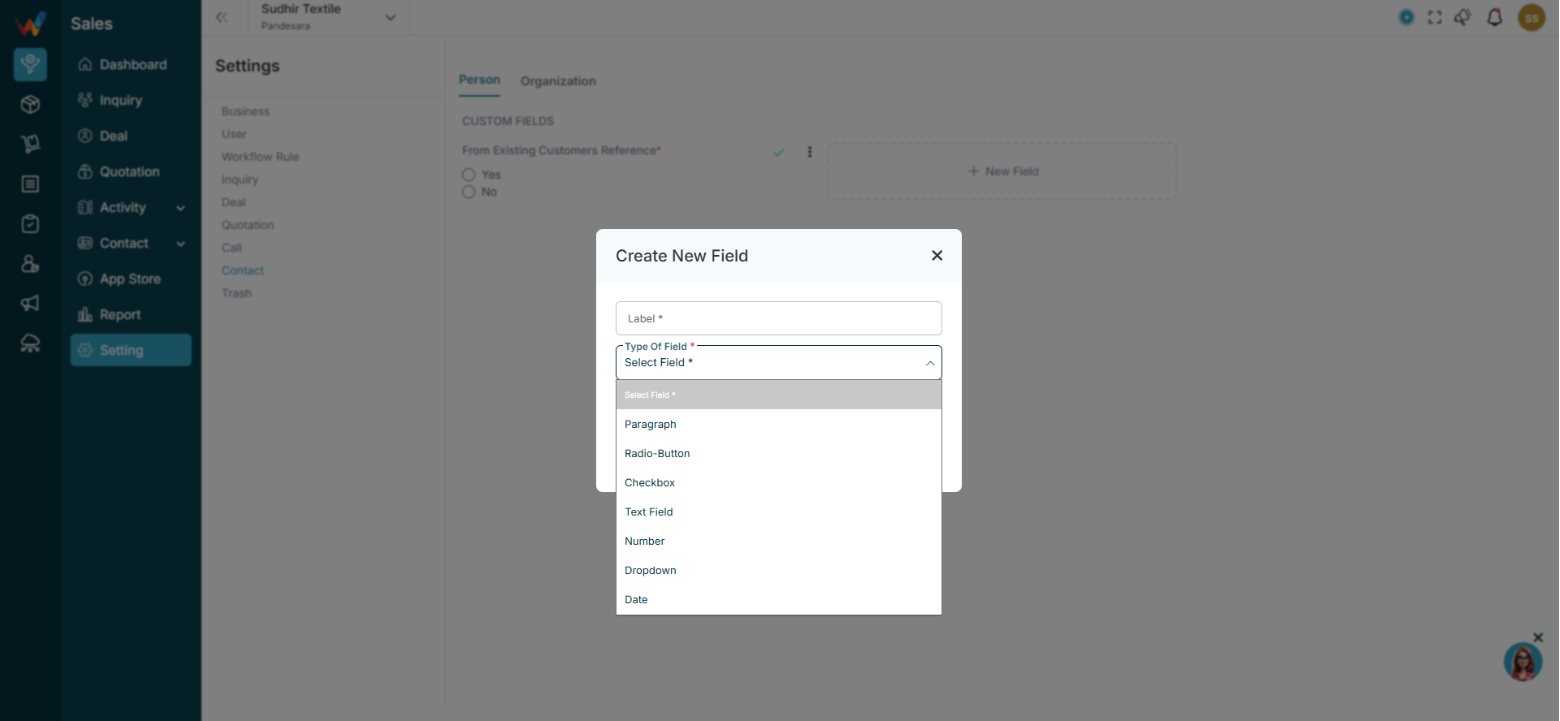
2.2 Add Custom Field (Person)
Click:
➕ New Field

Enter:
- Field Label
- Field Type
- Mandatory (Optional)
2.3 Available Field Types

- Text Field
- Number
- Dropdown
- Checkbox
- Radio Button
- Date
- Paragraph
2.4 Textile Person Field Examples
- Department — Dropdown
- Buyer Category — Dropdown
- Purchase Authority — Radio
- Preferred Language — Dropdown
- Birthday — Date
- WhatsApp Active — Checkbox
2.5 Example Use Case
Buyer Name: Rajesh Shah
Company: Saras Textiles
Role: Purchase Manager
Preferred Communication: WhatsApp
This data helps the sales team personalize follow-up.
Organization (Company Level Contact)
3.1 When to Use Organization

Used when:
- Storing business or company information
- Textile traders
- Wholesalers
- Export buyers
- Retail chains
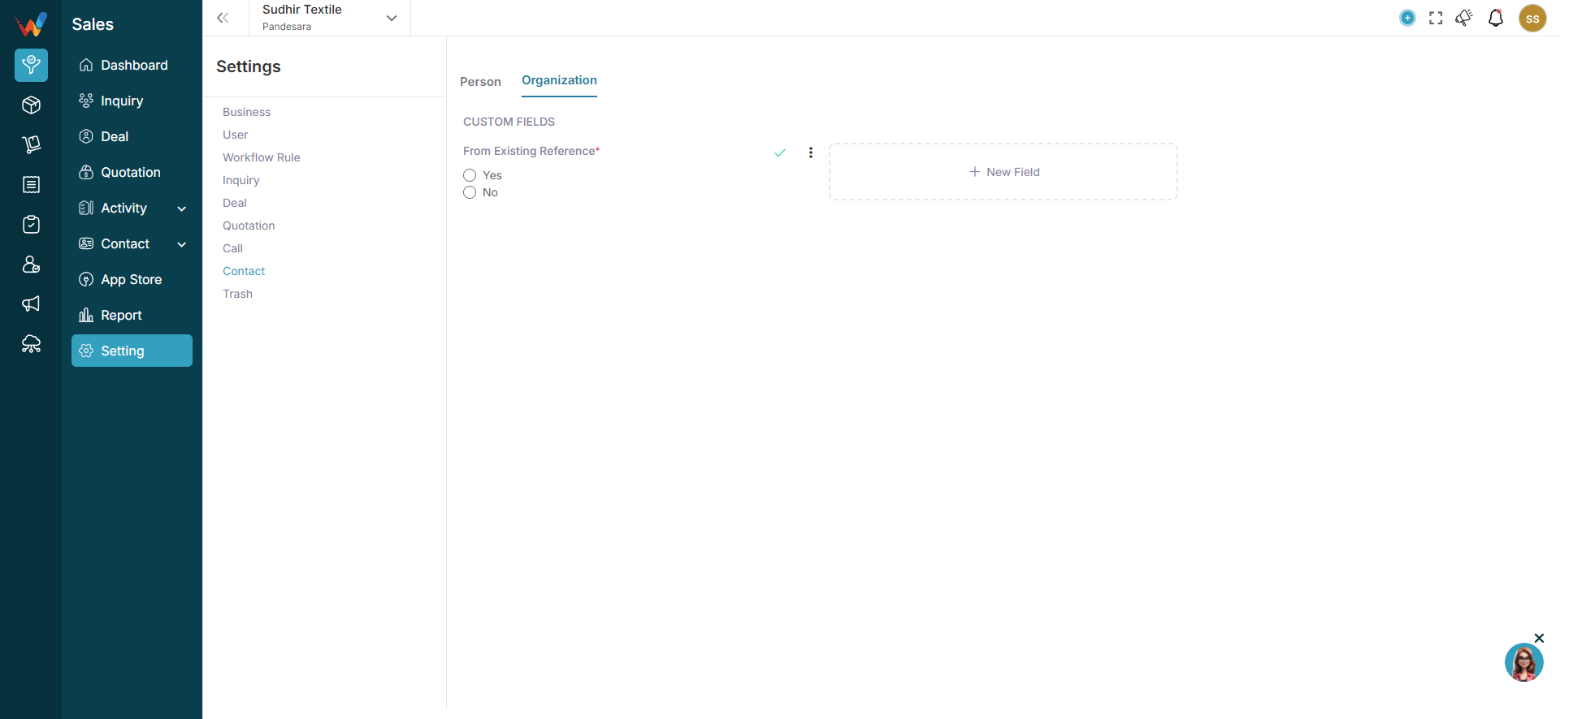
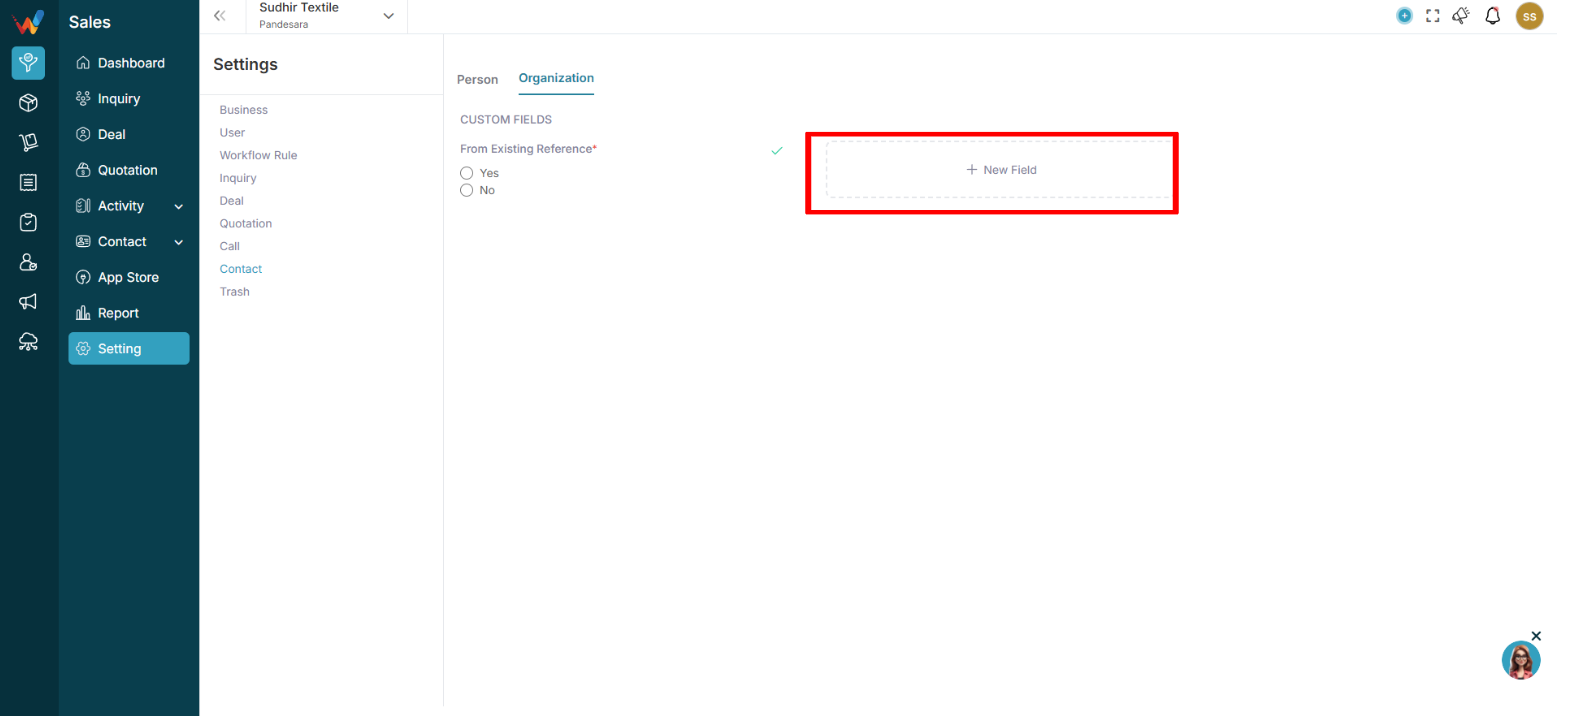
3.2 Add Custom Field (Organization)
Click:
➕ New Field

3.3 Textile Organization Field Examples
- Business Type — Dropdown
- Annual Turnover — Number
- Primary Product Category — Dropdown
- Credit Limit — Number
- Payment Cycle — Dropdown
- GST Category — Dropdown
- Territory — Dropdown
3.4 Example Organization Record
Company Name: Saras Fabrics
Business Type: Wholesaler
Primary Product: Cotton Dress Material
Credit Limit: ₹10,00,000
Payment Cycle: 30 Days
This helps in:
- Sales qualification
- Risk assessment
- Target segmentation
Introduction
1.1 Contact Settings (Person & Organization)
This section allows you to:
- Customize contact data fields
- Collect textile-specific buyer information
- Separate Individual vs Company details
- Improve CRM data quality
This directly affects:
- Buyer segmentation
- Credit and payment tracking
- Sales follow-up personalization
- Reporting accuracy