System Logic
How System Works (Logic Flow)
1.1 Part 5: Logic Flow
When a new lead is created:
System checks Branch Assignment Rules
If condition matches → Assign Branch
If no rule matches → Assign to HQ
After branch assigned → User Assignment Rule runs
So flow is:
Lead Created
→ Branch Assigned
→ User Assigned
Why Branch Assignment Is Important
2.1 Without Branch Routing
- All leads go to HQ
- Manual transfer needed
- Delay in response
- Confusion between branches
2.2 With Automation
- Faster follow-up
- Clear branch responsibility
- No internal conflict
- Clean reporting
Important Note
3.1 Difference Between Branch Assignment and User Assignment
Branch Assignment Rule controls:
Where the lead lives
User Assignment Rule controls:
Who handles the lead
Both work together.
Common Mistakes (Branch Assignment)
- Not defining default logic
- Overlapping city conditions
- Not testing rules
- Forgetting to save
Final Checklist (Branch Assignment Rule)
- Branch selected
- Source condition defined
- Location rule added
- Rule saved
- Test lead created
Advanced Business Strategy
6.1 Combined Automation Strategy
You can combine:
- Branch Assignment
- User Assignment
- Round Robin
To create a fully automated sales routing system.
Example:
Lead from Jaipur
→ Jaipur Branch
→ Round Robin between 3 Jaipur sales executives
Fully automated.
Impact & Branch Assignment
Business Impact (User Assignment)
1.1 What This Feature Directly Improves
This feature directly improves:
- Lead response time
- Sales accountability
- Branch performance
- Owner control
Branch Assignment Rule
2.1 What Branch Assignment Rule Controls
This controls:
- Which branch receives the lead
- Based on source or location
- Before user assignment happens
This works before User Assignment Rules.
Branch Assignment Rule – Complete Guide
3.1 Navigation

Go to:
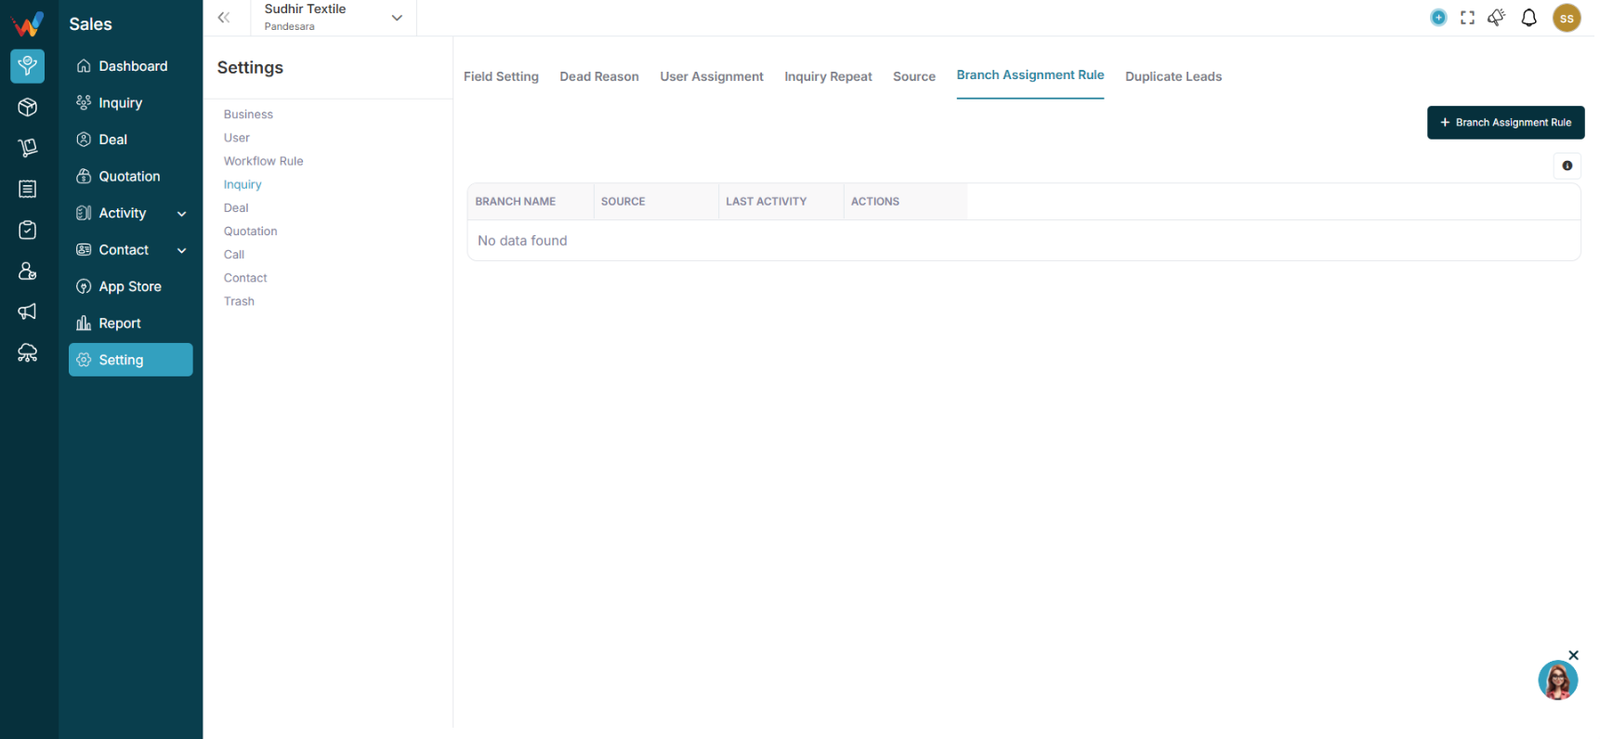
Settings → Lead Settings → Branch Assignment Rule
You will see:
- Branch Name
- Source
- Last Activity
- Actions
- Branch Assignment Rule button
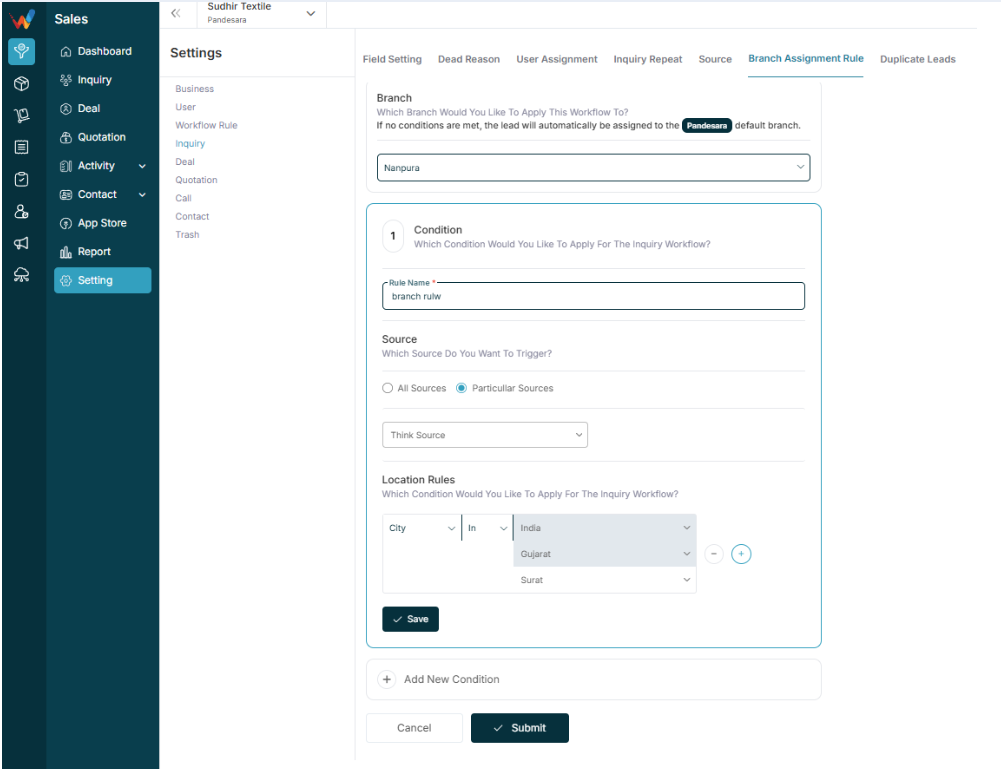
3.2 Part 1: What Is Branch Assignment Rule?
Branch Assignment Rule automatically assigns a lead to a specific branch based on:
- Source
- Location (Country / State / City)
If no rule matches:
Lead goes to HQ (Default Branch).
3.3 Part 2: Create New Branch Assignment Rule
Click:
Branch Assignment Rule
3.3.1 Step 1: Select Branch

Choose which branch should receive leads when condition matches.
Example:
3.3.2 Step 2: Select Source Trigger
You can choose:
- All Sources
or - Particular Sources
If selecting Particular Sources:
Choose from the dropdown list.
Example:
- Hyderabad Expo
- Google Form
- Webinar
- wp-ads-demo
- Webhook
3.3.3 Step 3: Add Location Rules
You can define conditions using:
Country
State
City
Each rule has:
Field → Operator → Value
You can:
- Add multiple conditions
- Use AND logic
- Add additional condition blocks
Example Scenarios for Business
4.1 Case 1: City-Based Routing
City = Surat
→ Assign to HQ Branch
City = Ahmedabad
→ Assign to Ahmedabad Branch
City = Jaipur
→ Assign to Jaipur Branch
4.2 Case 2: State-Based Routing
State = Gujarat
→ Assign to Gujarat HQ
State = Rajasthan
→ Assign to Jaipur Branch
4.3 Case 3: Country-Based Routing (Export Business)
Country = UAE
→ Assign to International Sales Branch
Country = India
→ Assign to Domestic Branch
4.4 Case 4: Source + Location Combined
Source = Hyderabad expo
AND
City = Hyderabad
→ Assign to Hyderabad Branch
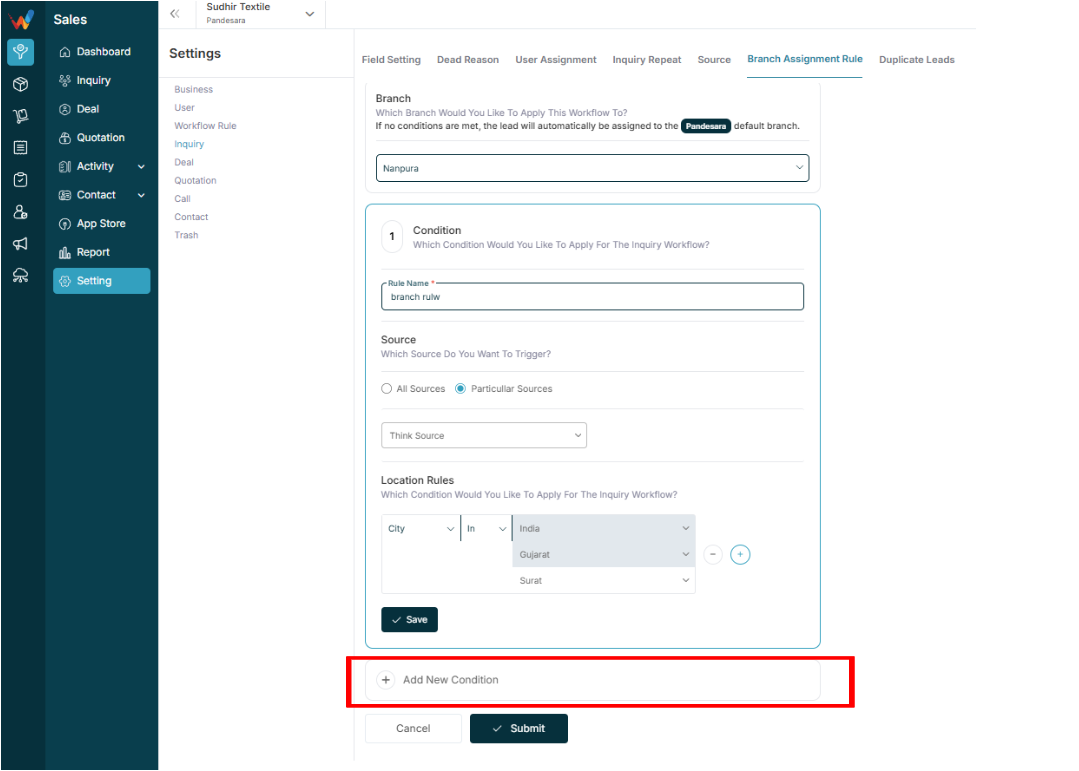
Add Multiple Conditions
5.1 Part 4: Add Multiple Conditions

Click:
Add New Condition
You can create multiple condition blocks.
The system evaluates rules in sequence.
Use Cases & Best Practices
Business Use Cases (User Assignment)
1.1 Case 1: Exhibition Leads
Source = Hyderabad Expo
→ Assign to Hyderabad Sales Head
1.2 Case 2: City-Based Assignment
City = Surat
→ Assign to HQ team
City = Jaipur
→ Assign to Jaipur Branch
1.3 Case 3: Digital Marketing Leads
Source = Google Form
→ Round Robin between 5 telecallers
Why This Is Important (User Assignment)
2.1 Without Assignment Rules
- Leads stay unassigned
- Follow-up delay
- Manual confusion
- Owner dependency
2.2 With Assignment Rules
- Auto distribution
- Zero lead leakage
- Faster follow-up
- Branch-wise clarity
Common Mistakes (User Assignment)
- Creating overlapping rules
- Not checking rule priority
- Forgetting to turn ON rule
- Assigning both user & role incorrectly
Best Practice for Textile (User Assignment)
- Use source-based routing
- Use location-based assignment
- Use Round Robin for marketing leads
- Keep rules simple
- Review rules monthly
Final Checklist (User Assignment Rules)
- Rule name created
- Source selected
- Location rule defined
- User/Role assigned
- Rule turned ON
Impact & User Assignment
Business Impact
1.1 What This Section Directly Impacts
This section directly impacts:
- Lead clarity
- Conversion rate
- Team productivity
- Owner reporting
User Assignment Rules
2.1 What User Assignment Rules Ensure
This is one of the most powerful automation features in your system.
It ensures:
- No lead loss
- Automatic distribution
- Right lead to right person
- Branch-wise control
- Smart routing based on location or source
User Assignment Rules – Complete Guide
3.1 Navigation
Go to:
Settings → Lead Settings → User Assignment
You will see:
- Existing Rules List
- ON/OFF Toggle
- Edit / Delete option
- Create User Assignment Rule
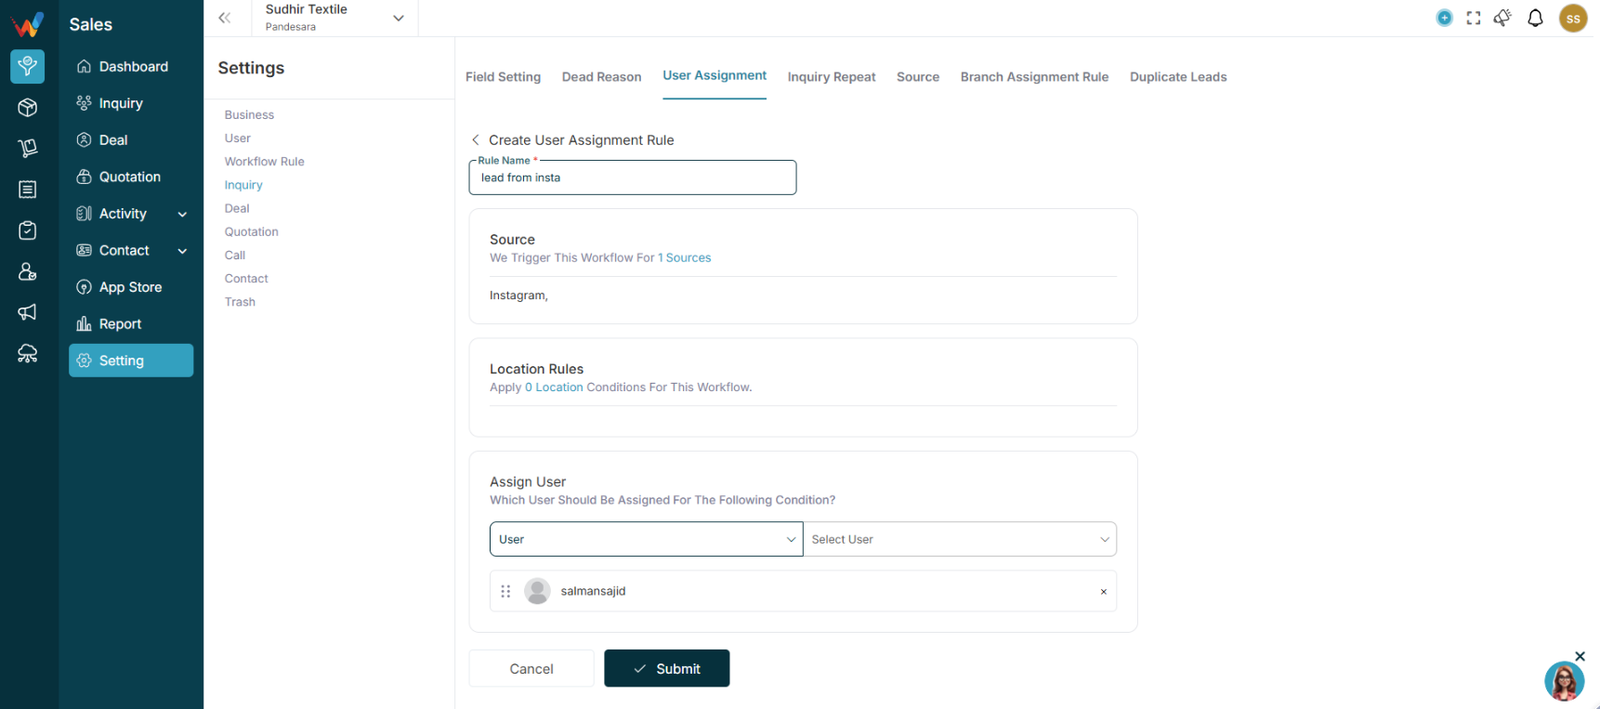
3.2 Part 1: What Is User Assignment Rule?
User Assignment Rule automatically assigns new leads based on:
- Source
- Location (Country/State/City)
- Role or Individual user
- Round Robin logic
Instead of manually assigning every lead, the system does it automatically.
3.3 Part 2: Create New Assignment Rule
Click:
Create User Assignment Rule
3.3.1 Step 1: Enter Rule Name

Example:
- Surat Leads
- Hyderabad Event
- Digital Print Team
- Round Robin – Sales
3.4 Part 3: Select Source Trigger
Section:
Source – Which Source Do You Want To Trigger?
You can select:
- All Sources
or - Particular Sources
If selecting Particular Sources, choose from list:
- Google Form
- TextileCRM Demo
- Scribd
- wp-ads-demo
- Webinar
- Webhook
Example:
If source = Hyderabad Expo → Assign to Hyderabad team
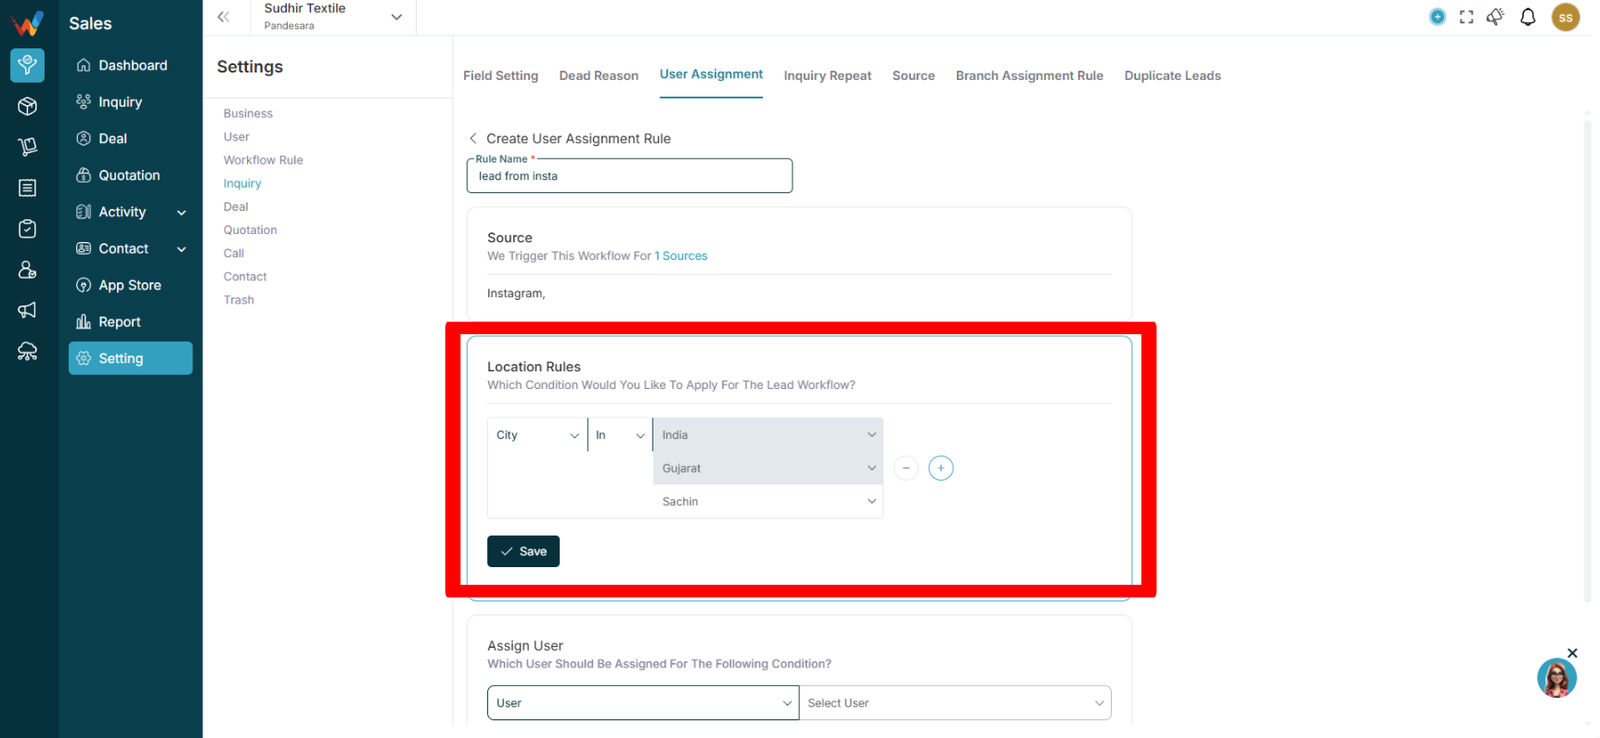
3.5 Part 4: Location Rules

Section:
Location Rules – Apply Location Conditions
You can define conditions based on:
You can use:
- AND condition
- OR condition
- Multiple rule blocks
Example 1:
Country = India
AND
State = Gujarat
→ Assign to Gujarat Sales Team
Example 2:
City = Surat
OR
City = Ahmedabad
→ Assign to West Region Manager
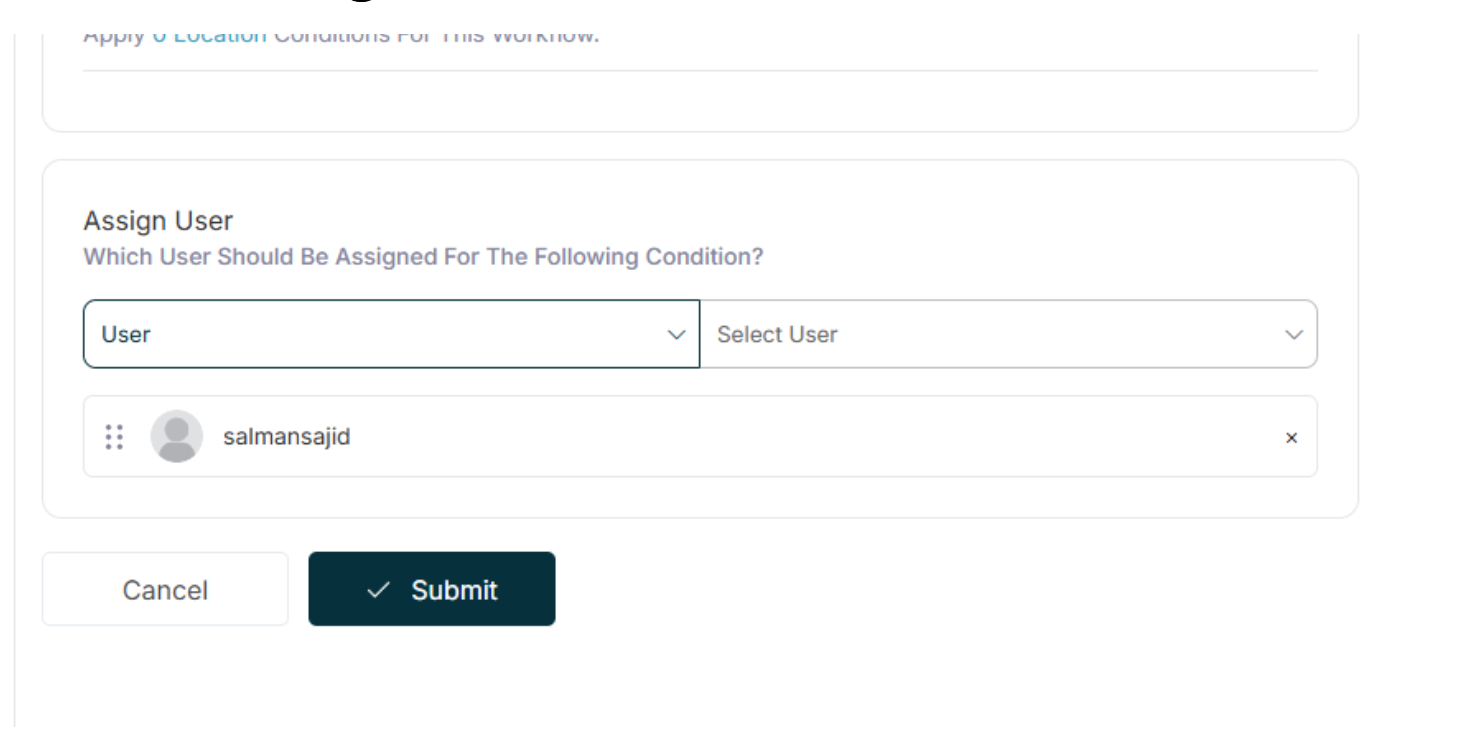
3.6 Part 5: Assign User Section

Section:
Which User Should Be Assigned?
You can assign by:
3.6.1 Option 1: Assign Specific User
Choose:
User → Select User
Example:
Assign all Surat leads to Tanvi Rathod(user)
3.6.2 Option 2: Assign by Role
Choose:
Role → Select Role
Example:
Assign all Mumbai leads to Sales Head role
The system will assign users under that role.
3.7 Part 6: Round Robin Assignment
In your main User Assignment list, you can enable:
Round Robin
This means:
- Leads will be distributed equally
- One by one among selected users
- Fair distribution
Example:
If 3 sales people:
Lead 1 → User A
Lead 2 → User B
Lead 3 → User C
Lead 4 → User A
3.8 Part 7: ON / OFF Toggle
Every rule has:
ON/OFF toggle
If ON:
Rule is active
If OFF:
Rule will not trigger
Lead Best Practices
Ideal Textile Lead Setup
1.1 Ideal Setup Checklist
- Custom fields for fabric type
- Status stages clearly defined
- Recurring enabled for regular buyers
- Sources properly maintained
- Branch rules automated
Common Mistakes
- Too many statuses
- Not defining source properly
- Not activating recurring for repeat buyers
- Not using custom fields
Final Checklist (Lead Settings)
- Custom fields created
- Status pipeline finalized
- Source list clean
- Assignment rule set
- Recurring enabled if required
Complete Guide
Lead Settings
1.1 Navigation
Go to:
Sales Module → Settings → Lead

You will see these tabs:
- Field Setting
- User Assignment
- Lead Recurring
- Source
- Branch Assignment Rule
- And more
Setting
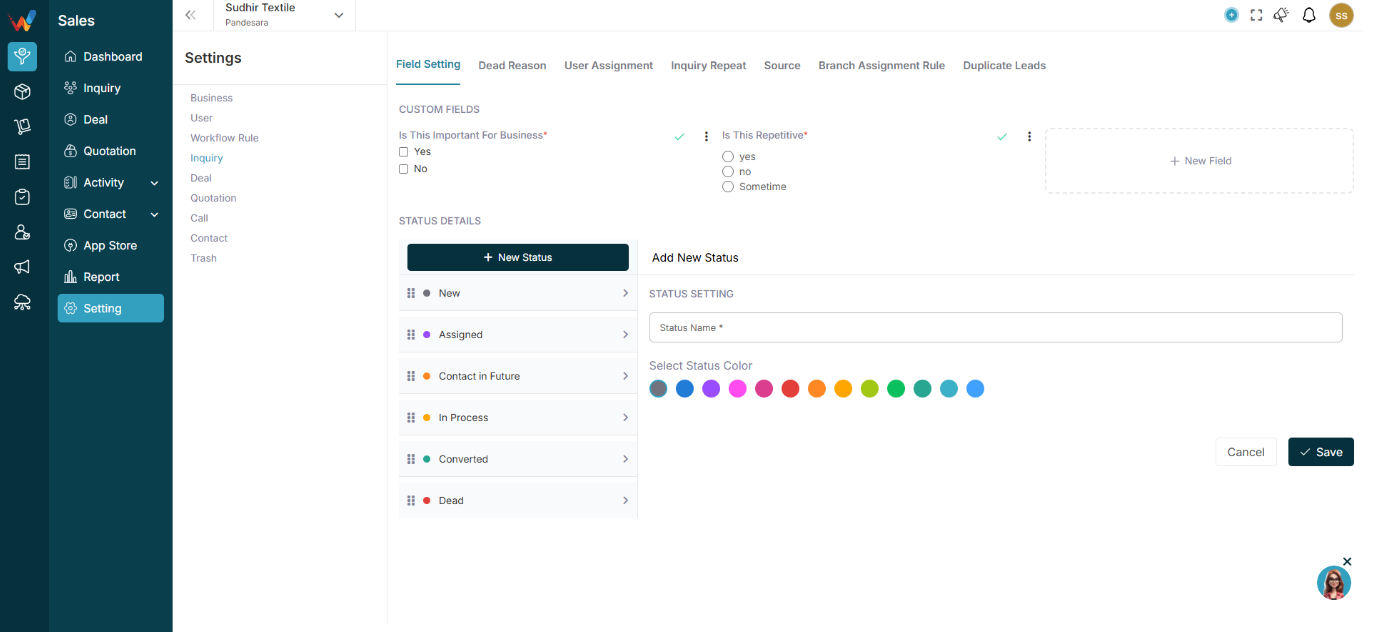
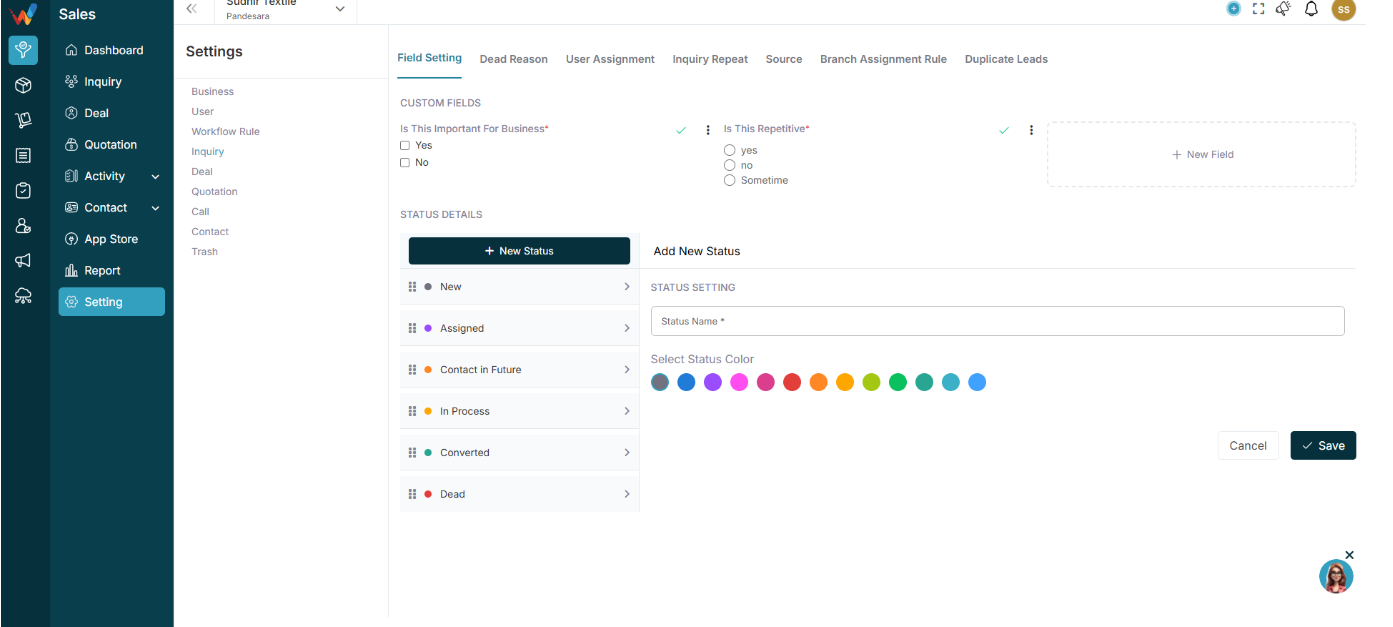
2.1 Field Setting
This controls what information is collected in every lead.
2.2 Custom Fields

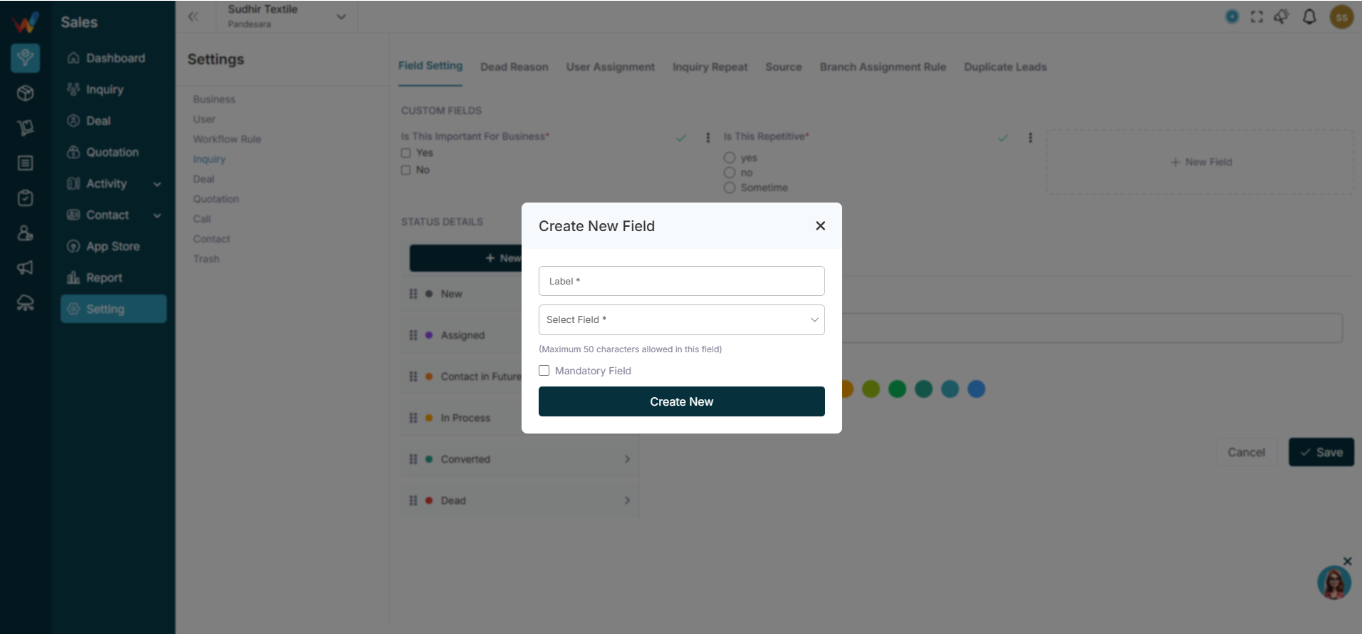
2.2.1 Create Custom Fields
You can create custom fields based on your textile business needs.

Click:
New Field
2.2.2 Fill Details
Field — Description
Label — Field name (Example: Fabric Type)
Type of Field — Select field type
Mandatory — Optional checkbox
2.3 Available Field Types

- Paragraph (long text)
- Radio Button
- Checkbox
- Text Field
- Number
- Dropdown
- Date
2.4 Textile Examples
Field Name — Type
Fabric Type — Dropdown
GSM — Number
Quantity Required — Number
Required Delivery Date — Date
Sample Sent — Checkbox
2.5 Field Actions
Click 3 dots on field:

- Activate Field or Deactivate Field
- Edit
- Delete
Inactive fields will not appear in lead form.
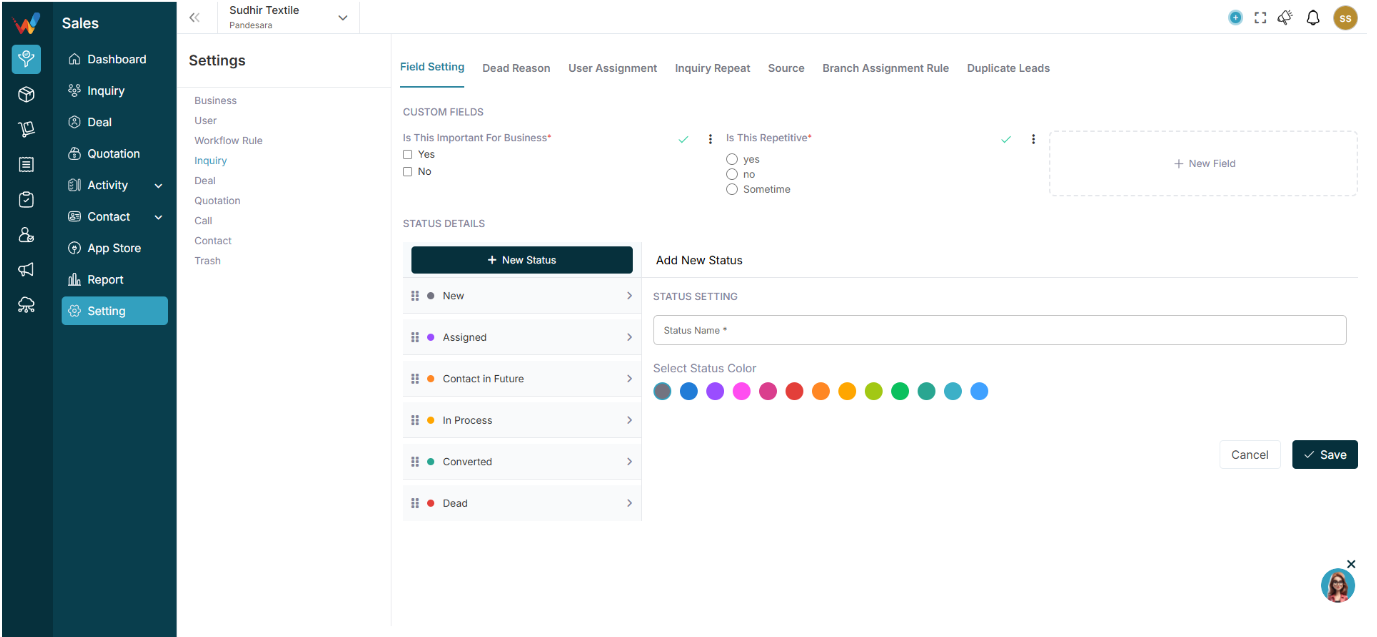
Status Setting
3.1 Status Details
This defines your lead pipeline stages.
You can:
- Create new status
- Edit existing
- Change color
- Rearrange sequence
3.2 Add Status

Enter:
- Status Name
- Select Status Color
Click Save.
3.3 Example Textile Pipeline
- New
- Assigned
- Intro Call
- In Process
- Followup
- Contact in Future
- Final Follow up
- Dead
3.4 Why Status Colors Matter
Colours help:
- Identify urgent leads
- Separate hot & cold leads
- Improve visual tracking in Kanban view
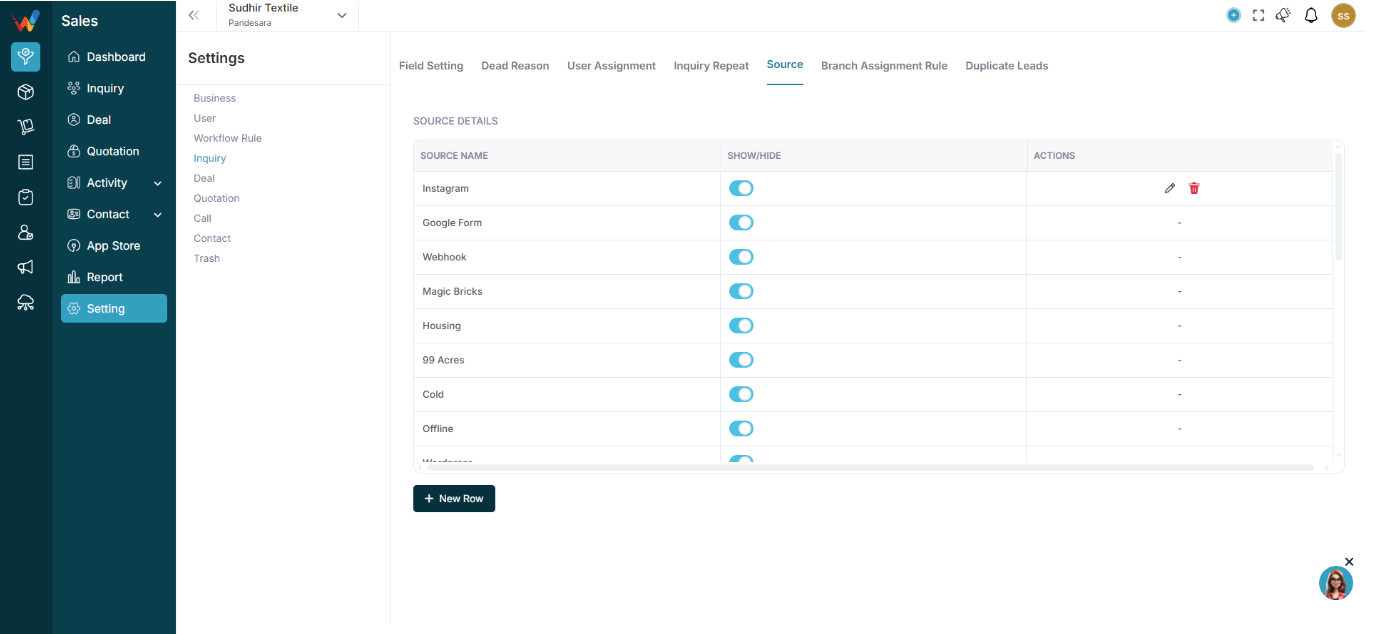
Source Settings

4.1 Navigation
Navigate to:
Lead Settings → Source
You will see:
- Source Name
- Show/Hide
- Actions
Examples:
- Google Form
- TextileCRM Demo
- Webinar
- JITO Event
- Webhook
- wp-ads-demo
4.2 Add New Source

Click:
New Row
Add:
Source Name
Save.
4.3 Show / Hide Toggle
If ON:
Source appears in lead form.
If OFF:
Source hidden (not deleted).
4.4 Why Source Is Important
Helps track:
- Which event gave most leads
- Which ads convert
- Which exhibition worked
- ROI calculation
Introduction
Navigation Path:
Sales Module → Settings → Inquiry

1.1 What Lead Settings Define
The Lead Settings section in WORTAL CRM plays a critical role in configuring how inquiries are captured, managed, and processed within the system. It provides complete control over the structure, flow, and validation of lead data, ensuring consistency and efficiency across the sales process.
Through Field Settings, administrators can define which fields appear in the lead form, making it easy to capture relevant business information while avoiding unnecessary data entry. The Dead Reason configuration helps teams standardize why leads are marked as lost, enabling better analysis and decision-making.
The User Assignment and Branch Assignment Rule features ensure that leads are automatically distributed to the right sales representatives or branches based on predefined logic. This reduces manual effort and improves response time. The Inquiry Repeat setting manages how recurring or duplicate inquiries are handled, ensuring that repeat customers are tracked properly without data confusion.
Additionally, the Source setting allows businesses to track where leads are coming from—such as marketing campaigns, referrals, or direct inquiries—helping measure performance and ROI. The Duplicate Inquiry control prevents redundant entries, maintaining clean and accurate data within the CRM.
Overall, Lead Settings provide a structured and automated foundation for managing inquiries, improving data quality, enhancing team productivity, and enabling better sales tracking and reporting.
Roles, Permissions & Security
Sensitive Permissions (Use Carefully)
- Delete → All
- Mass Delete Permission
- Export Permission
- User Permission
- Settings Access
Only Admin should have these.
Common Mistakes Businesses Make
- Giving All access to everyone
- Not using Own permission
- Not restricting Delete
- Giving Export access to sales
Best Practice for Textile Businesses
- Only 1–2 Admin
- Branch Managers per location
- Sales limited to own branch
- Reports access only to senior team
- Mass delete restricted
Why Roles Matter in Textile CRM
4.1 Business Context
Textile businesses deal with:
- High-value orders
- Design confidentiality
- Price-sensitive discussions
- Multi-branch inventory
Without role control:
- Sales can see other branch buyers
- Inventory can be edited wrongly
- Reports can be manipulated
With proper roles:
- Clear structure
- No chaos
- Data secure
- Owner control intact
Final Checklist
- Role created
- Permissions reviewed
- Assigned to correct users
- Sensitive permissions restricted
Permissions & Role Management
Export & Mass Permissions
1.1 Export & Mass Permissions
1.1.1 Export Permission
Allows:
- Download reports
- Export leads/deals
Give carefully.
1.1.2 Mass Update Permission
Allows:
- Bulk status change
- Bulk assignment
1.1.3 Mass Delete Permission
Allows:
Highly sensitive.
Edit Role
2.1 Edit Role
Go to:
Settings → Roles → Click Edit icon
You can:
- Change permissions
- Add/remove module access
- Save changes
All users under that role will automatically update.
Delete Role
3.1 Delete Role
You can delete role only if:
- No users assigned
OR - Reassign users first
How to Configure Smart business Role
4.1 Ideal Setup
Admin → Full
Branch Manager → All (Branch limited)
Sales Head → All (Branch limited)
Sales Person → Own
Intern → Read Own only
Why OWN Permission
Why OWN Permission Is Very Powerful
1.1 Why It Matters in Textile Business
In textile business:
- Many salespeople work in the same market.
- Same product line.
- Same price discussions.
If everyone sees everyone’s leads:
- Data misuse risk
- Client poaching risk
- Internal conflict
OWN permission solves this.